Monday, February 29, 2016

Fractal White Tiger February 2016 Update

I only managed to put 7 days worth of work on my Charting Creations "Fractal White Tiger" chart based on artwork by Ricky Barnard.  However, I did manage to add 2,107 stitches.

Someone asked me if I could add a coin to give a sense of scale to the piece. 

Last month, I worried about the coverage the tent stitch was providing with the darker sections. Those fears were unfounded.


This was how it looked in my last update. (The camera was zoomed in much closer.)

It does not look like a tiger yet, but I just love watching these colors come together. 


I am sharing my progress on this project at A New Stitchy Start. I do hope you will stop by and see the progress other bloggers have made on their cross-stitch projects!


I am also linking up with Monday Stitchery Link Party #47 at Super Mom - No Cape! 

I do hope you will stop by to see the vintage embroidery pattern Sue has shared this week and to see the lovely work other bloggers have shared.


Oh - I also have to share a bit of exciting news. I was delighted to find out I won last week's giveaway that Kim offered at Wisdom with Needle and Thread. She will be offering one last giveaway this month, which should be posted today. I do hope you will stop by and take a look at Kim's lovely work. She is a great painter, she cross-stitches beautifully and she makes the sweetest dolls and miniatures.

Thank you for stopping by!
Renee


Wednesday, February 24, 2016

Feeling Spoiled


On Monday I received a phone call from a relative that was facing a stressful situation this week. So, I canceled my plans on Tuesday so I could hang out with someone I care about and lend a helping hand. After 7 hours of helping out, I headed off to do my grocery shopping for the week and then made the half hour drive home to make dinner for my family. (Exhausted? Who? Me?)


Imagine my absolute delight to find a package from Wales sitting on my dining room table. 


Let me back up a second. Last year, I don't remember what led me to it, but I stumbled upon the blog "Quilts and Cakes" and was so delighted with the projects Gina shared on her blog that I began to follow her posts. My family read all of the Harry Potter books. (In fact, we finished the last 3 hours of the first book sitting around our dining room table and reading by candlelight because the power went out.) So, I was delighted when I saw the Hogwarts/Harry Potter swap quilt Gina made. Other favorites from her blog include the Little Red Riding Hood mug rug Gina created for a fairy tale mug rug swap and the Harley Quinn quilt she created for a Villains Swap. And, I love "An Octopus's Garden", which she made for an Under the Ocean swap. (In fact, the dolphins in that piece inspired my attempt at embroidering a dolphin on Annette's block in the UTS round robin I am in.)


Through comments, email and even Facebook, Gina and I have become friends this past year. A short time ago, she asked for my address so she could mail me a few "bits and pieces" she did no longer needed and hoped I could use. I had no idea she was sending me such a treasure trove of goodies!


Wow! Am I spoiled, or what?! It will be so much fun to incorporate these treasures into my work. Thank you, Gina! Your sweet package was a delightful ending to a very long day.

I am wishing you all an amazing day!
-Renee


Monday, February 22, 2016

CQJP 2016 January Block Completed!


Well... the end of February is drawing near and I finally completed my CQJP 2016 January block! (CQJP stands for Crazy Quilt Journal Project. You may learn more about it here and see tons of crazy quilted eye candy here.)

My goal for CQJP 2016 is to create 12 12-inch blocks that will be pieced into a quilt for my bedroom. The color scheme in our room is red, black and white. Sticking primarily to these colors has been challenging in itself. Creating a block that will hold up to multiple trips through our washing machine and dryer in the future has also been challenging. (I do miss adding beads and bits of silk ribbon embroidery.) However, adding a few polymer clay buttons I created myself was a lot of fun. 

Because I frequently see work on other blogs and wonder how things were done, I have shared details including the stitches and flosses I used to create each seam and each motif along the way. These posts are also my on-line journal for this project. For easier reference, I created this Pinterest board for my CQJP 2016 project so I may easily find the details if I need to look back at something in the future.


I am linking this post with Monday Stitchery Link Party #46 at Super Mom - No Cape! I do hope you will stop by to see the vintage embroidery pattern Sue has shared this week and to see the lovely work other bloggers have shared.

Thank you for stopping by!
Renee

Sunday, February 21, 2016

CQJP 2016 January Block Motifs 10, 11 & 12

The 10th motif on my Crazy Quilt Journal Project (CQJP) 2016 January block filled a small triangular space. 

First, I created a flower with size 8 DMC #815 pearl cotton and six detached chain stitches. You may notice that rather than tacking the stitch close to the loop, I spaced the stitch out a tad to add a more pointed tip to each flower petal.

A colonial knot with size 12 DMC B5200 pearl cotton created the center of the flower.

Next, I added two feather stitches working from corners of the triangle back to the flower. These were worked in size 12 DMC #699 pearl cotton floss and detached chain stitched leaves were then added to most of the tips. I also added a straight stitch to the center of each leaf to fill it with green.

French knots were then added (using the same red pearl cotton used to create the center flower) to the random tips of the feather stitches that I skipped while adding the leaves.

The 11th motif is the only element of my CQJP 2016 January block that my husband really dislikes. (He held his hand over this section while looking at the completed block. I had to laugh. One thing I truly appreciate is his honesty when it comes to my embroidery adventures. I always know his compliments are genuine!) As you can clearly see, my teeny tiny bird is WAY to small for this branch and nest. I decided this little red bird must be checking out another (larger) bird's nest.

The tree branch was added with size 8 Anchor #00360 pearl cotton and several lengths of chain stitches that began just off of the edge of the block (to be caught in the seam when the quilt is sewn together.) I stitched the bottom of the branch, then the top of the branch, and then filled in the section in between.

After stitching the branch, I traced several of the leaf shapes from Sharon B.'s Crazy Quilting Templates Set 2 onto the block, leaving part of the upper branch empty for the nest and the bird. Using size 5 DMC #4045 variegated green pearl cotton and fly stitches, I filled in each leaf.

For the nest, I really wanted to try out the Nest Tutorial that Cathy K. shared in the Spring 2016 edition of the Crazy Quilt Quarterly Magazine. Unfortunately, I did not have any fibers that would have worked well. So, I used straight stitches at various angles using size 12 DMC Ecru pearl cotton, size 8 Anchor #0300 pearl cotton and two strands of DMC #422 cotton floss.

To make the bird, I used 2 strands of DMC #321 cotton floss to make a detached chain stitch. I made a second detached chain stitch around this first one. (One of my embroidery books refers to this as a double detached chain stitch.) 

A colonial knot added to the upper end created the bird's head and three straight stitches at the lower end created the tail.

A single strand of DMC #435 cotton floss and two angled straight stitches created a beak. Using the same floss, I added two straight stitches from the bird's body to the tree branch. Three tiny straight stitches extended from the bottom of those and over the branch to create tiny bird feet.

The 12th (and final) motif was created with one of the polymer clay buttons I created earlier this month. 

Using a strand of size 8 Anchor #00047 floss and a stem stitch, I created a string with a bow.

The button was then attached with size 12 DMC #B5200 pearl cotton.

Every time I look at this motif, I think of the expression, "pulling on my heart strings." Silly, I know. *grins*

Tomorrow, I will share a full picture of my CQJP 2016 January block.. Thank you so much for following this journey with me!

-Renee

Please note: I am not affiliated with the Crazy Quilt Quarterly Magazine. I do love that the magazine is dedicated to this craft that I love so much and if you crazy quilt, I do hope you will consider contributing photos of your work. You may learn more about that here.  I am not affiliated with Sharon B.'s crazy quilting templates either. However, I did receive a set and agreed to share my honest opinions about using them. So far, I love them! 

Saturday, February 20, 2016

CQJP 2016 January Block Seam 11 and Motif 9

The 11th (and final) seam on my Crazy Quilt Journal Project 2016 January block was fun to stitch.

Using size 8 DMC #125 pearl cotton, I added a feather stitch down the seam and then worked my way back up adding detached chain stitches (leaves) along alternating tips from the feather stitch.

Size 8 DMC #498 pearl cotton colonial knots added tiny flower buds to the vine.

For the 9th motif, I added a little flower in a pot. I sketched a small pot shape onto the fabric using light pencil marks. Using size 8 Anchor #00360 pearl cotton floss, I outlined the pot with a split stitch and filled it with long and short stitches.

This ended up being entirely too small for the space I added it to, so I added French knots randomly spaced within the remaining area using size 12 DMC #B5200 pearl cotton.  (The idea of filling some space with white stitching was inspired by Kathy Shaw's January CQJP 2016 block seen here.)

The top of this section still looked bare (my very honest hubby was quick to point this out.) So, I added another butterfly with a flight path.  The butterfly was stitched with size 8 DMC #815 pearl cotton detached chain stitches. Using a single strand of matching DMC #815 embroidery floss, I added 2 pistil stitches for the butterfly's antennae and used this same strand of floss to add the meandering flight path with a running stitch.

Tomorrow, I will share the last 3 motifs and on Monday, I will share the entire block. Thanks for following along this CQJP 2016 journey with me! (To see loads of crazy quilting eye candy and to learn more about the Crazy Quilting Journal Project, just click here.)

-Renee

Friday, February 19, 2016

CQJP 2016 January Block Seam 10 and Motif 8

The 8th motif on my Crazy Quilt Journal Project (CQJP 2016) January block was inspired by an idea in the ebook that came along with Sharon B.'s Crazy Quilt Templates Set 2.

I used the templates to trace the flower stems and leaves.

Size 8 DMC #320 pearl cotton was used to stitch the stems using a stem stitch and the leaves, using the Vandyke stitch.

Size 8 DMC #B5200 pearl cotton was used to create detached chain stitches to make a butterfly and to add a running stitch flight path.

Next, I added 3 of the polymer clay buttons I made earlier this month using Premo Sculpey 5042 Black, 5001 White and 5026 Pomegranate.


Seam 10 was embellished with a simple chain stitch using size 8 Anchor #1206 pearl cotton.

Thanks again for stopping by!
Renee

Note: I am not affiliated with Sharon B.'s crazy quilt templates. I was asked to review the Set 2 templates and am still having fun playing with them in the process!

Thursday, February 18, 2016

My First Polymer Clay Buttons!

On February 5th, I played with the polymer clay my husband and my boys gave to me for Christmas.

The salesman at Michaels assured my husband that the clay could be baked directly in our home oven. However, I did a fair amount of research on-line and discovered the clay leaves a residue in your oven which can cause fumes at temperatures generally used for cooking food. If you do cook the clay in the same oven you cook food in (information I found on this was mixed), it is my understanding the entire oven - including the racks - should be cleaned before cooking food.  Personally, I opted to save up and wait for a 50% off coupon to Joann Fabric and purchased a craft oven just for clay. This also allows me to set the oven up on our back patio, so I do not have to worry about keeping the house well ventilated to avoid exposure to the fumes the clay gives off as it cooks. I also found a 40% off coupon for a clay conditioner (which is similar to a pasta maker, I guess.) 

The clay oven I purchased also recommended purchasing an oven thermometer and I am SO glad I did. Sculpey Premo clay should be cooked at 275 degrees F. The oven I bought goes shows 250 and then 300. I assumed setting the dial betwen these two would be roughly 275. Wrong. It was just shy of 300. Thanks to the oven thermometer, I discovered turning the dial just barely to the left of 250 heats the oven to 275. Who would have guessed?

Anyway, my first attempts playing with clay were quite fun. I loosely followed this tutorial by Lisa Clark of the Polka Dot Cottage, because I liked the look of her buttons with small dots. I continued rolling out the scraps and cutting buttons for those pictured on the lower part of the photo above. 

After baking the clay, I was surprised to discover the larger buttons were still quite flexible. Thinking I must have done something wrong, I put my Google search engine to work and discovered this is normal for polymer clay. In my case, this was great news. I plan to add these buttons to my CQJP 2016 blocks this year and feel they will be far easier on the embroidery in the washing machine than buttons with a more ceramic feel would be.

Oh - before I forget, I saw a couple of items that may be of interest.

1) Mary Corbet has a crewel embroidery pattern giveaway on her blog that is open until 5 p.m. (Central Time) on February 24th.

2) Pamela Kellogg announced there will be a special Holiday Edition of the Crazy Quilt Quarterly to be released in September. She is requesting submissions of Christmas and Hanukkah themed blocks by May 1st. You may find more details here.

Thanks so much for stopping by! 
Renee

Tuesday, February 16, 2016

TAST 2016 Stitch 29

TAST 29: Barb Stitch


This was a fun stitch for me. One of my crazy quilting go-to stitches is the buttonhole stitch. The barb stitch expands on the buttonhole stitch. 

To keep my stitches even, I used an edge of one of Sharon B.'s Crazy Quilting Templates Set 2 and traced the "barbs" on the pink fabric. The stitches on the black were done without the template, just following the spacing from the pink side. 

I worked the buttonhole stitches along both sides with size 8 Anchor #052 pink pearl cotton. I whipped the center section together with size 8 Anchor black pearl cotton. 

To dress the seam up a bit, I added French knots and straight stitches to both sides using more of the size 8 Anchor black pearl cotton on the pink fabric and size 8 DMC #605 pink pearl cotton on the black fabric.

TAST stands for Take a Stitch Tuesday. It is a personal stitching challenge offered by Sharon B. on Facebook and on her blog, pintangle.com. You may read more about it hereIf you follow the TAST Facebook group, you know there are some incredibly inspiring examples of these stitches being shared. Anyone may join at any time during the challenge. Thank you, Sharon, for offering TAST!

Thank you for stopping by!
Renee


Monday, February 15, 2016

Changing Comment Settings Due to Spam

Hi all! I hoped to finish my CQJP 2015 January block to share and link up with the Monday Stitchery Link Party at Super Mom - No Cape! It is nearly finished but not quite. I do encourage you to visit to see the darling embroidery patterns Sue shared and to see the fun posts that linked up this week. 

I also want to apologize if any of you that click the little box to have follow-up comments emailed to you when you leave your sweet comments. Twice this week, I have been spammed by Software Solution (they spammed 20 blog posts today alone.) If you are being emailed these comments, I do apologize. Tonight, I changed my comment settings back to requiring a word verification. If that does not work, I will switch to moderated comments.

I am wishing you all a wonderful week!
Renee

Sunday, February 14, 2016

Happy Valentine's Day!

I am wishing you all a lovely Valentine's Day!  

This beautiful postcard arrived in my mailbox recently. Gayle S. of California created this beauty for the Crazy Quilting International Valentine Postcard Swap 2016. I absolutely love it! Thank you so much, Gayle!  

You may see all of the postcards created for this swap at the Crazy Quilting International blog, here.

I also wrote a tutorial for making crazy quilted fabric postcards. You may find that here, on the CQI blog.

A few other notes you may find of interest are below. (Do you ever have that nagging feeling you are forgetting something? I have that now...)

1. Charting Creations has a sale through midnight CST (central standard time) tonight. 

2. Heaven and Earth Designs has a sale through midnight tonight (I think EST (eastern standard time), but I could not find the information to confirm that.) HAED also has also updated the list of freebie charts and you may see them here.

3. The Victorian Motto Sampler Shoppe has a floss giveaway that ends on February 28th.

4. Kim at Wisdom With Needle and Thread will be announcing a giveaway each week this month. The Week 3 giveaway will be announced on Monday, February 15th.

5. Anthea at Hibiscus Stitches will be hosting Christmas Through the Year (CTTY). If you are interested in creating and sharing your non-Christmas themed gifts early, I encourage you to check out CTTY here.

6. Sharon B. at Pintangle shared information about a free monogram ebook available through the Antique Pattern Library. You may find that post here.

7.  Pamela Kellogg of Kitty & Me Designs shared a few patterns for crazy quilt seams using waste canvas. You may find them here.

8. Susan of CQ4Fun and DesertSky Quilting is offering two link parties for bloggers each month at Stitch-In Days. The second Saturday of each month, if you are working on an embroidery project designed by Jenny of Elefantz, you are invited to link up and share progress on your work. On the fourth Friday of each month, you are invited to link up and share your progress on any hand-embroidered project. You may find more details here.

Happy Valentine's Day!
-Renee

Friday, February 12, 2016

CQJP 2016 January Block Seam 9 and Motifs 5, 6 & 7

The 9th seam on my CQJP 2016 January block was inspired by Valerie Bothell's Joyful Embellishments Stitch 2. However, I substituted French knots for the detached chain stitches so the stitching would not overlap the green vine to the right.

To create this seam, I traced a curvy line using a wavy ruler I purchased from Creative Memories for scrapbooking years ago. (Oops! This post was edited 2/20/2016. In the original post, I mistakenly stated this seam was created using a crazy quilting template.)

Next, the seam was embroidered with size 8 Anchor #0225 pearl cotton feather stitches.

Size 8 DMC #498 pearl cotton French knots were added to the tip of each feather stitch.


This was my best attempt at photographing the 5th motif on this block. 

The butterfly was created using size 8 Anchor #00047 pearl cotton to make four detached chain stitches for the wings, a straight stitch for the body, two more straight stitches for the antennae and two French knots at the tip of each of those.  

Size 12 DMC #B5200 pearl cotton running stitches were added to create the butterfly's flight path, which includes 2 heart-shaped loops. (You may be able to see that better if you click the photo for a larger image.)


This small dragonfly lace motif (that I purchased from Crazyquiltingsupplies.com - please note, I am not affiliated with the website) became the 6th motif. Using a single strand of DMC Blanc cotton floss, I tacked it down with tiny white stitches.


For the 7th motif, I added "Love" using a strand of size 8 Anchor #00047 pearl cotton. This was my first attempt using the Vandyke stitch (this week's TAST stitch) on a curve. As you can see, I need more practice! The lower case letters were added with stem stitches.

Clusters of 3 French knots were used to fill in the surrounding area using size 12 DMC #B5200 pearl cotton.

There are only 5 seams and 2 motifs left to complete this block. (Did I say only? 12-inch blocks do take a while to finish!)

Thank you for stopping by!
Renee


Thursday, February 11, 2016

CQJP 2016 January Block Seams 7 & 8 Motif 4


The 7th seam on my CQJP 2016 block was another opportunity to play with the bonnet stitch I recently learned through TAST.

This seam was stitched with size 8 DMC #125 variegated green pearl cotton to create the bonnet stitch. Next, 3 small straight stitches were added to the top of the bonnet stitches using size 8 DMC #815 pearl cotton.


The 8th seam was created with sets of straight stitches using size 8 Anchor #1206 red and black variegated pearl cotton.


Sharon B.'s Crazy Quilting Templates Set 2 were used to create the 4th motif. 

First, I traced one of the flower motifs. Next, I traced a stem and then traced 2 leaves. For the flower, I also drew a small circle in the center. (Note: I used a mechanical pencil to trace the shapes. In the tighter sections of the templates, I found the pencil lead from the mechanical pencil fits easily.)

The stem was stitched with size 8 DMC #125 pearl cotton and the twisted chain stitch.

The leaves were added with the same floss and fly stitches worked from the tip to the base. (I do wish I switched my variegated green floss around on my needle for the top leaf, so the lighter color would have been at the tip.)

Next, I used a split stitch around the outer petals, using size 8 DMC #815 pearl cotton and filled the petals in with a long and short stitch. This was worked from the outer tips, in to the edges of the circle I drew. 

Using size 8 Anchor white pearl cotton and a satin stitch, I filled the center of the flower.

The completion of my January block is finally within sight! Thank you for stopping by.

-Renee

*Note: I am not affiliated with Sharon B.'s crazy quilt templates. I was asked to review the Set 2 templates and am having great fun playing with them in the process!


Wednesday, February 10, 2016

CQJP 2016 January Block Seam 6 - Motif 3


In the last post about my Crazy Quilt Journal Project (CQJP) 2016 January block, I shared a sneak peek of the next step.

Using one of Sharon B.'s Crazy Quilt Template Set 2 vine shapes and an idea in the ebook she includes with the set, I created this flowery vine to cover a seam and motif area on the block.

Size 12 DMC #699 pearl cotton and a stem stitch created the vine. Pairs of detached chain stitches added leaves.

Size 8 Anchor #00047 and sets of 5 detached chain stitches created flowers. 

Size 12 DMC B5200 colonial knots made the flower centers.

Thank you for stopping by!
Renee

*Note: I am not affiliated with Sharon B.'s crazy quilt templates. I was asked to review the Set 2 templates and am having great fun playing with them in the process!

Tuesday, February 9, 2016

TAST 2016 Stitch 28

TAST Stitch 28: Vandyke Stitch

This week through TAST, we are learning the Vandyke stitch.

After seeing this gorgeous example of the stitch at Queenie's Needlework, I knew I wanted to work the stitch on a curve.

My sample was worked with size 8 red Anchor pearl cotton. I think I figured out the spacing on the curves, but should have made the stitches along the center longer on the left-side of the L.

I almost only shared this angled photo so you couldn't see my oops as well. But, this was a learning experience for me and I think it will be part of a fun motif when I add the other details.

Now, I must confess... Seeing this L, my hubby started laughing and asked me if I was changing my name to Laverne. (Did I just date myself with the Laverne and Shirley reference?!) 

TAST stands for Take a Stitch Tuesday. It is a personal stitching challenge offered by Sharon B. on Facebook and on her blog, pintangle.com. You may read more about it hereIf you follow the TAST Facebook group, you know there are some incredibly inspiring examples of these stitches being shared. Anyone may join at any time during the challenge. Thank you, Sharon, for offering TAST!

Thank you for stopping by!
Renee

Monday, February 8, 2016

Twilight Duel Update #6 February 2016

The 2nd Monday in February is here already!

This photo shows my progress as of January 10th on Twilight Duel - the Heaven and Earth Designs chart based on art by Ruth Thompson.

Here is my progress through January 27th. I only managed to work on this project 5 days last month - adding 847 stitches in 6.5 hours.

Page 2 is 34.34% complete and the chart is 7.27% complete.

I hope to have a lot more progress to share on March 14th!

I am linking up with the Monday Stitchery Link Party at Super Mom - No Cape! again this week. It is a great place to visit for a free embroidery pattern and to find links to more eye candy. If you do any hand stitching and have a blog, I encourage you to join the fun!

Thank you for stopping by!
Renee

Sunday, February 7, 2016

CQJP 2016 January Block Seam 5 and Motif 2


We are already one week into February, and I am still plugging away at my Crazy Quilt Journal Project (CQJP) 2016 January block. 

Seam 5: 

1. Two overlapping rows of the herringbone stitch using size 8 Anchor perle cotton #1206 - a variegated red and black. I used waste canvas to keep my spacing even.
2. Tiny straight stitches tacked down the center where the longer herringbone stitches overlapped. I added this step because the quilt will be machine washed and I wanted to be sure the stitches were well secured and would not easily snag or pull.

Motif 2:

The spider web was created using size 5 DMC B5200 pearl cotton and the stem stitch. (Note: the string of web the spider is dangling from was created later.)

The spider was stitched with size 12 DMC #310 pearl cotton. 
1. The abdomen was stitched first by making a small detached chain stitch (also called a lazy daisy) and then making a larger detached chain stitch around the first stitch. (One of my embroidery books refers to this combination as a double lazy daisy stitch.)
2. The head was added with a colonial knot
3. Beginning between the head and the abdomen, small stitches were made and tacked down to create the 8 legs. (I always start with the two small legs in front, the longer legs in front, the shorter legs in back and then the longer legs in back.)

The web the spider dangles from was created with the stem stitch in size 12 DMC B5200 pearl cotton. 

This motif needed to be completed before I could embellish the next seam. Here is a little sneak peek that might explain why.


As you can see, seam 6 also fills a 3rd motif area. I will share more photos of it soon.

I must admit, I forgot how long it takes me to complete a 12-inch crazy quilt block. A couple of times, I have thought about setting this CQJP 2016 January block aside and making a smaller set of blocks for this challenge. However, I really would like to finish a lap quilt by the end of this year.  In spite of thinking I am a little insane (due to the size of the project), my hubby thinks it may well be the coolest thing I have made yet. (Please note: he has seen some of the secret work I will not be able to share with you until May or June and liked it so much that he wanted to start emailing pictures of it to his family. I was mean and said, "Shhh.... It's a secret!") I keep reminding myself, although I am a bit behind on this block, I am ahead on a future block...

Thanks so much for stopping by!
Renee


Friday, February 5, 2016

Valentine for My Sweetheart


Last October, I decided I should finally make a project and submit a photo to the Crazy Quilt Quarterly Magazine. My schedule was rather full, so I almost opted to wait. However, after looking through the types of submissions Pamela Kellogg hoped to receive for the Spring edition of the magazine (which had a submission deadline of November 1st), I decided to make a Valentine postcard for my husband. 


It definitely needed seams with hearts.
The base seam above was inspired by 


This was another fun stitch to complete.


While ironing the crazy quilted panel to the Peltex to create this postcard, these flower sequins lost a bit of their shape from the heat. However, I still love this feather-stitched seam!


This was a fun way to dress up a Cretan stitched seam.


In hind sight, I should have used white to create the butterfly's flight path. Can you see that it reads, "Be mine"?


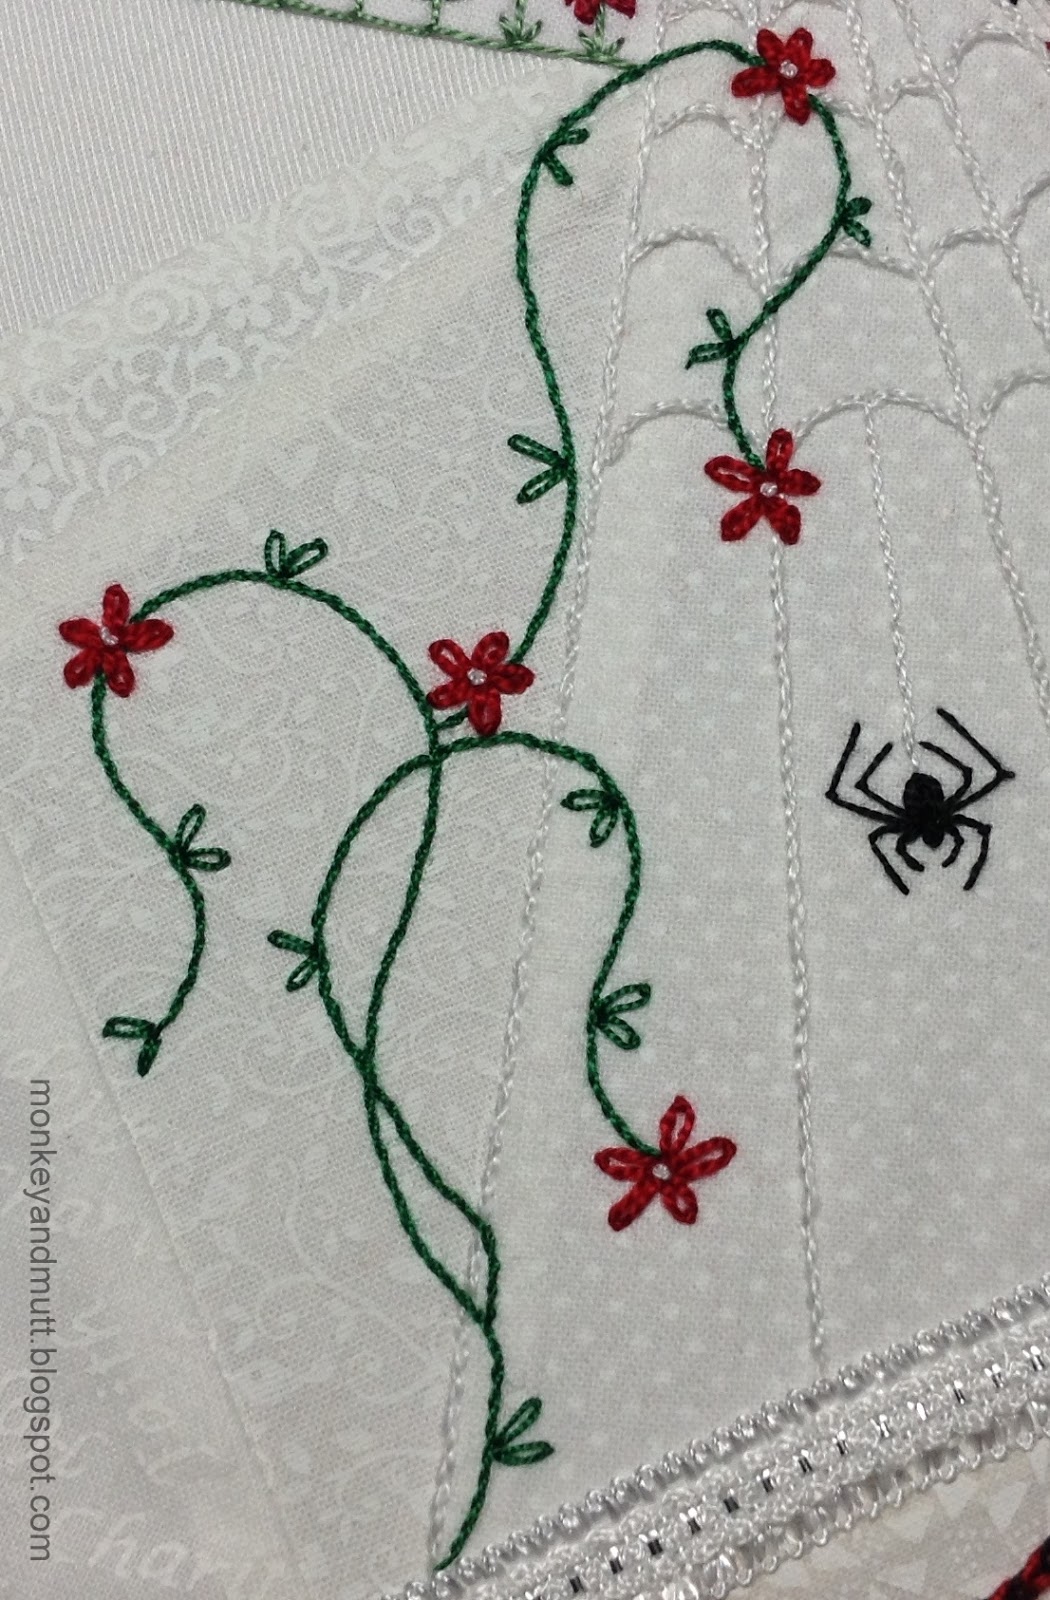
There is also a message in the spider's web.


I am not certain, but I believe this was the first spider 
I created with a heart-shaped bead.


After writing a brief love note on the back, 
I mailed it to my husband's work address.


I mailed it in a plastic sleeve.
My husband said a small hole wore into the plastic covering the spider, so I was thankful for that extra bit of protection.


Yesterday, my husband emailed me a picture of his Valentine, 
displayed in the center of his cork board at work.

Thank you so much for stopping by! If you crazy quilt at all, I  encourage you to submit some of your work to the Crazy Quilt Quarterly Magazine. Pamela Kellogg will be accepting submissions for the Autumn 2016 edition through May 1st. For more details and for a list of themes for this edition, check out this page on her blog. There is also a Crazy Quilt Quarterly Calendar Contest running through May 1st. You may find more details here (just click on the first photo in the post for a larger view of the contest rules.)

Renee