Sunday, May 31, 2015

Patriotic Tote Bag

This little tote bag marks several items off of my To Do List. 


First of all, for the pocket I used the 6-inch crazy quilt block I created last year for my Crazy Quilt Journal Project 2014 (CQJP 2014) July Block. My goal was to create a purse for every block last year, so one more is now complete!


Second, I created the tote by (loosely) following this tutorial from mommaspocketbook.com that I found on Pinterest. So, I am linking this post with Stop Pinning and Make Something at A Focused Journey. (If you are interested in joining, the rules are here.)


Third, this will be a Christmas gift, so I will be sharing it at 1 Xmas Item a Month.

I had a difficult time photographing the completed tote bag. So, here are a few close-ups.

Here is a close-up of the outside pocket. The tutorial calls for an 8-inch square. My block was a 6-inch square, so it is smaller than the one used in the pattern. I love it anyway! The seams were all created using beaded stitches Sharon B. shared with Take a Stitch Tuesday (TAST) last year. The dragonfly is a piece of white lace I purchased. And I created the white spider using 2 sizes of white pearl beads.


Here is a close-up of the front of the tote.


And this is the back. I used Susan Winget Stars on Wood fabric for the exterior.


Here is a peek at the interior pocket. It is hard to tell in the photo, but there are faint U.S. flags beneath the words in this American Valor Fabric from quiltingtreasures.com. (I think I purchased this at a quilt store. I looked on-line and do not think it is still available.)

This will be a Christmas gift for someone that served in the United States armed forces. I do hope the recipient will like it!

Thank you so much for stopping by!
Renee


P.S.
I have all of the fabric out needed to finally make a Christmas stocking with the Alma Lynne Santa cross-stitch I have shared with you the past few months. I will be piecing the front tomorrow and hope to have progress to share next month!


Friday, May 29, 2015

Under the Sea Block Step 8: The Final Details


This is the final post in a series explaining how I embellished Sandra T.'s block in the CQI UTS Round Robin we are in together. Links to previous posts in this series are below.
Step 1: Planning the Seams
Step 2: Planning Motifs
Step 3: Embellishing the Seams

The photo above shows how the block looked after adding the elements I originally sketched out for this block (with a few minor changes along the way.) As you can see, there are still some fairly bare areas that could use more embellishments. (You may click on any image for a larger view.)


I still needed to add beads to one seam, so I did that first. I individually secured Mill Hill petite glass seed beads to the tops of the button hole seam. (I passed the needle and thread through each bead 3 times with a single strand of matching floss and then secured the bead with 3 knots in the back so the knot would not pull through to the front of the fabric. One thing I like about Mill Hill beads is that they offer a conversion chart letting you know which DMC flosses match their beads.)


Next, I added more "seaweed" along the ocean floor using feather stitches.  One thing Sandra mentioned she would like on her block was glitter. So, I added a single strand of white DMC metallic floss to a couple strands of Waterlilies by Caron silk floss. (This was #207 Bermuda Reef - the same color used for the chain-stitched seam on the block.) I used this combination of flosses to fill in the far left side of the block with some seaweed. This extends the picture off of the block. I also added a section of this seaweed between the red and purple coral.

To me, it felt like the clear beads on the red seaweed in the lower-left corner looked... heavy for lack of a better word. I felt like I needed to add more beads on the right to balance out the block.  So, I used a size 5 DMC variegated purple floss to make another feather stitched section of seaweed coming in from the right of the block. I was careful to leave the "v" sections of the stitches at least one-fourth-inch away from the side of the block, so I could add purple seed beads without having them too close to the seam lines.

I also added 3 clear seed beads in front of the seahorse in a pattern resembling tiny air bubbles.


The remaining spaces were filled with more tiny fish. Some were made with the same variegated floss used for the fish seam in Step 3 of this series.


To add a bit more sparkle, I also created some of these fish using 2 strands of a blue-gray shade of DMC metallic floss.

Most of the variegated orange fish are swimming from the left side of the block to the right side. Most of the metallic fish are swimming from the right to the left. And a few of the fish are distracted by the "vegetation" within the block.


And that is how I transformed Sandra's lovely bare block (pictured above) into the scene pictured below.


There are so many ways to create an under the sea block. I must confess, I frequently second-guess the design elements of blocks I complete. But, I also look for elements I am happy with. On this block, I love the seahorse and am happy that I did manage to pull more of the orange and purple from the fabrics into the embellishments in a way that makes me feel the colors on the block are fairly well balanced.


Above is a photo of the blocks Kathy S., Nicki Lee S. and I embellished. Although our styles are all unique, I think we have managed to embellish blocks that go well together.

Thank you so much for stopping by and for sticking with me through such long posts! 
Renee

Thursday, May 28, 2015

Under the Sea Block Step 7: Ocean Floor Motifs

After adding the turtle and the jelly, this is how Sandra's block looked. Next, I opted to embellish the ocean floor.


Remember my sketch? Here is how I penciled this section in on my plans for the block.


First, I added "seaweed" using a feather stitch and 3 strands of the same variegated DMC floss I used to create the seahorse. 

I began with the top of the center section and worked my way down just beneath the basted seam line at the bottom of the block. 

Next, I added the section to the left, followed by the section on the right. The bottom of these sections met the bottom of the center section. NOTE: Because I planned to add beads to the tops of each of the feather stitches, I kept these stitches at least one-fourth-inch away from the basted seam lines.

There was enough space between the center and right sections to work another feather stitch down and connect it to the center section.


Then, I "auditioned" beads by laying one or two on the block. The petite glass beads I love so much barely showed up, so I went with these clear seed beads. (For the record, I worried the whole time that these beads were too big. I finally decided I tend to prefer subtle, small and delicate embellishments and I was stepping out of my comfort zone.) This step took me a while because I wrapped the thread through each bead 3 times and then secured each bead in the back with 3 knots. This way, the beads stay firmly in place and do not flop around easily on the block. And, if one bead comes loose in the future, all of the beads will not fall off because they were individually attached.


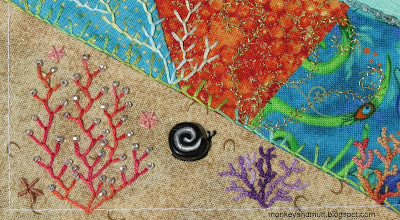
After that, I added a snail. The bead used for the body was purchased at Let it Bead in Portland, Oregon. Because this bead is rather thick, I placed it roughly an inch from the basted seam line. 

After securing the bead to the block, I brought a 6-strand segment of DMC 310 black floss up just behind the bottom of the snail's shell and then brought it down through the fabric where I wanted the place the snail's head. 

Using a second needle and a single strand of DMC 310 black floss, I couched this segment into place as the snail's body. Then, I secured the 6-strand segment behind the block. With the single strand of floss, I added two pistil stitches to make the small antenna to the head.


Coral, created with a few strands of variegated purple floss and French knots, came next. Now, I could pencil this in on the back (or front) of the block, but I usually just wing it when I add the coral. 


I began at the seam line and worked my way up with a tightly packed line of French knots. Then, I added small connecting lines of French knots, as seen here.


I continued adding lines and branches to create a shape that looked coral-like to me.


I just kept going until I felt it looked full.


When it reached the point pictured above, I felt this coral was complete.


As you can see, the sandy ocean floor still looked a bit bare. I needed to add more. I contemplated adding another feather stitched area to the right of the purple coral, but I need to complete the section just above it first.


I added a section section of coral here using the same method and using the same variegated floss used to create the fish embellishing a seam above.


Sea stars are great additions to fill in space. This one was created using 2 strands of floss (each strand was a different color to blend light and dark colors into the sea star.) I made 5 bullion knots that met in the center.


Whipped wheels also make great sea stars. Again, I used strands of 2 different shades to add lighter and darker aspects to the sea star.


This completed the plans I had sketched out for this section.


In fact, this completed the elements I had planned and sketched for this block. (Aside from the small beads I needed to add to the seam just above the sandy section.)


However, there were still several areas that could use a bit more embellishment. My next post in this series will share how I chose to fill in the block.

This post is part of a series explaining how I embellished Sandra T.'s block in the CQI UTS Round Robin we are in together. Links to previous posts in this series are below.
Step 1: Planning the Seams
Step 2: Planning Motifs
Step 3: Embellishing the Seams

Thank you for stopping by!
Renee

Wednesday, May 27, 2015

Work In Progress Wednesday 05/27/2015

3 columns complete!
Saturday morning, I woke up pretty early and could not get back to sleep. So, I went downstairs and stitched for a couple of hours, waiting for my family to wake up. I was thrilled to complete the third full column of the Heaven and Earth Designs Santa and the Mouse Freebie chart. This completed over 260 stitches. 


4 columns complete!
Saturday night, my husband and I met with his parent's Pinochle group. We try to get together with them once a month. They have two tables of Pinochle going at a time. Usually, my husband sits in as an 8th person for their group, and I bring a project to work on. This month, I took Santa and the Mouse. By the time we left, I had nearly completed the 4th column of stitches. I finished the few remaining stitches in that column Sunday night. That brought the total stitches added this week to 664. 


Above is a picture of how it looked last week. The curtain is done now. At that time, this chart was 71% complete and was on schedule to be completed by October 13th. Now it is 75% complete and with an addition of 250 stitches per week, it should be completed by September 29th!


Last Week's Goals:
1. Complete 250 x-stitches on the HAED Santa & the Mouse chart (which is no longer available, but it is a part of this chart at Heaven and Earth Designs.) Done. See pictures above.
2. Complete Sandra's Under the Sea block for the CQI Round Robin. Finished and mailed. 

3. Work on my Beginner's block from Kathy Shaw's FREE Crazy Quilt Basic Class. It is done! I will share more pics on Monday. Here is one of my favorite seams. 

4. Link up with the Monday Stitchery Link Party #7 at Super Mom No Cape on May 25th. (If you missed the party on the 18th, you may check it out here!) Done!
5. Put together a 2nd raised bed for our garden with my husband. Nope. I have spent over 7 hours working in our yard, but they were not spent on the 2nd garden box.
6. Share my 1 Xmas Item a Month post. Not yet, but it will be shared soon!
7. Link up with the Stop Pinning and Make Something May Link Party. (The May link up is here and details to join in are here.) Not yet. This will tie in with the 1 Xmas Item a Month post.

This Week's Goals:
1. Complete 250 x-stitches on the HAED Santa & the Mouse chart (which is no longer available, but it is a part of this chart at Heaven and Earth Designs.) 
2. Link up with the Monday Stitchery Link Party #8 at Super Mom No Cape on June 1st. (If you missed the party on the 25th, you may check it out here!)
3. Put together a 2nd raised bed for our garden with my husband.
4. Share my 1 Xmas Item a Month post.
5. Link up with the Stop Pinning and Make Something May Link Party. (The May link up is here and details to join in are here.)

Tuesday, May 26, 2015

Under the Sea Block Steps 5 & 6: Turtle and a Jelly


Step 5: Turtle Motif

After creating the seahorse on Sandra's block for the Crazy Quilting International Under the Sea Round Robin (CQI UTS RR) I am participating in, I found a little turtle charm in my stash.

I felt this would be a perfect addition for a couple of reasons. 

First of all, if you remember my sketch, I had not added a motif to the center orange section of the block, as I was not sure how much space would remain after embellishing the seams to the right and left.

This turtle fit in that space perfectly!

Second, the block Kathy S. embellished for Sandra included two turtle charms. (They are along the sandy bottom seam. You may click any photo for a larger view.) So, adding a turtle charm to the block I embellished created a little more cohesion between these two blocks.

The turtle charm came with an additional metal ring attached to the small circle seen in the photo at the top of this post. I pried that ring open and removed it. Then, I tucked the remaining circle under floss from the feather stitched seam and sewed it in place using clear nylon quilting thread. After securely stitching the loop into place, I tacked down each of the four legs where they attach to the body. The clear thread made these stitches virtually invisible.

Step 6: A Jelly Motif

A dear family friend of mine spent years volunteering at the aquarium in Newport, Oregon. She has told me that starfish are not actually fish, so they are now called sea stars. Likewise, jellyfish are not fish, and they are now called jellies. I keep trying to remember!

I do not remember where I bought these clear, glittery, plastic buttons. However, they came in a package with three sizes. 

When I sketched out ideas for this block, I planned to use one of the smallest buttons to add a jelly to the left of the feather-stitched seam, near the top. (As seen in the photo of the sketch shared earlier in this post.) However, my feather stitches extended far enough to the left that I felt the jelly would look too crowded in that section. So, I opted to only use the medium sized button in the top purple section.

I placed the button on the block, being sure to leave plenty of room for the long tentacles, and stitched it to the block using clear nylon quilting thread. Next, I threaded two needles with a single strand of DMC metallic white floss. I created one tentacle at a time, beginning with a longer one, I used one threaded needle to create a straight stitch. Using the second threaded needle, I couched the straight stitch down, but I brought the needle up to the right or left of that original stitch to make a curvy tentacle. I created four longer tentacles and then added three shorter ones in between them.


After adding the turtle and the jelly, this is how the block looked.

This post is part of a series explaining how I embellished Sandra T.'s block in the CQI UTS Round Robin we are in together. Links to previous posts in this series are below.
Step 1: Planning the Seams
Step 2: Planning Motifs
Step 3: Embellishing the Seams

Thank you for stopping by!
Renee


Monday, May 25, 2015

Memorial Day and Monday Stitchery Link Party

It is Memorial Day in the United States. For many, this means a three day weekend. For many others, it means so much more. It is a day that I feel thankful that my family and loved ones that have served their country made it home safe; and my heart goes out to the families and loved ones of those that paid the ultimate sacrifice.

Tomorrow, I will share more about the under the sea block I was working on. Today, I felt I needed to share something more patriotic.


Some of you may remember seeing this before. It was my July block for the Crazy Quilt Journal Project 2014 (CQJP 2014). My goal for the CQJP 2014 was to create 12 purses using the blocks for each month.


I plan to use the block as a pocket on a tote bag. The Susan Winget Stars on Wood fabric pictured above will be used for the exterior of the bag.


And, I think I have just enough of this print for the interior of the bag. The salvage of the fabric only contains part of the information about it, but it says it is from www.QuiltingTreasures.com (I did not find it in their current inventory) and it says American Valor Fabrics, American Valor Foundation.


I hope to have the tote finished to share later this week. Today, I am joining Monday Stitchery Link Party #7 at Super Mom - No Cape. If you do any hand stitching, I encourage you to join in the fun!

Thank you for stopping by.
Renee