Friday, March 31, 2017

"Ocean Frolics" Wall Quilt

"Ocean Frolics" Under the Sea Themed Crazy Quilted Wall Quilt

This was such a fun project to finish up! Using 3 of 6 blocks from a Crazy Quilting International Under the Sea Round Robin I participated from August of 2015 through March of 2016, I created this wall quilt. "Ocean Frolics" sounded like a fitting title!


Confession time... If I had not signed up for the UFO Challenge 2017 through allpeoplequilt.com, these blocks would still be safely tucked away. #12 was drawn as the project to work on in March, so I needed to embellish the bare block below and create a wall quilt.


When piecing my blocks, I made a mistake that could have caused some serious issues. On the back of the block Annette embellished, I marked the 6 x 6-inch square about a quarter-inch too high for the water/skyline to match with the other blocks. 


Luckily, Annette left space between the seam allowance and the beads and charms she added. I was able to place that block lower and cut the blocks slightly larger than 6-inches in height. 


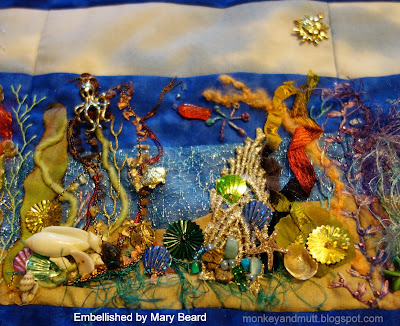
With the change in the way I cut the blocks, I had a raw edge of fabric exposed along the bottom of the block, so I added the small shell bead in the lower-left corner to Mary's block to hide it.

This piece provided me with my first opportunity to whip stitch the blocks together. I feared the beads and charms would interfere with the foot on my sewing machine. It was a fun challenge and turned out surprisingly well.


I stitched over the seams between the blocks by adding more sea vegetation.


My first attempt at printing a label on my computer by ironing the wrong side of the fabric to the waxy side of freezer paper and cutting it to 8.5" x 11" had a bit of a hiccup. The top of the fabric pulled from the paper as it printed. Because it made the print wavy on an ocean themed place and because my husband declared we were keeping this wall quilt to hang in our home, I decided to use the label anyway. I included the name and dates of the round robin and the names and locations of each of the ladies that embellished blocks within the quilt.

I cannot thank Annette and Mary enough for their beautiful work.

For April, #11 was drawn as the project to work on, so I will be assembling a wall quilt with the other 3 blocks from this round robin. I can barely wait! I am not too happy with my machine binding attempts, so I plan to hand bind the next one.

Thank you all so much for stopping by! 
Renee

Related posts:
Bare blocks sent out - here
My work on Annette's block - here
My work on Mary's block - here
Blocks returned home - here
Block I embellished - here
UFO Challenge 2017 List - here


Thursday, March 30, 2017

Sun, Sand & Sea BOM Block 2


Last night, I shared this sneak peek on Instagram.

Last year some of my blogging friends participated in the Sew Incredibly Crazy & Friends In Our Garden Block of the Month. The blocks were so cute, I frequently wished I had made the time to participate. (You may see one of the completed quilts here.) 

In late February, I learned there was a Sun, Sand and Sea Block of the Month and decided I would try to make the time this year.


If I understand correctly, each block pattern is free the month it is introduced and there is a linky party at the end of the month with a drawing for those that participate. 

Block 1 is Hello Sunshine designed by Amy at Sew Incredibly Crazy. I have picked out my fabrics, but have yet to attempt my first dresden plate pattern.

You may find the information here and find the pattern here.

Block 2 is Time to Surf designed by Carol of Just Let Me Quilt.

You may find the information about the block here and find the pattern here. It is free in March.

I was able to use fabrics from my stash to create this block. There was even a roll of Therm O Web Heat N Bond Lite Iron-on Adhesive in my stash that came in handy. 

I did not have any silver or gray fabrics for the fender or the dolphins, so I colored fabric with Crayola crayons and ironed the wax out, as shared in this post for Valentines I made. (Speaking of Crayola... I did not even know there were Crayola Fabrics by Riley Blake until I read about this block at Just Let Me Quilt, here. How fun!)

This quilt will be a Christmas gift (possibly in 2018?) for an Oregon State University fan in my life. I made them a quilt years ago that is now threadbare and I have been told several times they need a new one. 

I have not filled in the license plate yet, as I might personalize it. 

This was my first time using a buttonhole stitch to secure applique. I tried my sewing machine for the first cloud I completed and then opted to just hand stitch around the remaining pieces. (Embroidery is in my comfort zone. When it comes to my sewing machine, I still feel like a novice!)

Block 3 will be designed by Carla of Creatin' in the Sticks. I saw a sneak peek of it on the Sew Incredibly Crazy and Friends Block of the Month Facebook Group. It looks like another fun block! You may find the group here.

As this will be a Christmas gift, I will also be sharing my blocks on the 1 X-mas Item a Month Blog.

Thank you for stopping by!
Renee

Note: I am not affiliated with any of the products shared within this post.

Tuesday, March 28, 2017

TAST 78

This week's Take A Stitch Tuesday (TAST) stitch was added to the Under the Sea wall quilt I am working on for the UFO Challenge 2017. 

TAST 78: Up and Down Feathered Buttonhole Stitch


You may find the instructions here on Pintangle. I encourage you to visit just to see the beautiful examples Sharon shared. 

I worked the stitch with size 5 DMC #4250 perle cotton floss.

I dressed the seam up with Mill Hill Magnifica Glass Beads #10026.

Next, I added detached chain stitches with size 8 DMC #605 perle cotton floss.

It was a fun stitch and I look forward to using it again in the future!

You may learn more about TAST here.

In celebration of 10 years of TAST, Sharon B. is sharing a series of interviews. The most recent interview was with Queeniepatch of Queenie's Needlework. You may read the interview here and check out Queenie's blog here. She was working on her Kafferepet quilt when I first discovered her blog. I encourage you to check it out here.

Thank you for stopping by!
Renee


Monday, March 27, 2017

February Wall Quilt


In January, I finally fully finished this crazy quilt block I embellished back in June of 2012 into a small wall quilt. It was the 2nd block I ever embellished.

Most of the seams and a few of the motifs on this block were inspired by the book An Encyclopedia of Crazy Quilt Stitches and Motifs by Linda Causee. (I checked the book out a the library and loved the ideas.) You may see more photos of the completed block here.

I would have shared this finish sooner, but I submitted a photo to the Spring 2017 Edition of Our Quilting Journey Magazine, which is available through Magcloud. The theme was flowers and baskets. (I am not affiliated with the magazine. You may find it here, if you are interested.) The theme of the next edition will be stars abound. Sane and crazy quilting submissions may be submitted by May 1, 2017. You may find more details about submissions here.

I am linking with Stitchery Link Party #103 at Super Mom - No Cape! I encourage you to stop by to see the free embroidery pattern and check out details on the anniversary giveaway.

Life here has been very busy! I hope to catch up on replying to comments on Tuesday. Wishing you all a fantastic week!
-Renee


Monday, March 20, 2017

CQI UTS RR #2 - My Block Completed!


This weekend, I finished embellishing the final block from the set of blocks I created for my second Crazy Quilting International Under the Sea Round Robin (CQI UTS RR.) 

This was the set of bare blocks I created in August of 2015. My plans were to create 2 wall quilts with the embellished blocks.

My blocks returned home in March of 2016. (You may see that post here.)

When I put my list together for the UFO Challenge 2017 offered by allpeoplequilt.com, the top set of blocks in the photo above was #12 on the list. 

In March, #12 was announced as the project of the month. 

This is how the set looked at the beginning of this month.

I think my first attempt at an island was successful. 

The land was outlined with a split stitch and filled with a satin stitch. Stem stitches created the trees.

This is something I have wanted to try since Sandra Todd added an island to this block that she embellished in my previous CQI UTS RR. Isn't it fabulous?!

To match the other 2 blocks in this set, I had to step out of my comfort zone. Adding trims and clusters of beads/buttons is a real challenge for me.
Here, I added several beads, embroidery, trims and a fun lobster button. I believe the trims were a gift from Mary at Crazy Quilting in Texas with Mary K. Beard. The lobster was a gift from Gina at Quilts and Cakes.

More embroidery, trims and beads were added here.

The lace was a gift from Barbara Nicki Lee Seavey of Raviolee Dreams. (I am not affiliated with her shop.)


This is how the blocks look side-by-side. 

The first block was embellished by Annette of Welcome to Annette's World. (I am not affiliated, but she sells cotton and silk fabric prints of her artwork in her Etsy shop.)

The second block was embellished by Mary. (I shared a link to her blog earlier in this post.)

Now, I need to sew the wall quilt together by the end of the month. The beads and charms are much closer to the seamline than I am accustomed to, so I may practicing a whipped stitch to sew this one together. (Challenging myself allows me to learn more - I love it!)

Thank you so much for stopping by!
Renee

NOTES:
1. Crazy Quilting International is a group that meets on Facebook.
2. This block was shared on Instagram this weekend, as seen here.
3. I sometimes share sneak peeks on my Facebook page, here.
4. This block may be found on this Pinterest board.

It is Monday, so I am joining Stitchery Link Party #102 at Super Mom - No Cape. The free embroidery pattern this week is a basket of Wild Roses. There is also a giveaway celebrating 100 weeks of Stitchery Link Parties and the blog's 9 year anniversary. You may join the party and/or learn more here.


Wednesday, March 15, 2017

TAST 76


I am still playing catch up from my Internet issues earlier this week, and pretending it is Tuesday for my TAST post.

TAST 76: Whipped Chain Stitch

I traced curvy lines from Sharon B.'s Crazy Quilt Templates Sets 1 & 2 onto the back of my block for these underwater flower vines/stems.  (I am not affiliated with the templates, but did receive them to review and love working with them.)

The chain stitches were worked with size 8 DMC perle cotton #954. 

Size 8 DMC perle cotton #125 was whipped around the chain stitches.

Flowers were created with 5 rice bead petals and a small pearl bead in the center.

These were so fun to make, I plan to add them to another block soon!


The link in the TAST title above will take you to the tutorial for 2 versions of the whipped chain stitch. I worked the 2nd version on this block in January of 2016. You may see more photos here.

TAST stands for Take a Stitch Tuesday, a personal stitching challenge offered by Sharon B. at Pintangle.com. You may learn more about it here and find the TAST Facebook group here.

To celebrate 10 years of TAST, Sharon B. is sharing a series of interviews with TAST participants. On March 9th, she posted an interview with Maureen of CrazyQStitcher. I fell in love with Maureen's work in 2014 with the gorgeous bird blocks she created for the Crazy Quilt Journal Project (CQJP). You may find the interview here and see Maureen's CQJP 2014 blocks here


A few fun notes that may be of interest:


1. Sharon Boggon's new book, The Visual Guide to Crazy Quilting Design: Simple Stitches, Stunning Results, will be released in August. It is available for pre-sale at Amazon, and for the moment it is at a reduced price. (I am not affiliated with the book, but do receive a small credit from Amazon if you visit through my blog and make a purchase.) You may find it here.

2. There is a giveaway for the Spring Flowers Collection of floss at Victorian Motto Sampler Shoppe. (I have no affiliation.) You may learn more here

3. Pamela Kellogg of Kitty and Me Designs will be making cross stitch designs for Kreinik and she offered a free St. Patrick's Day pattern you may find here.

4. I have 3 pieces embellished and ready to sew into projects for my currently empty Etsy shop. Once they are aded to the shop, I will announce it on my Hand Stitched Treasure Facebook page.

Thank you for stopping by!
Renee


Tuesday, March 14, 2017

Twilight Duel Update #18 - March 2017

Today, I am pretending it is still the 2nd Monday of the month. 

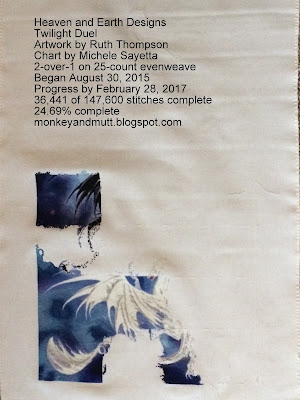
We had Internet issues for a couple of days, so yesterday I was unable to share this update on the Heaven and Earth Designs Twilight Duel cross-stitch I am working on for my youngest son. He fell in love with Ruth Thompson's dragons when he saw this chart. At my current rate of progress, it should be finished by March of 2020. (I did warn him it would be about a 5-year project!)

As mentioned last month, I am working on page 13 for a challenge with the New Official Heaven and Earth Designs Group on Facebook. I took the piece off of the frame for a photo at the end of February and have not worked on it since. 

To complete the challenge, I need to add about 190 stitches a day. There is a lot going on this month, so that may not happen.

I did decide to reward myself though. Every time I finish a 10x10 grid on the chart of page 13, I add a thread to fill in a bit of page 7 (to the blank area left of page 13.)

Can you see the beginnings of the talon that appeared last month?! I was thrilled to see it emerge. And this piece is SO close to being 25% complete!

Percent Complete

Project: 24.69%     (It was 23.79%)
Pages 1 & 2: 100%
Page 3: 18.94%
Page 4: 100%
Page 5: 1.83%
Page 6: 0%
Page 7: 13.66%     (It was 11.08%)
Page 8: 100%
Page 9: 2.73%
Page 10: 0.25%
Page 11: 0%
Page 12: 0%
Page 13: 40.87%   (It was 26.08%)
Page 14: 3.62%     (It was 3.44%)

I am linking with the Monday Stitchery Link Party #101 at Super Mom - No Cape! I do hope you will visit to see the beautiful free vintage rose embroidery pattern and to see what others have been working on. There is a giveaway celebrating last week's 100th Stitchery Link Party and celebrating the blog's 9th year, I do hope you will check it out.


Thank you for stopping by!
Renee


Saturday, March 11, 2017

CQJP 2017 February Block Motif 1


My CQJP 2017 February block was pieced last month.

I pieced the CQJP 2017 March block at the same time.

Both blocks will be used as pockets on tote bags. One will be donated for an auction next month and the other will be added to my (currently empty) Etsy shop inventory.

For the first motif on the February block, I traced a reverse image of a seahorse on the muslin backing of the block. 

Next, I followed the traced lines with a split stitch and used a satin stitch to complete the seahorse. (I like using the split stitch to give a cleaner edge to the satin stitches.)

Stomach area: 1 strand of DMC #4040.
Body: 1 strand of Waterlilies by Caron #207 Bermuda Reef (I think I fell in love with using silk embroidery floss!)
Eye: 1 strand of DMC #310
Center of eye: straight stitch of size 12 DMC perle cotton #B5200 floss.

It may be difficult to see, but here is a sneak peek at the 2nd motif. I will be using the octopus from the Stitcher's Revolution SR10 Sailor's Delight Iron-On Transfer set.

The last time I embroidered an octopus, it took me about 10 hours. I am hoping to be a little faster this time. You may see the octopus added to Sandy's block in a round robin here

I usually embellish the seams and then begin adding motifs to my crazy quilt blocks. To make sure the seams will not interfere with the motifs I want to add, I am working the motifs first.

Related blog posts:
Seahorse Tutorial (I used Seahorse 1 Sketch for this piece.)
CQJP 2017 January Block

The Pinterest board documenting my CQJP 2017 project may be found here.

I sometimes share sneak peeks on my Instagram account and on my Hand Stitched Treasure Facebook Page.

CQJP stands for Crazy Quilt Journal Project. It is a personal challenge to complete one crazy quilt block a month measuring a minimum of 8-inches by 8-inches. You may learn more about the rules here and see the blocks that have been completed this year here.

Thank you for stopping by!
Renee


Friday, March 10, 2017

InCoWriMo 2017 in Review

Disclaimer: This post includes a couple of links to Amazon. I am not affiliated with the products. However, my blog is affiliated with Amazon. If you visit Amazon from my blog and make a purchase, I do earn a small credit.


In a post on January 31st, I shared my plans to participate in InCoWriMo 2017 (INternational COrrespondence WRIting MOnth.)

The goal was to mail or deliver one hand-written letter, note or postcard every day in the month of February. Although I did not write every single day, I did manage to mail or hand deliver 28 items (postcards, letters, and a giant posterboard Valentine) by February 28th. 

Throughout the month, I shared photos of my outgoing mail on my Instagram account. (You may find it here.) Now that everything has been received, I thought I would share my first InCoWriMo experience. (It is a photo heavy post!)

Day 1: Crazy Quilted Valentine for the Crazy Quilting International Valentine Fabric Postcard Swap went to New York. (There are more pics on this blog post.)

Day 2: Embroidered "snail mail" fabric postcard mailed to my Mom in Oregon. (More information may be found here.)

Day 3: A letter with a hilarious package of gum went to a relative in South Carolina. The gum cost less than the shipping price, but it was worth the laugh. (I purchased the gum at a candy store in Lincoln City, OR. However, I did find it on Amazon (for a higher price) - if you are interested in reading the text on the back, you may find it here.)

Days 4: I mailed this funny card to a relative in South Carolina with a sense of humor that fit the card. (I'm not affiliated. It made me laugh!) 

Day 5: I mailed a letter in the top envelope to a friend in Oregon. (I made the envelope with a piece of scrapbook paper and a Kreate-a-Lope C6 Envelope Template.)

Day 6: A "thinking of you" card went to a dear family friend in an Oregon coastal town.

Days 7-9: InCoWriMo "snail mail" fabric postcards went to Kansas, Canada, and California. (I shared a tutorial of how these were made here.)

Day 10: A birthday card was mailed to a young man in Oregon. (One of my dearest friends had him on my birthday years ago. What an amazing birthday gift!)

Day 11: A birthday card was mailed to a relative in South Carolina.

(I was thrilled to find these Happy Birthday stamps in a drawer.)

Days 12 & 13: My friend is a photographer (Lori Norton Photography) and for Christmas, she gave my husband and I a set of gorgeous note cards featuring her work. I practiced some caligraphy (using actual ink and nibs) on notes to two dear friends. One went to Arizona and the other to Canada.

Day 14: I stole this idea from a college roommate the year my husband and I met. I wrote him a Valentine on posterboard and incorporated the names of candy bars into the text. He barely looked at it when I gave it to him. A couple of years ago, he commented it was probably the coolest Valentine he had ever received - and to think for over 20 years I thought he hadn't liked it! It appears I did manage to embarrass him that first Valentine's Day. Oops! So, I made him another posterboard candy Valentine this year. Over 20 years later, I think I embarrassed him again - lol! (Someone on Instagram asked if there was a Pulp Fiction reference here. Nope! I just worked the candy into the letter.)

Days 15 - 21: Postcards of Silver Falls State Park went to Oregon, Arizona, and The Netherlands. A postcard of the Boeing Factory in Everette, Washington went to The Netherlands. And a Dilbert card and a funny postcard both went to South Carolina.

Day 22: I mailed a thank you card to Veronica after receiving this amazing birthday card she drew for me. She is SO incredibly talented!

Day 23: A "thinking of you" card went to a coastal town in Oregon. 

Day 24: A funny postcard went to a relative in SC.

Day 25: A baby arrival card went to a friend in Oregon that just had her 2nd child.

Day 26: A thank you letter went to my mom in Oregon in another hand made envelope.

Day 27: A crazy quilted under-the-sea themed fabric postcard went to a blogging friend in California that offered to write me during InCoWriMo.

Day 28: I printed a copy of the under-the-sea themed fabric postcard onto a notecard, adding the text "InCoWriMo 2017", and mailed it to North Carolina.

Where my InCoWriMo outgoing mail went:
Arizona - 2
California - 2 
Kansas - 1 
New York - 1
North Carolina - 1 
Oregon - 11 
South Carolina - 6
Canada - 2
The Netherlands - 2

I received mail from:
Arizona
California
Kansas
Oregon
Pennsylvania
The Netherlands

2 of the items I received were through InCoWriMo. 1 was through a swap and the other 3 were surprises. 4 of these items were shared in this post. One was shared on Day 22, above. And I am awaiting permission to share the last postcard I received. It is a beautiful print of a painting made by a blogging friend.  (I still need to reply to that one!)

InCoWriMo was a very fun experience. I am not very good about keeping in touch through letters and phone calls, so it was a great opportunity to send some happy mail to people in my life. I look forward to participating again in 2018!

Thank you so much for stopping by and making it through such a looooonnnnnnnnggggggggg post!
-Renee