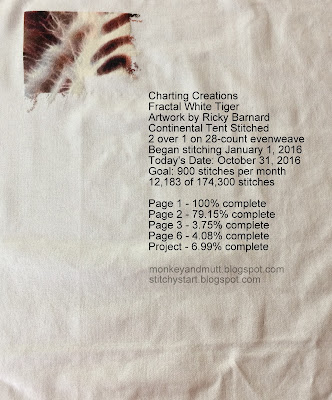
This month I added less than 500 stitches to the Charting Creations Fractal White Tiger piece I am stitching for my eldest son. The artwork is by Ricky Barnard.
The colors in this top photo are accurate. Last month, I had a hard time getting a good picture.
This is how it looked last month. I filled in some of the white and finished most of the third stripe on the right.
This piece is a joy to work on.
I am linking up with A New Stitchy Start.
I am also linking up with Stitchery Link Party #82 at Super Mom - No Cape.
I spent the day making Halloween treats for my youngest son and his friends.
Pinterest came to my rescue with their last minute plans to watch movies at our house and give out candy to trick-or-treaters. I am so blessed that my boys are friends with such great kids.
Two of my favorite treats of the day were the Oreo pudding dirt cups with tombstones and Purple People Eaters. For the dirt cups, I used the recipe from this pin on Pinterest, but added the tombstones after seeing them in other photos.
The recipe for Purple People Eaters may be found through this pin on Pinterest. (Due to lack of time, my cups were not as fancy as the one shared with recipe.)
I think the kids enjoyed themselves. I know I did! Happy Halloween.
Thanks so much for stopping by!
Monday, October 31, 2016
Friday, October 28, 2016
1 Christmas Item a Month October 2016
If you are stopping by for the Eerie Nights Blog Hop, you will find my creations here. Today is the last day of the hop. The full schedule may be found here.
Can you believe November will be here next week?! I really wish I knew where the time went!
I apologize for the photo quality. My camera did not want to cooperate with the gray daylight we have had recently.
Using the "Christmas Spirit" fabric by Geoff Allen I had in my stash, I made a second fabric postcard.
I just love this fabric!
Making fabric postcards is so much fun!
My backs backs and edges still need some practice...
I had one more finish this month, but I mailed it out early and it has not reached its destination. I will share it with you next month!
If you are interested in making a fabric postcard the links below may be helpful.
Earlier this year, I shared a tutorial on how to make crazy quilted fabric postcards on the Crazy Quilting International Blog.
My 2 favorite fabric postcard tutorials are found at Patchwork Posse (this post has loads of great information and ideas) and at Quilted Delights (I love to use the finishing method shared in this tutorial to finish the edges of my postcards.)
I do hope you will stop by the 1 X-mas Item a Month blog to see what others have made this year.
Thank you so much for stopping by!
Renee
Wednesday, October 26, 2016
Eerie Nights Blog Hop Day 5
Welcome to the fifth day of the Eerie Nights Blog Hop!
If you are new to my blog, welcome!
Special thanks to Marian of Seams to be Sew for organizing
and to Amy of Sew Incredibly Crazy for hosting the hop.
I also want to thank the sponsors of the blog hop:
I fell in love with these Timeless Treasures fabrics:
Glow Webs by Gail Cadden, Glow Ghosts and Dark Clouds.
I decided I needed them for the blog hop.
I just love fabrics that glow in the dark.
I began crazy quilting in May of 2012.
This was the very first block I crazy quilted.
It has been safely tucked away for more than 4 years.
Loosely following this tutorial I found on Pinterest, I turned the block into a pocket on a tote bag.
I used Dark Clouds fabric for the exterior, black cotton for the interior and the Glow Webs for the inside pocket.
I have wanted to try making a zipper pouch for over a year.
A couple of blogs I follow have shared this zipper pouch video on YouTube by the Missouri Star Quilt Company. They looked like so much fun to make, but the idea of cutting a zipper intimidated me.
It was SEW much easier than I thought it would be!
Before you try making one, let me warn you, they are addictive!
I made a second zipper pouch using the Glow Ghosts fabric on the exterior and the Glow Webs inside.
This time, I put pockets inside using a spider print from my stash.
I also added an optional wristlet strap, using the wristlet instructions found in step 2 of this tutorial.
For the tissue-pack cover, I loosely followed the tutorial I discovered through this Pinterest pin.
I must confess...
I was thrilled to see the zipper pouch glow in the dark.
Seriously. It is the little things in life...
Picture me finding my 16-year-old and 19-year old sons in the kitchen and insisting they follow me.
Where?
Into the hall bathroom, of course!
There is not a window in there.
We squeezed into the small half bathroom. I closed the door, turned off the lights and clapped my hands with delight.
When I turned the lights back on, my boys were shaking their heads and trying not to laugh.
I have another confession.
I needed to make a second tissue-pack cover.
Why?
It's a little embarrassing, but last year I realized one of my bags did not have a good place to keep my license, debit card, gift cards, Safeway card, Fred Meyer card, library card, etc.
Out of necessity, I pulled the tissues out of my tissue-pack cover and stuffed the cards in there.
It was perfect.
There was plenty of space for the thick pile of cards.
Now I have one tissue cover for my cards and one for tissues.
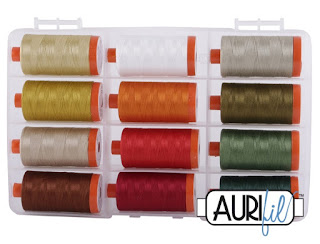
I have read great things about Aurifil thread on other blogs.
Out of curiosity, I decided to try some.
I really liked it!
I used the variegated yellow/orange Aurifil thread
with this Halloween print from my stash to make a glasses case.
To make this case, I loosely followed the tutorial
I discovered through this pin on Pinterest.
(I cut my fabric 3.5-inches by 8-inches to make it smaller
so my smaller framed glasses would not keep falling out.)
To say I am thrilled to have a Halloween themed bag and accessories is probably an understatement.
(Did I mention some of it glows in the dark?!)
For next year, I may add another (smaller) zipper pouch
to hold my coins and a second glasses case.
(I do not want my sunglasses to get jealous.)
For the blog hop, we were asked to share something we already have that we like to use at Halloween. Every October these two tealight holders add some candlelight to our home.
I do hope you will visit the other blogs participating today!
Living My Dream - me
Do not forget to enter the drawings!
(Please note: some of the prizes will only ship
within the United States.)
Today's giveaway is from Aurifil.
You may enter below:
a Rafflecopter giveaway
Wishing you all a Spooktacular Halloween.
Thank you for stopping by!
Renee
Tuesday, October 25, 2016
TAST 2016 Stitches 46 & 58
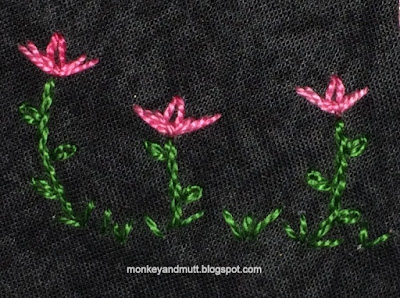
The flower above was created with 4 berry stitches.
I used size 5 DMC #48 variegated pink floss.
A hot pink seed bead was added to the center of the flower.
The flower tops were created with slipped detached chain stitches worked with size 8 DMC #48 variegated pink floss.
Using size 8 Anchor #246 (I think that is what the sticker says) green floss, the stems were created with stem stitches, leaves were added with detached chain stitches, and grass was added with angled straight stitches.
Click on the stitch titles above to follow the links to the tutorials at Pintangle.com.
TAST stands for Take a Stitch Tuesday, a personal stitching challenge offered by Sharon B. at Pintangle.com.
You may learn more about TAST here.
Members of the TAST Facebook group share some incredibly creative uses of the stitches.
You may join the TAST challenge at any time.
Sharon recommends beginning with the first 15 basic stitches.
On an unrelated note:
My day of the Eerie Nights Blog Hop will be tomorrow.
I do hope you will stop by to visit.
I must admit, I was childishly delighted with the items I created with these Timeless Treasures glow-in-the-dark fabrics.
(Please note: I am not affiliated with Timeless Treasures.)
Aren't they spooktacular?!
(I just love glow-in-the dark fabric, don't you?)
Thank you for stopping by!
Renee
Monday, October 24, 2016
CQJP 2014 November Block Completed!
Better late than never?
In November of 2013, I signed up for the Crazy Quilt Journal Project 2014 (CQJP 2014).
I planned to create a crazy quilted purse each month.
It is 2016 and I am still working toward completing that goal.
The November block is now complete!
I had so much fun embellishing this one.
(I think this spider is one of my favorites.)
For those of you that follow my blog, you may recognize some of the seams from previous Take a Stitch Tuesday (TAST) posts.
This dragonfly (butterfly?) and the seam beneath it were both created with the use of Sharon B.'s Crazy Quilt Template Set 2.
I was more than a little flattered when Sharon asked me if I would like a set in exchange for an honest review.
Um... Wow. Yes, please!
Then, Pamela Kellogg asked if I would write a review for
the Crazy Quilt Quarterly Magazine.
Absolutely!
The above photo is on page 34 of the Summer 2016 edition of the Crazy Quilt Quarterly Magazine.
(I am not affiliated with the templates, but I do love using them.
I am not affiliated with the magazine, but I love reading it and encouraging crazy quilters to submit their work!)
If you are curious about my other blocks for CQJP 2014, here are links to the completed blocks and the purses/totes completed so far:
January block and purse (this one took a ribbon.)
May block
June block and purse
August block and purse
October block and purse
The December block is pieced and ready for embellishment.
I should finish CQJP 2014 by the end of this year.
Today, I am linking with the Monday Stitchery Link Party #81
at Super Mom - No Cape!
The free embroidery pattern is Jack-o-Lanterns and Bats!
If you do any hand embroidery, I encourage you to join the party.
Speeking of Jack-o-Lanterns and spooky things, the Eerie Nights Blog Hop continues throughout this week. I encourage you to check it out. I will be sharing my creations on Wednesday, the 26th.
Thanks for stopping by!
Renee
Thursday, October 20, 2016
Eerie Nights Blog Hop Begins Today!
Begins Today!
Special thanks to:
Marian at Seams to Be Sew for organizing the hop
and
Amy at Sew Incredibly Crazy for hosting us!
There is a giveaway every day
thanks to these sponsors:
The Blog Hop Schedule is below!
October 20th
October 21st
October 24th
October 25th
October 26th
Living My Dream - me
October 27th
October 28th
Monday, October 10, 2016
Twilight Duel Update 14 October 2016
Wow! The 2nd Monday of October is already here.
Last month I shared this progress picture of Twilight Duel - the Heaven and Earth Designs cross stitch based on artwork by the amazing Ruth Thompson.
I added over 5,000 stitches this month! (I guess there is nothing like a challenge deadline to motivate me...)
As I began the project August 30, 2015, I like to take a photo of my progress on the 30th of each month.
This is how it looked on September 30, 2016.
For those of you that use Q-snap frames, is there a good way to avoid the line the clamps are leaving on my fabric? Any advice is welcome. With the time put into this piece I really do not want to damage it.
On October 9th, I finished page 8!
You may remember, I was working on a Parking Challenge for the New Official Heaven and Earth Designs Facebook Group. I met the October 15th deadline.
Part of the white dragon's mouth appeared, as did a tiny bit of a knee!
32,342 stitches are done, so there are 115,258 stitches to go...
After submitting my photos for the challenge, I worked in the threads I had parked on pages 7 and 9. I still have a few to finish on page 14. Then I plan to finish page 3.
Percent Complete:
Project: 21.91% (It was 18.34%)
Page 1: 100% - Done
Page 2: 100% - Done
Page 3: 14.14% (Same)
Page 4: 100% - Done
Page 5: 1.83% (Same)
Page 7: 7.08% (It was 2.95%)
Page 8: 100% - Done (It was 36.75%)
Page 9: 2.73% (It was 0.22%)
Page 10: 0.25% (Same)
Page 14: 1.83% (It was 0%)
Page 8 Milestones (4th page completed):
Last month I shared this progress picture of Twilight Duel - the Heaven and Earth Designs cross stitch based on artwork by the amazing Ruth Thompson.
I added over 5,000 stitches this month! (I guess there is nothing like a challenge deadline to motivate me...)
As I began the project August 30, 2015, I like to take a photo of my progress on the 30th of each month.
This is how it looked on September 30, 2016.
For those of you that use Q-snap frames, is there a good way to avoid the line the clamps are leaving on my fabric? Any advice is welcome. With the time put into this piece I really do not want to damage it.
On October 9th, I finished page 8!
You may remember, I was working on a Parking Challenge for the New Official Heaven and Earth Designs Facebook Group. I met the October 15th deadline.
Part of the white dragon's mouth appeared, as did a tiny bit of a knee!
32,342 stitches are done, so there are 115,258 stitches to go...
After submitting my photos for the challenge, I worked in the threads I had parked on pages 7 and 9. I still have a few to finish on page 14. Then I plan to finish page 3.
Percent Complete:
Project: 21.91% (It was 18.34%)
Page 3: 14.14% (Same)
Page 5: 1.83% (Same)
Page 7: 7.08% (It was 2.95%)
Page 9: 2.73% (It was 0.22%)
Page 10: 0.25% (Same)
Page 14: 1.83% (It was 0%)
Page 8 Milestones (4th page completed):
- Finished the 1st skein of white.
- Finished the 2nd skein of white. (I am now using the 3rd of the 5 white skeins I purchased for this project.)
- Surpassed 30,000 stitches!
- It is now more than 20% complete!
I am linking up with the Monday Stitchery Link Party #79 at Super Mom - No Cape this week. Please visit to see the free vintage embroidery design shared and to see what others shared.
If you do any hand embroidery, please join the party!
Tuesday, October 4, 2016
TAST 2016 Stitch 50
TAST Stitch 50: Looped Cretan Stitch
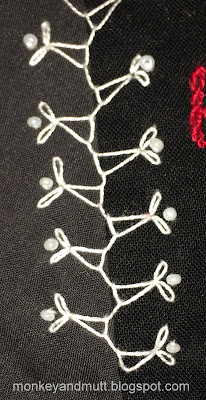
I love using the Looped Cretan Stitch as a base stitch for angels.
To keep my stitches even, I used waste canvas.
The stitches were made with size 12 white perle cotton.
After removing the waste canvas, I added pairs of detached chain stitches to create wings. Then I added a bead for the head.
If you are interested, you may see my first attempts with the Looped Cretan Stitch and with the Beaded Looped Cretan Stitch here, in this TAST post from 2014.
Or, you may try to find them in the two photos below.
The Looped Cretan Stitch is in the block above.
(You may see more photos of this block here.)
The Beaded Looped Cretan Stitch is in the block above.
(You may see how I used this block in a project here.)
TAST stands for Take a Stitch Tuesday. It is a personal stitching challenge offered by Sharon B. You may learn more about it on her blog, Pintangle, here. There is also a TAST Facebook group. I love seeing how creative the members there are with the weekly stitches! If you are interested in learning or practicing embroidery,
I encourage you to join the fun!
Subscribe to:
Posts (Atom)


