 |
| The block I chose to embellish. |
The beautiful landscape Barbara W. created on the first block
completed for Kathy S. made my decision a no-brainer on this round
robin. I have a fondness for landscapes and embroidered trees. I also
love snowmen. So, I needed a landscape with a tree and a snowman. Oh,
and maybe a cardinal to better coordinate with the block Barbara
embellished!
One of the tricky parts of a round robin, for a Newbie like me, is coordinating my work to mesh well with the work the others have done in the round robin.
With my first round robin, we all made one block and the other 4 members divided the seams and spaces by 4 to complete one-fourth of the work. Coordinating with the colors and styles of stitching and fitting my ideas into the remaining space was quite the challenge sometimes.
 |
| My sketch to embellish the block. |
This is my first DYB (Do Your Block) round robin, and I think I prefer the opportunity to embellish a complete 6-inch block. Planning out the entire block without worrying if I am leaving enough space for others to fill in their seam treatments or to add a motif is kind of nice. (Not that I always make a plan, but for this round robin, I have so far!)
I searched the Internet for "Winter Tree Images" and found a
whimsical tree covered in snowflakes. I loved the curve of the tree, so I sketched a similar tree with slightly different branches. I thought a birdhouse would be a fun touch, but I had no idea how I would make one. And, I was not sure how I wanted to add a snowman to the block. Felt applique? Satin stitch? (I worried the long threads would snag.) Short and long stitch? (I am still struggling with my CQJP 2013 block using that method.) Decisions, decisions.
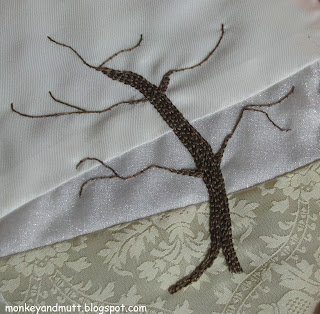
 |
| Beginning of chain-stitched tree. |
Using a strand of a dark brown and a strand of a light brown and a chain-stitch, I started with the tree. By the end of that evening, I felt a pit of dread in my stomach. I seriously wondered if I might need to contact Kathy and apologize for ruining her block. Seriously. (Maybe she could stitch a seventh block? Maybe? Could I take out all of those tiny chain-stitches without ruining the fabric? I doubted it.) Embroidery invaded my dreams that night. In the morning, I looked at the tree and felt the same dread. When I mentioned my concern to my 13-year-old, he commented, "Well, it is a weird design for a tree." Sigh. It wasn't just me...
My only option was to keep going and see if it would improve. (After all, I wanted to throw away my current CQJP 2013 block for quite a while, and now I am kind of pleased with how it is going...)
 |
| Progress on the tree - I was not happy with the way it looked. |
So, I finished the tree as I had sketched it, but it did not look as whimsical on the fabric as it had on paper. It looked... off. There was too much empty space in the middle.
Adding a few more branches helped a bit. I just worried my whimsical tree was going to end up better suited for a Halloween block...
 |
| Tree completed. |

It looked better. I could work with this. Now, the challenge was going to be adding a birdhouse! I pulled out my doodle cloth and attempted a satin-stitched birdhouse. A padded satin-stitch worked! I used two strands of a light blue rayon floss and a split stitch to outline the shape. Next, I made satin-stitches in the longer direction, so the top stitches would be shorter and less likely to snag.
Once the stitches were complete, I used 3 strands of a dark brownish-gray cotton floss and 3 straight stitches to create the roof and the base of the birdhouse. A straight stitch using a strand of a light brown (lighter than the lighter shade used in the tree) connected the birdhouse to the tree-branch.
While creating my "practice" birdhouse, I discovered a French knot hole for the bird's entrance sunk through all of the stitching. Adding a colonial knot on top of the French knot still sunk through. So, I added a small seed bead. I'm not sure how I could have added it without disrupting some of the satin stitches. Yet, overall, I was happy with the outcome.

Then, using 2 strands of a light brown cotton floss and straight stitches, I added a fence along the bottom seam. Because the white fabric was so sheer, I tucked each stitch down in the back. In essence, the fence was a reverse button-hole stitch. (The back of the fabric showed a button-hole stitch, whereas the front was simple fence posts.) Tiny stitches connected the posts together.
Now, it was time for the snowman. I used acrylic paints in black and orange to paint a face on one button and two buttons on a second button for the snowman's head and torso. Using clear quilting thread, I sewed the buttons on with a third, larger, button at the base. After sewing the larger button on, I managed to sew a black seed bead into each button hole (which I placed in a vertical position) to look like more buttons on the snowman. A couple of twig arms were couched down, and a ribbon scarf (in blue to coordinate with the birdhouse - as I feared red was too bright) finished him up.
 |
| Button Snowman |
It took me a couple of attempts on my doodle cloth, but I did manage to make a cardinal by copying the one Barbara W. created for Kathy S. I put him on a different branch than I had in my sketch. If I kept him on the top branch, he would have been further toward the center. Most of the movement flowed from the upper-right to the lower-left of the block and I did not want to distract from that. So, I put the bird a bit closer to the upper-right corner. (I also opted not to stitch a bird on the snowman's arm, as I feared the bottom corner would begin to look too cramped.)
I also added a few French knots using white rayon floss to add some snow to the branches of the tree.
 |
| Tree for Kathy's Block. |
The last step was to add snowflakes. I used white metallic floss for some snowflakes and white rayon floss for others. No two snowflakes were the same. I thought this final step would be rather quick, but it took almost as long as it had to create all of the other embellishments. Trying to figure out placement and how to make this one differ from that one probably took me the longest!
This is how the block looked when I finished. I do hope Kathy S. will be pleased with this wintery scene. Below you can see the both of the completed blocks.
This was such a fun block to create. Kathy S., thank you for the beautiful canvas! Your blocks are gorgeous and the fabrics were so fun to stitch.


