Sunday, July 29, 2018

Treasure Chest Tutorial Part 5: Embellishment


If you missed previous parts of this tutorial,
links are provided at the end of this post.

This post is long and photo heavy.
Click on any photo for a larger view.

After Part 4 of this tutorial, your block was pieced or attached to foundation fabric and ready for embellishment.

I encourage you to be as creative as you want while embellishing your treasure chest postcard!

IMPORTANT: 
1. Think small: If you use different beads or add charms or buttons to your work, please remember that the postcard cannot be more than 1/4-inch thick and the stabilizer added in Part 5 of this tutorial will add about 1/8-inch thickness.
2. Keep all stitching within the basted seam lines. (I recommend leaving at least 1/8-inch between stitching and the basted lines.)
3. All beads should be at least 1/4-inch away from the basted seam lines.
4. If you are new to embroidery, consider creating a Doodle Cloth to practice your stitches. Simply sew a piece of fabric large enough to fit into your hoop to a muslin foundation.

This photo shows the supplies I used to embellish the fabric postcards for this tutorial. Your supplies do not need to be exactly the same.

You will need:
Scissors
Embroidery hoop
Pencil
Needles: embroidery needles of various sizes, milliners needle, beading needles
Embroidery floss or perle cotton
     Ecru, cream or brown for net
     Greens for sea vegetation
     White embroidery floss for Jellyfish
     Colors of preference for: flowers, fish, starfish, coral
Beads size 11/0 or smaller (I prefer size 15/0)
     Gold to fill majority of treasure chest
     Cream or white for pearl necklace
     Color(s) of preference for gems in treasure chest
     Optional: color of choice for "flowers" on buttonhole stitch

Note: My embroidery skills are self-taught through on-line tutorials. I found Sharon B.'s Stitch Dictionary at Pintangle.com to be an invaluable resource. Mary Corbett's website, Needle 'n Thread, is also a great resource with many "How to Videos". I am not affiliated with either website. 

For each step, I will list the materials I used. The name of the stitch used is linked to the instructions Sharon B. or Mary Corbett have shared. Photo collages will show my work-in-progress to better demonstrate how I worked some elements onto the block.

Step 1: Place your block in an embroidery hoop or a Q-snap frame.
I strongly recommend using a hoop for your work. Failure to keep the fabric taught can allow the embroidery to bunch some of the fabric.

Step 2: Add a net with Cloud Filling Stitch.
I used size 8 Anchor #926 cream colored perle cotton. 
A net on the ocean floor would not be perfectly symmetrical, so I did not worry about perfectly even placement of the foundation stitches.
Note: All stitches are within the blue basted seam line.

Crazy Quilted Postcard: 
I added a net along the "sandy seam" on the bottom-right corner.

Not shown: after working the Cloud Filling Stitches, I couched a strand of the same perle cotton beneath the foundation stitches along the seam line.


Mixed Media Postcard: 
I created the net along the bottom-right corner of the block.

As seen in the 12th image of this collage, after completing the Couch Filling, I couched a thread beneath the foundation stitches at the top of the net.

Step 3: Sea Grass added with Buttonhole Stitch 
I used 2 strands of DMC variegated 4050 embroidery floss. 
This stitch is intentionally worked uneven to give the impression of a sea grass growing along the edge of sand beneath the treasure chest.
Note: I intentionally keep the tops of the first and last stitches about 1/4-inch away from the basted seam lines so that I may add beads later that will not become a problem while sewing the postcard together in Part 5 of this tutorial.


Crazy Quilted Postcard:


Mixed Media Postcard:


Step 4: Sea Vegetation added with Feather Stitch
Stitched with size 8 DMC #125 variegated green perle cotton.
I framed both sides of the postcards with tall fronds of sea vegetation created with feather stitches. 
Note: I intentionally placed the base of the plant on the net. Some of those stitches were worked over the cloud filling stitches and others were worked beneath those stitches to give the illusion the plant was growing up through the netting. However, when the feather stitches crossed over the buttonhole stitches, I kept them on top, as these plants are in the foreground.


Crazy Quilted Postcard:

Three main sections of the plant were started at the top and worked down to the base of the plant. Additional sections were added to fill in more space.


I added one plant on the right, with the base of the plant growing through the net (as explained above.)
Note: the first section works down the seam.


A second plant was worked onto the left side of the block.

Mixed Media Postcard:
(I forgot to take a photo of the full piece after this step.)


I chose to have the tips of the plants on the left and the right curl in toward the treasure chest.


Step 5: Flowers added with Detached Chain Stitch
Worked with size 8 DMC #48 variegated pink perle cotton.
Detached chain stitches were randomly added between some of the feather stitches.
Each stitch began near the joint of the feather stitch, as seen in this photo.


The securing stitch was placed about 1/8-inch away from the loop, to add a slight tip to the flower.


Crazy Quilted Postcard:


Mixed Media Postcard:
Step 6: Jellyfish added with Split StitchSatin Stitch, and Couching.
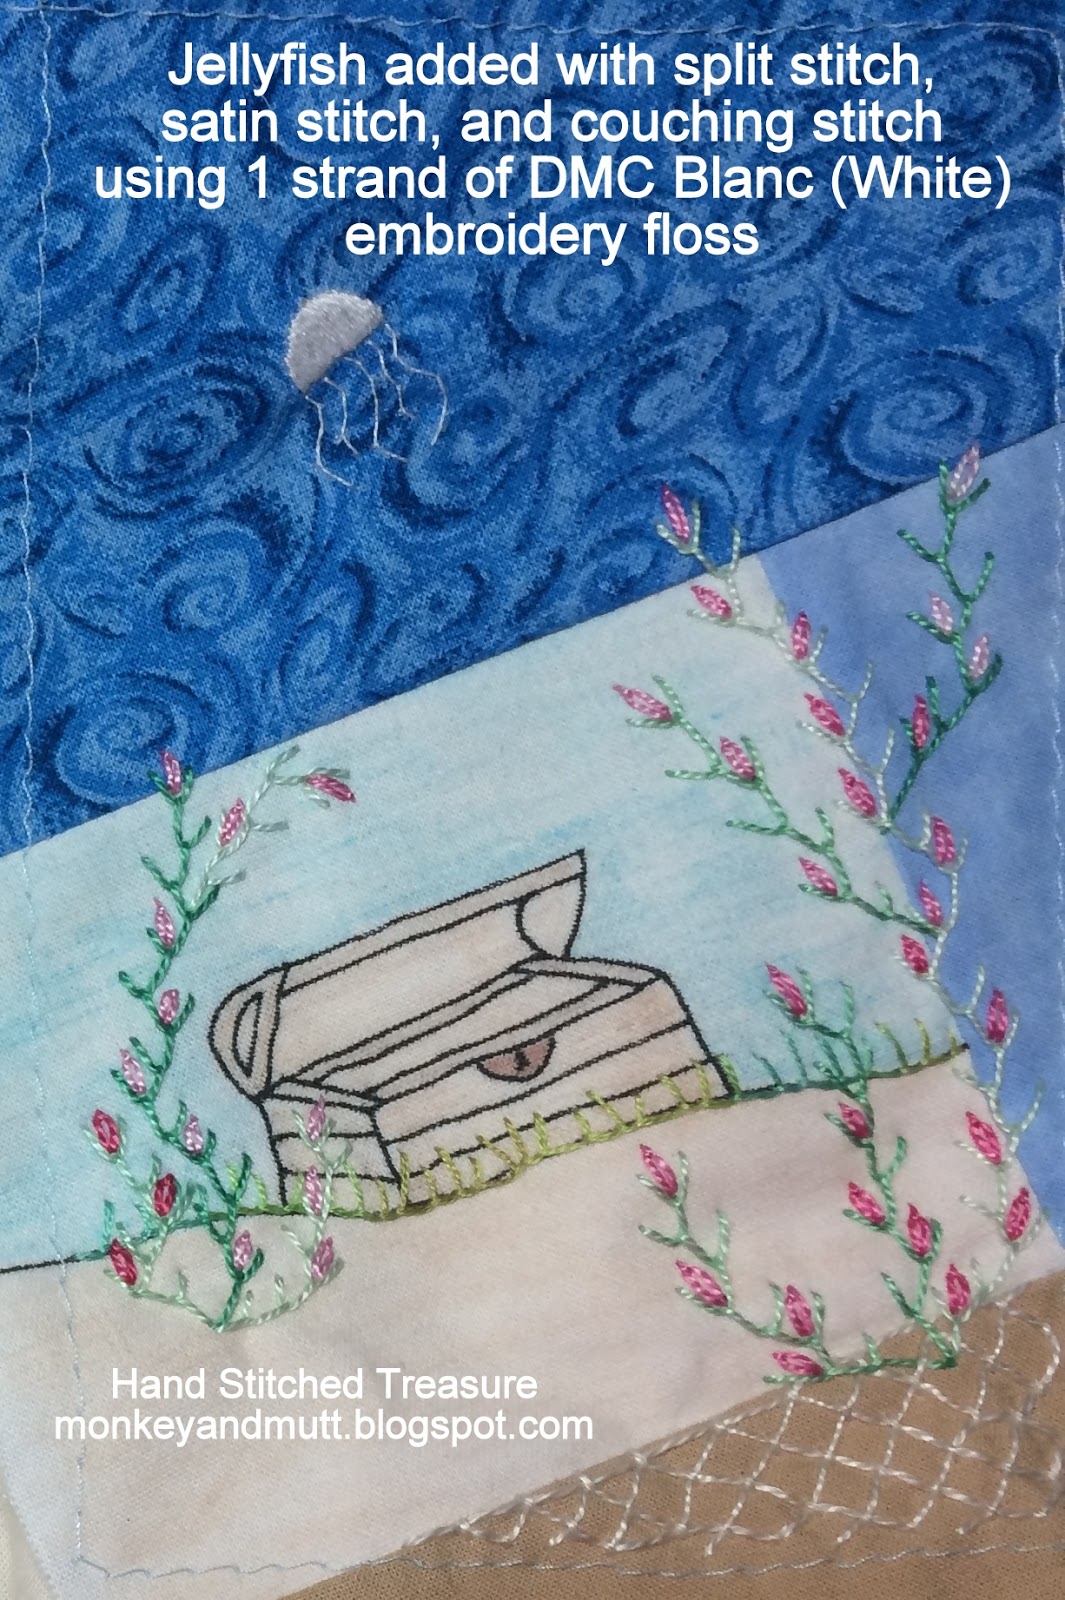
Created with a single strand of DMC Blanc (White) embroidery floss.
Note: I only added this to my crazy quilted postcard, but it could easily be added to the mixed media option.
The satin stitch works best when the fabric is taut. So, I highly recommend using an embroidery hoop. The split stitched outline helps keep the edges of the satin stitches even.


First, I sketched a half circle on the back of the block.

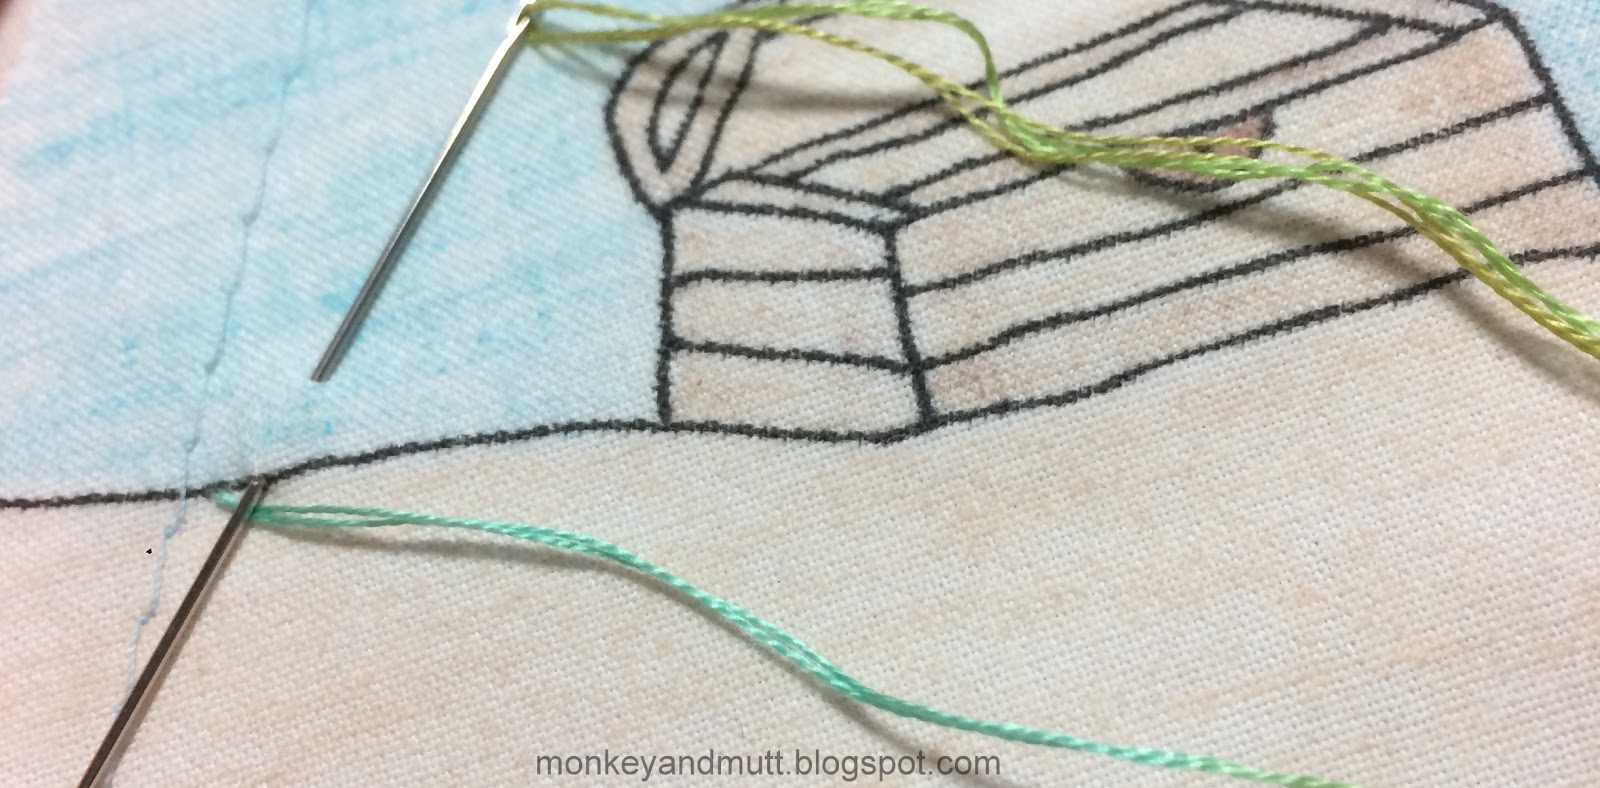
Next, I used a Split Stitch to outline the body of the jellyfish. I followed the sketch on the back of the block for this step. 


Still using 1 strand of white floss, I began at one edge of the shape and filled the outline with Satin Stitches.

Tentacles were created by couching 5 curvy lines along the bottom of the jellyfish.


Step 7: Starfish added with 5 Bullion Knots and a French Knot center or created with the Whipped Wheel Stitch
Note: Bullion Knots and French Knots are much easier to create using Milliners needles.
3 starfish were added to the Crazy Quilted Postcard and the Mixed Media Postcard.


This starfish was created with 2 strands of DMC #4120 variegated embroidery floss. 

Work 5 Bullion Knots as seen in this photo.
Place a French Knot in the center of the Bullion Knots.


This Whipped Wheel starfish was created with 1 strand of DMC #52 variegated purple for the foundation stitches. 
2 strands of the same floss were used to whip around the foundation.
Step 8: Fern added with Fly Stitch
Note: Though I only added this fern to the Crazy Quilted Postcard, you may easily work it onto the Mixed Media Postcard.


First, 3 curvy lines were sketched on the back of the block. (See #1 in photo collage.)

Starting at the top, make a small straight stitch. Begin the first Fly Stitch level with the middle of the Straight Stitch. Follow the line on the back of the block when making the tail of each Fly Stitch.

Step 9: Coral added with French Knots
French Knots worked with 2 strands of DMC #90 variegated yellow embroidery floss.
Note: I added this to the Mixed Media Postcard, however, you could add it to the Crazy Quilted Postcard.
I work the French Knots from the bottom up, randomly adding stitches. If you prefer to have a set pattern, you may wish to sketch the shape of the coral on the back of your block with a pencil, and place your knots along those lines.

Step 10: Fish added with Detached Chain Stitch and 3 Straight Stitches
Worked with 2 strands of DMC #4077 variegated yellow embroidery floss.
Make a Detached Chain Stitch, fill it with a Straight Stitch. Then add 2 small Straight Stitches to the end that began the Detached Chain Stitch to create a tail.


Crazy Quilted Postcard:
The final seam of the block was embellished with a curvy line of fish, taking care not to stitch over the other embroidery on the block. To add motion to the block, the fish are swimming the opposite direction of the jellyfish. Additional fish were then added to fill in the block.


Mixed Media Postcard:
Fish were randomly added to fill in the block.


Step 11: Add Beads
I used the following Mill Hill Petite Glass Seed Beads (size 15/0) in the treasure chest:
40557 Old Gold (for gold)
42010 Ice (for diamonds)
40020 Royal Blue (for sapphires)
40123 Cream (for pearl necklace)
40252 Iris (for amethyst)
Lacking red in this size, I used a Toho size 11/0 seed bead for a ruby.
Note: When adding beads, I use 1 strand of a matching shade of embroidery thread and a beading needle. I pass the needle through each bead 3 times and then secure the bead by knotting the thread on the back 3 times. This holds the bead firmly in place (so it does not easily flop) and prevents other beads from falling off of the postcard if one is somehow torn off.


Crazy Quilted Postcard:
#42027 Champagne Mill Hill Petite Glass Seed Beads were added to the sea grass seam.


Mixed Media Postcard:
#45270 Bottle Green and #40332 Emerald Mill Hill Petite Glass Seed Beads were added to the sea grass seam.


The blocks are now ready to make into postcards!


Links to related blog posts:
Treasure Chest Sketch
Treasure Chest Tutorial Part 1: Gathering Supplies
Treasure Chest Tutorial Part 2: Design Transfer
Treasure Chest Tutorial Part 3: Coloring Fabric
Treasure Chest Tutorial Part 4: Piecing & Foundation


Monday, July 16, 2018

Treasure Chest Tutorial Part 4: Piecing and Foundation


If you missed the first parts of this tutorial, 
links have been provided at the end of this post.

After Part 3 of this tutorial, your fabric was colored and heat set. If you have not already, remove the freezer paper from the back of your fabric.

Now to prepare the fabric for embellishment. Before adding embroidery, beads, or other embellishments, you need a foundation fabric. 

Click any photo for a larger image.

1. Cut a piece of muslin out that is at least 5" x 7" in size and is large enough to fit your embroidery hoop or frame.

2. Iron the muslin.

3. Using your fabric safe marker and a quilting ruler, draw a 4" x 6" rectangle onto the center of your piece of muslin. (I used a black Pigma Micron 05 marker and heat set the ink with the dry cotton setting of an iron, as explained in the Design Transfer part of this series.)

4. Trim the colored fabric.
  • Mixed Media Option: Trim the colored fabric to a 5" x 7" rectangle.
  • Crazy Quilt Option: Trim the fabric to a 3.5" x 4.5" rectangle.


5. Pin the postcard fabric to the muslin foundation. 
NOTES: The rectangle you drew in Step 1 will be the back side of the muslin foundation.
If needed, hold the fabrics up to a window to be sure the colored fabric is where you want it within the triangle on the back of the muslin.

Mixed Media Option: Center the 5" x 7" colored treasure chest fabric (colored-side-up) on the front side of the muslin. From the back side, pin the treasure chest fabric to the muslin. 
Skip down to Step 7.

Crazy Quilt Option: Decide how you want your postcard oriented and place the 3.5" x 4.5" rectangle on the front side of the muslin. The block needs to be pieced. See Step 6. 

6. Piece the crazy quilt fabric postcard. I chose a portrait orientation for my crazy quilt postcard and placed my treasure chest at an angle along the bottom edge.

The numbers in this image show the order in which the fabrics were added.

Fabric 1 - the colored image:
The colored fabric extends past the left side and the bottom on the bottom-left corner of the rectangle drawn on the back of the muslin.

Fabric 2: Find a scrap of tan or light brown fabric (think sand.) Be sure the scrap will extend beyond the borders on the bottom and the side of the rectangle on the back side of your muslin.

Place the fabric right-side-down on the treasure chest fabric, lining the edge with the sand-colored bottom edge of your colored fabric.

Place pins along the edges of the rectangle drawn on the back of the muslin.

Using 1/4" seam allowance, sew along this seam. (My stitched seams extend about 1/4" past the rectangle on the muslin on both sides.)

Press the seam with iron on cotton steam setting.

Open the fabric and press both fabrics flat onto the muslin foundation.

Trim the right edge even with the edge of your treasure chest rectangle.

To do this, flip the piece so the front is face down on your cutting mat.

Fold the muslin back away from the edge of the fabric. Set your ruler over the muslin, so you will not cut it by mistake. Line the edge of the ruler with the edge of the treasure chest fabric and trim the sand colored fabric.

As seen in the next photo, I also trimmed the bottom. Leaving an extra 1/2" to 1" of fabric extending beyond the rectangle drawn on the muslin, I trimmed the fabric on the bottom.


Fabric 3: Find a scrap of blue fabric.
Place the fabric right-side-down and pin it along the edge you just trimmed.
Sew the seam from the top of the treasure chest fabric down to the bottom of the sand fabric.
Iron the seam.
Open the fabric and iron the seam open.
Flip the fabric face-down, fold the muslin along the top seam of the treasure chest fabric. Place your ruler over the muslin (so you cannot accidentally cut it), line the ruler up with the top of the treasure chest fabric and trim the blue fabric. 
Trim the blue fabric so it extends about 1/2"-1" beyond the side of the rectangle drawn on the back of your muslin.

Fabric 4: Find another scrap of blue fabric. Be sure it is large enough to cover the remainder of the rectangle drawn on the back of your muslin foundation.
Place the fabric right-side-down and pin it along the top seam with the treasure chest and blue fabric.
Sew the seam.
Press the seam.
Open the fabric and press the seam open.
Without cutting the muslin foundation, trim the blue fabric so it extends about 1/2" to 1" beyond the rectangle drawn on the muslin foundation on the top and the left side of the block.

With the muslin foundation up, carefully pin the edges of fabric from the front. (It will look similar to the photo below, but with seams sewn on it.)


7. Baste the front of the postcard to the muslin foundation. This step is the same for both the mixed media and crazy quilt versions of the postcard.

I set my sewing machine to a longer stitch setting and sew along the lines of the rectangle on the muslin. This makes it easier to remove this thread after the block has been embellished.

Your postcard is now ready to embellish!
This will be covered in the next part of this tutorial. 

If you skip ahead, keep the following tips in mind:
A. Your postcard cannot be more than 1/4-inch thick and the stabilizer will add roughly 1/8-inch to that thickness. Your beads and/or charms should be small or thin.

B. After embellishing, we will be cutting the 4" x 6" rectangle. Keep all embellishing within the rectangle you drew on the muslin. The basted seam helps you visualize that area as you work.
C. You will be sewing along the edge of the postcard when it is done. Place all beads and charms at least 1/4-inch away from the outer edges of your basted rectangle.

Links to related blog posts: