 |
| "Ocean Frolics" Under the Sea Themed Crazy Quilted Wall Quilt |
This was such a fun project to finish up! Using 3 of 6 blocks from a Crazy Quilting International Under the Sea Round Robin I participated from August of 2015 through March of 2016, I created this wall quilt. "Ocean Frolics" sounded like a fitting title!
Confession time... If I had not signed up for the UFO Challenge 2017 through allpeoplequilt.com, these blocks would still be safely tucked away. #12 was drawn as the project to work on in March, so I needed to embellish the bare block below and create a wall quilt.
When piecing my blocks, I made a mistake that could have caused some serious issues. On the back of the block Annette embellished, I marked the 6 x 6-inch square about a quarter-inch too high for the water/skyline to match with the other blocks.
Luckily, Annette left space between the seam allowance and the beads and charms she added. I was able to place that block lower and cut the blocks slightly larger than 6-inches in height.
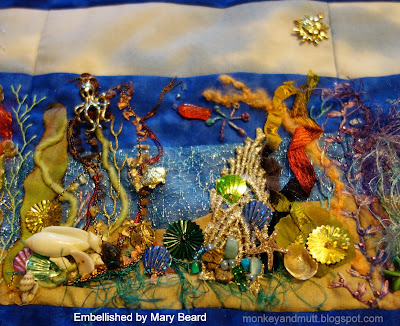
With the change in the way I cut the blocks, I had a raw edge of fabric exposed along the bottom of the block, so I added the small shell bead in the lower-left corner to Mary's block to hide it.
This piece provided me with my first opportunity to whip stitch the blocks together. I feared the beads and charms would interfere with the foot on my sewing machine. It was a fun challenge and turned out surprisingly well.
I stitched over the seams between the blocks by adding more sea vegetation.
My first attempt at printing a label on my computer by ironing the wrong side of the fabric to the waxy side of freezer paper and cutting it to 8.5" x 11" had a bit of a hiccup. The top of the fabric pulled from the paper as it printed. Because it made the print wavy on an ocean themed place and because my husband declared we were keeping this wall quilt to hang in our home, I decided to use the label anyway. I included the name and dates of the round robin and the names and locations of each of the ladies that embellished blocks within the quilt.
I cannot thank Annette and Mary enough for their beautiful work.
For April, #11 was drawn as the project to work on, so I will be assembling a wall quilt with the other 3 blocks from this round robin. I can barely wait! I am not too happy with my machine binding attempts, so I plan to hand bind the next one.
Thank you all so much for stopping by!
Renee
Related posts:
Bare blocks sent out - here
My work on Annette's block - here
My work on Mary's block - here
Blocks returned home - here
Block I embellished - here
UFO Challenge 2017 List - here


10 comments:
Congratulations on a grand finish. What a lovely wall hanging!
Wow! incredible work Renee
Beautiful finish Renee! Hope you are enjoying a lovely weekend! Christine x
What a lovely bunch of sea blocks. You are so lucky to have such gorgeous blocks, but you also worked hard on your own. Good thing you signed up for the 2017 UFO Challenge. =)
Very lovely finished project. And what's wrong with a WAVY under the sea label. Fits the bill, I'd say.
xx, Carol
No another ocean themed piece. I just LOVE it!! They look so perfect put together. What a piece!!
A beautiful and magical underwater scene. All contributors deserve high praise. I've never seen such a perfect melding of work by different embroiderers. Need I say I love it?
This is a real masterpiece, Renee, and several other quilters and stitchers had the chance to participate. Absolutely gorgeous.
This is a magnificent collaboration and your finished wall quilt is stunning. I like the Wavy printed label for Ocean Frolics. You are very clever to adapt to each little snafu and work around them. Your husband is very supportive and correct in keeping this amazing CQ Work of HeArt!!! Well Done Dear. <3
Personally I think your label printed that way on purpose - the fact that it came out wavy is perfect for an ocean themed quilt! Your quilt is so fun!! (btw - just a wee hint, that you probably already know - cut your fabric & freezer paper a bit larger than the size of your printer paper and then trim it down to size. Then press the edges once more to be sure they have a good seal before running through your printer).
Post a Comment