
So... I have a disclaimer. I do not know if the method I use is a recommended way to add a satin stitched motif to a block.
I have seen tutorials that recommend stitching the motif onto a piece of muslin or onto felt (as felt does not fray), and then carefully cutting the motif out and attaching it to the block as an applique. (Gerry at Older Rose has a great Birds on Felt Tutorial that uses this method.)
Every time I make one of these seahorses, I decide to try the applique method next time. And then I forget. Until I begin the next seahorse and see all of the tiny needle holes so close together (particularly in the tight little area inside of the neck), and begin to feel a bit panicked that I am ruining the fabric. Then, I remember I planned to try it as an applique next time. Of course, once it is done, it appears perfectly fine.
I tried searching for more information and advice on-line. All I found were multiple warnings that the satin stitch should be used to fill small motifs (about an inch in width or less) and reminders that the use of a hoop is important to keep the fabric taut enough to avoid puckering.
If you make satin-stitched or short-and-long-stitched motifs, I would love to know how you make yours! (I will not be offended if you say I am doing it wrong.)
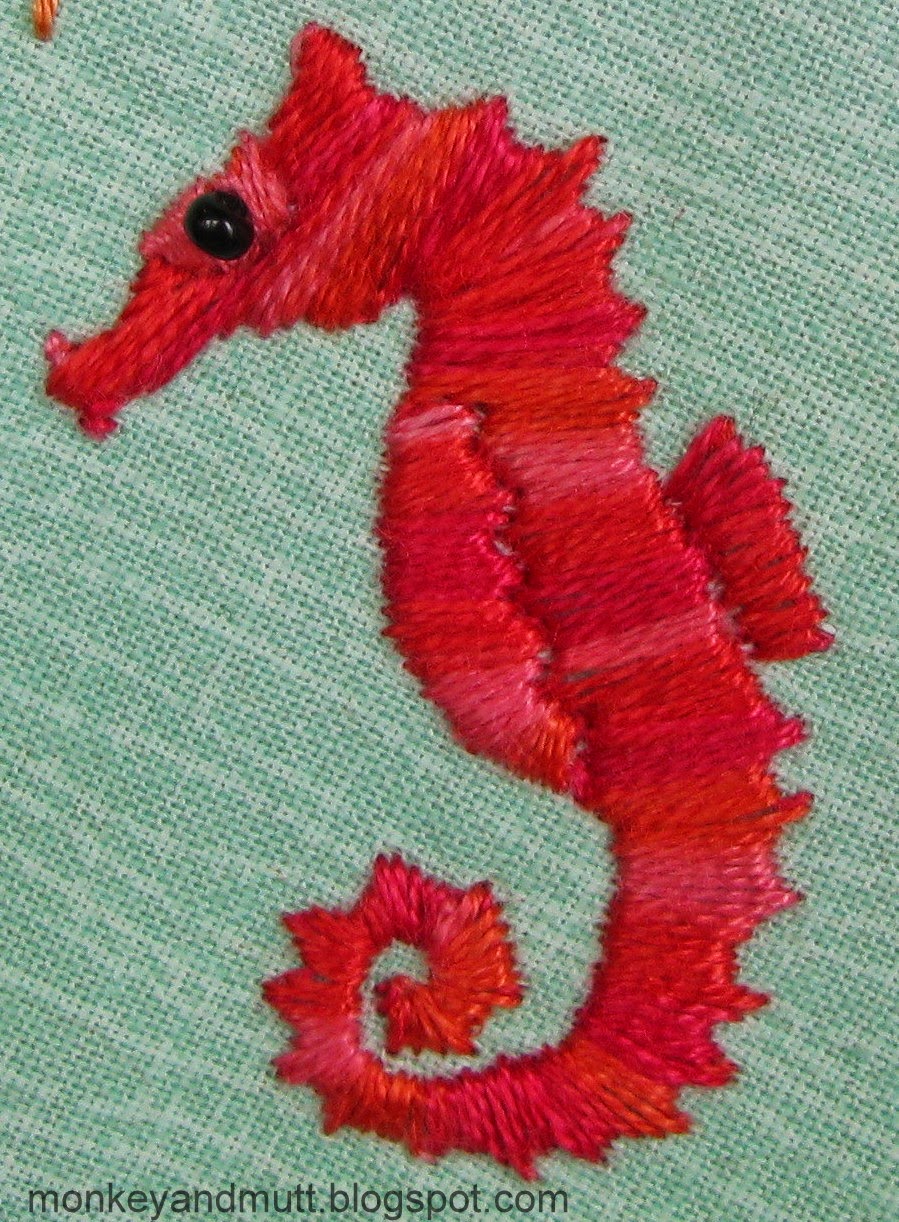
Correct or not, this is how I made my seahorse. (You may click on any picture for a larger image.)
1. Sketch the pattern.
I scanned my sketch and saved it as a PDF file, which allows me to print it at the original size, or change the percentage to print a larger or smaller image. Here is a link to the PDF for my Seahorse 2 sketch. (You should be able to follow this link to the PDF file, and then download and print it.)2. Transfer the pattern.
Some people like to mark the front of their fabric. That makes me nervous, so I reverse the image, hold it up to a window or to a light box and trace the design on the muslin backing using light pencil marks.
3. Stitch around the outline.
I made my first seahorse with a short and long stitch, so I used a single strand of floss and split stitch for the outline, as recommended in my book by Trish Burr. Out of habit, I used the split stitch again. I worked from the front of the fabric, but made sure my stitches followed the penciled pattern on the muslin back of the block. Around the inside section of the eye, along the inside of the belly, and along the back fin, you will see I have two rows of split-stitches so my satin stitches will have borders for each section.
4. Satin stitch the seahorse one section at a time.
I do not think it matters where you begin. Use a single strand of floss and the satin stitch to fill one area. I began with DMC 4200 on the belly. Each stitch began on the outside of the belly and ended between the two sets of split-stitches separating the belly and the body.
Next, I used DMC 3706 to fill in the eye area.

The body was next, using a strand of DMC 4200 again. These stitches used the second rows of split stitches around the eye and the belly, and the first row along the fin.

Still using a strand of DMC 4200, I stitched the fin last.

5. Add a black bead for to the eye.
Using a single strand of DMC 310 (black) floss, I stitched a black seed bead to the center of the eye area. (I like my beads to hold firmly in place, so I passed the floss through the bead three times and then knotted the thread three times in the back.
That is it! This little guy took me somewhere between 4 and 5 hours to complete. I am still working on improving the tail on this pattern, but I am still happy with it. I do hope Sandra likes it!
After I made my first seahorse (which feels like ages ago), a friend asked if I could trace my sketch with a Sharpie and share it as a PDF. I was not sure how. At long last, here is a PDF file of my Seahorse 1 Sketch. Pictures of this pattern outlined and completed using a short and long stitch are below.


If you like under the sea motifs, you might like to know that the Summer 2015 edition of the Crazy Quilt Quarterly magazine has a couple of amazing seahorse tutorials and an incredible octopus tutorial. (I am not affiliated with the magazine.)
This post is part of a series explaining how I embellished Sandra T.'s block in the CQI UTS Round Robin we are in together. Links to previous posts in this series are below.
Step 1: Planning the Seams
Step 2: Planning Motifs
Step 3: Embellishing the Seams
If you make an under the sea themed block using a tutorial in the magazine or using one of my seahorse sketches, I would love to see your work!
Thank you for stopping by!
Renee
18 comments:
Great seahorse! Thanks for sharing.
Your seahorses are lovely. I want to try Gerry's method, but haven't tried it yet. I'm not good enough yet to stitch like you do directly onto the block. I found a top at Goodwill that had animal appliques on it so I am cutting them off to use in the African blocks I am working on.
Thanks for continuing to share your progress.
xx, Carol
Hello Renee! Your seahorse looks fantastic so I wouldn't worry if you are doing it a correct or incorrect way.... you are doing it your way and it works!! Thank you for the tutorials.... I really love reading them all. I have my copies of the CQQ magazine now but I haven't read them through properly yet as I want to get my Farm Girl Vintage blocks caught up before I am distracted with something else! You know how it goes I am sure!! ;) Have a great weekend! :) x
Looks perfect to me!
AWESOME!!!!!! (what else can I say?)
xxx
Any way that works for you is the right way:) I love that seahorse!
Renee,
I love your seahorses...especially the way you trace the pattern on the muslin....great ideas!!!
BJ
I think your seahorse is fabulous.
Thanks for sharing your seahorse and how you made it, it's lovely!
Remember - in crazy quilting there is no right or wrong way!! Your seahorse is a handsome little fellow for sure.
This looks amazing to me. Thanks for sharing the tutorial.
When your hand stitched Seahorse is this beautiful I do not think there is any "right or wrong" method. Thank you very much for sharing your technique and your sketch. Simply Lovely. I once petted live SeaHorses at a tropical resort years ago. The "handler" picked them up and held them for me to pet. Very surreal experience. Creative Stitching Bliss...
Seahorses! I'm going to have to try one soon. Love how yours always turn out so cute :)
Thank you, Annet!
Shell, I cannot wait to see a seahorse you create! Your work always blows me away.
Thanks so much for this!! I've printed out your Sea Horse #2 sketch so now I can add a seahorse to my block.
Great tutorial and love the seahorse.
Adorable!!
Post a Comment