Remember my sketch? Here is how I penciled this section in on my plans for the block.
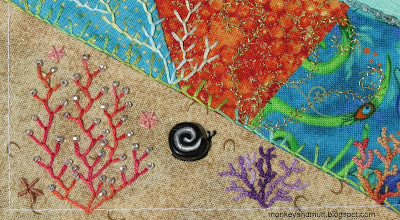
First, I added "seaweed" using a feather stitch and 3 strands of the same variegated DMC floss I used to create the seahorse.
I began with the top of the center section and worked my way down just beneath the basted seam line at the bottom of the block.
Next, I added the section to the left, followed by the section on the right. The bottom of these sections met the bottom of the center section. NOTE: Because I planned to add beads to the tops of each of the feather stitches, I kept these stitches at least one-fourth-inch away from the basted seam lines.
There was enough space between the center and right sections to work another feather stitch down and connect it to the center section.
Then, I "auditioned" beads by laying one or two on the block. The petite glass beads I love so much barely showed up, so I went with these clear seed beads. (For the record, I worried the whole time that these beads were too big. I finally decided I tend to prefer subtle, small and delicate embellishments and I was stepping out of my comfort zone.) This step took me a while because I wrapped the thread through each bead 3 times and then secured each bead in the back with 3 knots. This way, the beads stay firmly in place and do not flop around easily on the block. And, if one bead comes loose in the future, all of the beads will not fall off because they were individually attached.
After that, I added a snail. The bead used for the body was purchased at Let it Bead in Portland, Oregon. Because this bead is rather thick, I placed it roughly an inch from the basted seam line.
After securing the bead to the block, I brought a 6-strand segment of DMC 310 black floss up just behind the bottom of the snail's shell and then brought it down through the fabric where I wanted the place the snail's head.
Using a second needle and a single strand of DMC 310 black floss, I couched this segment into place as the snail's body. Then, I secured the 6-strand segment behind the block. With the single strand of floss, I added two pistil stitches to make the small antenna to the head.
Coral, created with a few strands of variegated purple floss and French knots, came next. Now, I could pencil this in on the back (or front) of the block, but I usually just wing it when I add the coral.
I began at the seam line and worked my way up with a tightly packed line of French knots. Then, I added small connecting lines of French knots, as seen here.
I continued adding lines and branches to create a shape that looked coral-like to me.
I just kept going until I felt it looked full.
When it reached the point pictured above, I felt this coral was complete.
As you can see, the sandy ocean floor still looked a bit bare. I needed to add more. I contemplated adding another feather stitched area to the right of the purple coral, but I need to complete the section just above it first.
I added a section section of coral here using the same method and using the same variegated floss used to create the fish embellishing a seam above.
Sea stars are great additions to fill in space. This one was created using 2 strands of floss (each strand was a different color to blend light and dark colors into the sea star.) I made 5 bullion knots that met in the center.
Whipped wheels also make great sea stars. Again, I used strands of 2 different shades to add lighter and darker aspects to the sea star.
This completed the plans I had sketched out for this section.
In fact, this completed the elements I had planned and sketched for this block. (Aside from the small beads I needed to add to the seam just above the sandy section.)
However, there were still several areas that could use a bit more embellishment. My next post in this series will share how I chose to fill in the block.
This post is part of a series explaining how I embellished Sandra T.'s block in the CQI UTS Round Robin we are in together. Links to previous posts in this series are below.
Step 1: Planning the Seams
Step 2: Planning Motifs
Step 3: Embellishing the Seams
Step 1: Planning the Seams
Step 2: Planning Motifs
Step 3: Embellishing the Seams
Thank you for stopping by!
Renee


4 comments:
Thank you for all the wonderful detailed information of how you embellished this block.... I am really finding it very interesting and useful. I particularly like the corals made with french knots, they look so wonderfully tactile! :) x
Thanks for your great detailed commentary on your progress! That bead for the snail is perfect. Love the corals. I like to add french knots whenever I can.
xx, Carol
What a great series Renee! You have added so many perfect little details that look very realistic to the theme.
Love it!!!!
Post a Comment