It is photo heavy post.
You may click on any picture for a larger image. And, I apologize. I tend to be verbose!
1. Trace Seams or Motifs if Needed
Before I make that first stitch, I think about any seams or motifs that need to be marked on the block to stitch them well. On this block there were two items.
A. The swirly seam. Using my sketch (and thinking hard to reverse the swirls) I lightly penciled the seam in free-hand on the back of the block.
B. The seahorse. I taped a sheet of paper with my seahorse drawn in black sharpie to a bright window. (Make sure the window is clean if it has had flowers growing near it. On a previous block, I failed to notice pollen on the window until I saw yellow smears on the fabric. It came out, but it was stressful!) Then I positioned the block over the paper so the seahorse outline showed through the block where I wanted it and at an angle I liked. As you can see in the photo below, I took care to leave plenty of room for seam treatments so they would not interfere with the seahorse.
There are several ways to transfer images onto a block. This is my preferred method. If the fabric had been too dark to see the drawing, I could have cut out the seahorse and traced it that way.
Note: I will share my seahorse pattern (if I can figure out how to add a document to a post) in a later post in this series. There are also a couple of great seahorse tutorials in the Summer 2015 edition of the Crazy Quilt Quarterly I hope to try out soon!
2. Select the First Seam
For this block, I looked at my sketch. The buttonhole seam will have the feather-stitched seam, the fly-stitched seam and the French knot coral motif overlapping it; so, I chose to embellish this seam first.
If you enlarge the picture, you will see I began and ended the seam slightly outside of the seam lines. This will ensure the full seam is embellished when the blocks are assembled. However, the seams are not far enough out to risk the threads being cut when the block is trimmed down.
The tops of the buttonholes are at least one-fourth-inch away from the seam lines because small beads will top each stitch. I will wait until the two seams and the motif that will overlap this seam are completed to add the beads so they do not hinder the stitching.
2. Select the Second Seam
Next, I chose to complete the fly-stitched swirly seam. Completing this seam would eliminate the risk of my feather-stitched seam accidentally overlapping my sketch for this embellishment.
This seam was created with a fly stitch using a single strand of DMC gold metallic floss.
I began the first stitch slightly above the top of the center curl. The tops of each "v" are slightly to the left and right of sketched line. The straight stitches follow the traced line on the back.
After the initial stitch, the "v" stitches began about halfway between the top and bottom of the straight stitch. This placement is easiest to determined from the front.
Bring the needle up at the bottom of the straight stitch from the previous fly stitch, catch the floss, and check the sketch on the back to see where to end the straight stitch. (I hope that makes sense...)
Confession: I wanted this seam to be bold and shiny like the feather stitched section Kathy S. created for Sandra.
 |
| Kathy's work on Sandra's block. |
So, I began using 4 strands of metallic floss, but could not get the strands to stay even for 2 stitches. I cut back to 3 strands. Even with a larger needle, the metallic floss frayed within 3 stitches. (The seams have more layers of fabric for the floss to pull through. I assumed that was part of the problem.) I tried 2 strands. Same problem. So... I went with 1 strand and made a very subtle embellishment. My hat is off to Kathy for creating such a lovely motif with metallic floss!
3. Select the Third Seam
The seam consisting of chain stitches and beads was next because I needed to know I would not accidentally place any fish or feather stitches in the way.
First, I created a chain-stitch using 3 strands of Waterlilies by Caron silk floss. The color is #207 Bermuda Reef. The trick here was to make the stitches large enough to add the beads later and not to pull them too tight, or leave them too loose.
Next, I added Mill Hill Petite Glass Beads #42010 at the larger end of each loop. (These may be found at most cross-stitch stores. I have also purchased mine at Amazon.) Note: I did not add a bead to the loop ending at the seam.
Select the Fourth Seam
I want the fish embellishing the upper-right seam to journey all the way across the block. So, I chose to complete the feather-stitched seam next. That way, I will know where to place the fish.
Select the Fifth Seam
Fish will decorate the final seam on this block. A couple of people have asked how to create these fish and I am happy to say they are super easy. I like to make them with variegated floss, so they are not all the same.
I used 2 strands of DMC 4120 variegated floss because it has several hues of orange and the block needs those to balance the colors.
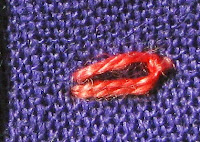
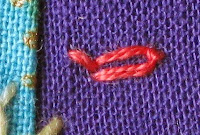
First, I made a detached chain stitch. This one is almost pulled too tight. If pulled tight, the stitch closes and creates more of a line than a loop, something you want to avoid. (To make a larger fish, I could have added a second detached chain stitch around the outside of this one.)
Next, I added a small straight stitch to the open end of the detached chain stitch.
A second straight stitch created a fish!
I could have ended there, but I opted to add a straight stitch in the center of the loop to fill in the center.
I began at the edge of the purple, above the orange, because I wanted the fish to miss the orange fabric (where they would not show up well.) I was also very careful about watching the back of the fabric to make sure my seam would not interfere with the seahorse I plan to add later.
As my husband pointed out, a "conga line of fish" is not exactly realistic. But, I think it is a fun way to dress up a UTS seam.
Sorry for the super long post! My next post in this series will cover an individual motif.
Previous Steps in this Series:
Under the Sea Block Step 1: Planning the SeamsUnder the Sea Block Step 2: Planning Motifs
Today, I am linking up with the Monday Stitchery Link Party #6 at Super Mom - No Cape. I encourage you to check it out. Today's free pattern has butterflies! If you have a blog and share photos of your hand stitching, I encourage you to join in the fun.
Thanks so much for stopping by!
Renee


11 comments:
Hello Renee! I love this series of posts showing how you design your blocks from start to finish.... thank you for sharing the details... I am learning a lot from them! Love the little fishes! :) x
Wow. This is so much fun to follow.
Thanks for sharing how you made your fish, they are so cute! I have a tip for you for the metallic thread, just stab stitch it and use short lenghts. That way it works much better. I'm looking forward to your seahorse pattern. I don't think it's possible to add a document to your post, but you can just add a photo of your drawing. That way it save's you a lot of time and we can change the size of your seahorse very easy when we use it. Thanks for all the work you put into these posts, I learn a lot from you!
Thank you Thank you for another great post in this series. LOVE those fish!!
Beautiful work!
Angela, thank you!
Annet, thank you for all of your sweet comments! You are too kind.
What fun! I love your wee little fishes - someday I'm going to do another under the sea project and will definitely borrow your pattern!
This is so cute! I love it and will look forward to seeing more blocks. It sounds like just a fantastic project
Thanks for sharing your process. Love the little fish conga line.
I'm so glad that you are doing this series. I had gotten stuck on the underwater scene I was working on so I've gone back and read through how you approach yours and I see maybe I need to sit down and do some planning instead of just winging it.
And thanks for linking up and also for encouraging others to come visit. Aloha hugs!
Post a Comment