Showing posts with label Sewing. Show all posts

Tuesday, December 31, 2019

2019 in Review


I wish you all a very happy and healthy new year!

Can you believe the last day of 2019 has already arrived and a new decade will begin in the morning?! 

To all of you that work full-time, care for loved ones and still manage to find time for crafts and blogging, way to go! (I am still struggling to find that balance...)

I am afraid my blogging has been very sporadic this year. I have a few plans to hopefully change that in 2020. We shall see how they work out.

Thanks to a Christmas gift exchange, I finally have a few finishes to share from this year. These zipper coin pouches and tissue case covers were created for my co-workers - a couple of ladies I am very lucky to spend time with each week.


My goals for 2019 (shared in this post) were:

  • Eat more vegetables. - Done! My husband and I completed the Whole 30 Challenge, which helped a lot with this goal. (I ate a mint without thinking about the sugar, so I didn't technically finish the challenge, but my husband did!)
  • Drink more water. - I did well with this for a while, but need to increase my water intake again.
  • Get back into a running routine. - I did this for several months. My son and I even ran in a Color Run this fall. (He let me share the photo above.) Circumstances out of my control required a running break, but I am eager to get back to it!
  • Finish up some unfinished projects. - Some progress was made on 2 projects from my UFO list, but there were no finishes. My cross-stitch projects received the majority of attention.


Thanks to joining the Stitch Along (SAL) hosted by Avis at Sewing Beside the Sea, I managed a fair amount of progress on my Heaven and Earth Designs Storykeep Effects of Caffeine (artwork by Randal Spangler.)
January 1, 2019 - 18.55% complete with 4,390 stitches. 

0 of 4 pages finished.

December 31, 2019 - 75.44% complete with 17,850 stitches.

2 of 4 pages finished.

13,460 stitches were added this year. 

If I meet my goal of 650 stitches every 3 weeks, this should be finished by July 12, 2020.


I joined a Stitch Around the World Challenge through the Facebook Stitchtalk HAED Challenges group. The goal was to add 53,855 stitches to one Heaven and Earth Designs cross-stitch chart. My personal goal was to accomplish half that amount on Twilight Duel (artwork by Ruth Thompson.) In reality, I completed just over 20% of the journey and I am thrilled with that progress. 

January 1, 2019 - 38.90% complete with 57,412 stitches.

7 of 24 pages finished.
December 31, 2019 - 46.45% complete with 68,567 stitches.

11,155 stitches were added this year. 

10 of 24 pages finished.


Next year, I hope to have more updates of my Charting Creations Fractal White Tiger to share on the Stitchy Start blog.

January 1, 2019 - 17.15% complete with 29,900 stitches.

4 of 30 pages finished.

December 31, 2019 - 20.58% complete with 35,868 stitches.

5,968 stitches added in 2019.

4 of 30 pages finished.

Next year, I hope to share more photos on Instagram. In 2019, these were the top 9 of the 45 photos shared. (I used the free tool at bestnine(dot)net to find my top 9.)


Happy New Year!
Renee


Saturday, July 29, 2017

CQJP 2013 January Block Zipper Pouch Completed


This zipper pouch was created with my very first Crazy Quilt Journal Project (CQJP) block in January of 2013. 


I have added credits on the photo as well, but would like to point out that I used waste canvas to stitch one of the houses from a cross stitch chart called, "Cozy Winter Twilight" that is in the Stoney Creek Country Living Collection booklet. And the birch tree and snowflake flowers in front of the mailbox were some of my first attempts using tutorials in Diana Lampe's book, Embroidery for all Seasons

This is the back of the pouch.


For the lining, I used a snowy print found in my fabric stash.


My attempts to capture the lining in a photo with my camera blurred around the edges. I thought the affect was kind of fun, but used the camera on my phone for the clearer view in the photo above.


This block was #1 on my UFO Challenge list for 2017. This was the project selected for July.

Thanks to the motivation this challenge provides, I have completed 4 UFOs (unfinished objects) this year and made progress on 3 others.

(If you click on this image for a larger view the text will clear. I am not sure why the Picasa program's text seems to blur when photos are added to my blog.)

A photo of this pouch may be found on my Instagram account, on this Pinterest board, and on my Hand Stitched Treasure Facebook page.

This zipper pouch is also part of my 1 X-mas Item a Month goals. You may see what others are making here.


Notes:

The Crazy Quilt Journal Project (CQJP) is a personal challenge to complete one crazy quilt block each month. Sign ups generally open in November and close in December the year before the challenge. You may see more of the work others completed during CQJP 2013 here. If you might be interested in participating in 2018, watch for the sign up information on this year's CQJP 2017 blog here

You may find more information about the 2017 UFO Challenge here at allpeoplequilt.com. 

Tutorials I found helpful in making this bag include the Missouri Star Quilt Company Zipper Pouch Tutorial on YouTube, found here, and part of this tutorial at Emmaline Bags.

I am not affiliated with any of these sites, links were added for your convenience.

Related posts:

CQJP 2013 January block complete - here

My 2017 UFO Challenge List - here

January UFO Challenge #6: CQJP 2014 Wristlet - here.

March UFO Challenge #12: CQI UTS RR Blocks Set 1 - here

April UFO Challenge #11: CQI UTS RR Blocks Set 2 - here


Thank you for stopping by!
-Renee


Friday, February 10, 2017

Fabric Postcard Tutorial


On Wednesday, I shared how I created this panel of "snail mail" prints

A few of these became fabric postcards, like the one pictured above.

I have made a few fabric postcards in the past, and the method seems to change a little bit each time. This post will share how I made the fabric postcard pictured above.

A few disclaimers before I begin:

1) For your convenience I have shared a few links to Amazon to better show the products I used. Please note: if you visit Amazon through my blog and make a purchase, I do earn a small credit. 

2) I have blended information from two fabric postcard tutorials to make my own. Both have some great information. Patchwork Posse has lots of tips and gorgeous examples of fabric postcards in this tutorial. And, I love using the finishing tips shared on this tutorial at Quilted Delights to zigzag stitch around the card.

3) Even with the changes I have made to finish the edges, the card stock is raw along the edge of the zigzag. Next time, I may try finishing the edges following this tutorial at Needled Mom.

4) I am not an expert! I am self-taught through on-line tutorials and trial and error. I am still learning. :)


Items You will need:

1. Decorated fabric for the front of the post card. (I used a colored piece pictured above. In this tutorial, I shared how to piece a crazy quilted front for your postcard.)
2. Rotary Cutter, Ruler & Mat
3. Sewing Machine - helpful, but you could sew by hand.
4. Card Stock 
5. Paper Trimmer (I have this one by Fiskars, but found less expensive options here.) or scissors and ruler.
6. Pellon Peltex 72F Two Sided Fusible Ultra Firm Stabilizer (Note: The Peltex is 20" wide, so a 6" strip would yield enough for 4 or 5 postcards. 1/3-yard should provide enough for up to 10 postcards. I purchased 2 yards at Jo-Ann Fabric with a 50% off coupon.)
7. Iron/Ironing Board
8. Pen(s) to write the address and message. (If using a fabric back, these should be permanent and fabric safe.)

How to assemble a 4- x 6-inch Postcard:

1. Iron and then cut the front fabric (fully embellished) to measure 4 1/2" x 6 1/2". Leave an extra 1/4" on each side.

2. Create the back of the postcard. 
Note: Using a card stock back will dull the needle on your sewing machine quickly.
a. I created a document in MicroSoft Word. (This is optional. If you want to hand draw the lines on the back, skip to "d" below.)
b. Cut a sheet of card stock to measure 8 1/2" x 11" using a paper trimmer or mark with a ruler and cut with scissors.
c. Put the card stock in your printer and print the postcard document.
d. Cut card stock to 4" x 6" using a paper trimmer or mark with a ruler and cut with scissors.
e. If you are worried about messing up when you write your message on your postcard you can write it at this point. Remember to leave about half an inch at the bottom for postal stickers and 1/4" around the edges where the card stock will be sewn.

3. Cut Peltex to 4" x 6".
4. "Sandwich" the layers. 
a. Place the front fabric face down.
b. Center Peltex on the wrong side of the front fabric.
c. Center the card stock face up on top of the Peltex.

5. Before ironing, carefully pick up the "sandwich" and gently push the edges of the front fabric against the Peltex to make sure it is centered as desired.

6. Fuse the layers according to the Peltex directions. I used the highest setting with no steam for 5 seconds on the back side and then carefully flipped it over and ironed the front fabric to the Peltex (taking care with embellishments like beads.)
Tip: If you wrote on the cardstock, you may wish to put a piece of fabric over the ink to protect your iron and ironing board.

7. Place the "sandwich" front-side-down on your cutting mat. Using a rotary cutter and ruler, trim front fabric to 4" x 6".
8. Trim any loose threads from the edges.
9. Finish the edges of the postcard. 
Hoping the card stock would look better around the edges, I tried something new this time.
a. Using a zigzag stitch, I set the width at 3.5 and the length to 0.3. I like to begin along the bottom edge of the postcard.
b. On the corners, I move slowly. Lifting the foot (with the needle in the postcard), I pivot the card slightly, take another stitch, and repeat this process a few times. When I get to the next side, I take a couple of stitches forward and then zigzag in reverse to the corner to better cover that section and then continue forward to the next corner. 
c. When I get near my starting point, I stop to clip the loose threads on the top and bottom of the postcard from my beginning stitch. (See the threads in the photo above? I do not like them to tangle up in the zigzag stitches.)
d. Following advice from the Quilted Delights Tutorial, without breaking the thread, I lift the needle and change to a straight stitch. Lift the zigzag foot and very carefully, slide the postcard so the inside edge of zigzag is lined up with the needle. Lower the foot and stitch around the postcard, then knot the thread.
e. Clip loose threads.
(The edges of the paper are still a bit raw from the zigzag stitching. Using a fabric back, this was not an issue. However, with a fabric back, the fabric needs to be prewashed and you need to use a permanent pen that will not run when wet. I use a Pigma Micron pen and heat set it with an iron on a dry cotton setting.)


10. Write your message on your postcard. The address should be on the right side and your message on the left. (I divided the center with little glitter-ink hearts.) If you plan to mail it without an envelope, leave the bottom 1/2" blank. Writing there would be covered by the sticker from the post office. (Personally, I have been having fun with some of the glitter pens in this 100-pack of gel pens I purchased on Cyber Monday with an Amazon birthday gift card I had not used.)

11. Your postcard is ready to mail! 

Please note, fabric postcards cost extra to mail. Currently, the surcharge for the US Post Office (USPS) to hand cancel them (as they cannot go through the machine) is $0.21. I purchased a package of 100 A6/A2 plastic envelopes like these to mail my postcards in. With the plastic envelope, these require a letter stamp (instead of a postcard stamp) and a surcharge stamp. (Within the US, that is $0.49 + $0.21= $0.70 at this time.) My post office told me I can put these in the outgoing mailbox (with the proper postage) and they will be sorted to be hand cancelled at the post office.

With February being InCoWriMo (International Correspondence Writing Month), I am having fun with the "snail mail" theme. I have been sharing my outgoing InCoWriMo mail on Instagram - where I also enjoy seeing what everyone else has shared with the InCoWriMo hashtag.

Within the next couple of days, I plan to add a page to my blog that will include a PDF of a postcard back and of the little mailbox drawing in case anyone is interested in using them. (If you do, I'd love to see and feature what you create!)

Tomorrow, I will share some happy mail that brightened my week and I hope to have another tutorial from the "snail mail" panel I colored and embroidered soon.

Thank you for stopping by!
Renee



Wednesday, December 28, 2016

1 Christmas Item a Month - December 2016


Wow! I do not know about all of you, but Christmas felt like it whipped right by. I do hope you all had a wonderful Christmas or a happy holiday season!

Last Friday, a relative went into the hospital for the 2nd time in two months. (They are home again now and doing well.) It was only two days after another relative had surgery (which went really well) and I found myself with too much nervous energy to get to sleep Friday night. So, instead of going to bed at 9:30 p.m., I started making these two little zipper pouches. :)


I thought they would be a fun way to gift a couple of gift cards we had purchased. 

Thanks to this tutorial by the Missouri Star Quilt Company on YouTube and this tutorial on making a wristlet, these were easy and fun to create. (I am not affiliated with either website, but found the information helpful.)


Both gifts were well received. Another last minute gift was one I made back in January. I intended to sell it in my Etsy shop when I made it... (Have you noticed a pattern there? 2017 is a new year, right?! I really will stock the Etsy shop...) 

I embroidered a snowman on the bottom of the tissue-pack. It was made with upcycled denim.


Once again, I want to thank Narelle for hosting the 1 X-mas Item a Month blog. Without that extra push of motivation each month, I would not have had as many handmade gifts to share this year. 

I do plan to participate again next year, if the workshop is open in 2017!

A dear friend of mine from Little Orphan Stitch let me know about another challenge that I have decided to participate with in 2017. If you have 12 or more UFOs, you may be interested! (UFO = UnFinished Object.)

I decided to participate in the 2017 UFO Challenge at allpeoplequilt.com. You may find the full details here. Projects do not have to be quilts. They may include embroidery, knitting, crochet, scrapbooking, and painting. Participants are to post photos of finishes with the hashtag #APQResolution on Facebook, Instagram and Twitter.

I told my husband I was making another commitment next year and I could almost hear him groan. (Every now and then he'll tease me by asking, "How many projects do you have going now?!") When I told him I joined a challenge to complete 12 unfinished projects in 2017, I think it left him a little bit stunned. (I am giggling as I type this. He is incredibly supportive!)

Today is also the last day to register for the Crazy Quilt Journal Project 2017

Tomorrow, I hope to share my list of 12 projects for the 2017 UFO Challenge. 

Friday, I will share my update on the Fractal White Tiger.

Saturday, I will share a review of my 2016 goals and progress.

Wow! 2017 is really close. I wish you all a fantastic week.  Thank you for stopping by!

Renee
.

Wednesday, December 14, 2016

Pink Spider Coin Purse

Embroidered spider web with pink beaded spider.

While looking through some photos this morning, I realized I forgot to share this project on my blog! Well... sort of.

The photo above was shared in this post, back in September of 2015, after the embroidery was completed. The spider and web were sewn onto denim recycled from an old pair of blue jeans.

I planned to create a coin purse (and 9 other projects) to finally stock my poor empty Etsy shop. (Did I mention I have a hard time with the idea of selling what I make?)

Coin purse with embroidered heart and pink beaded spider.

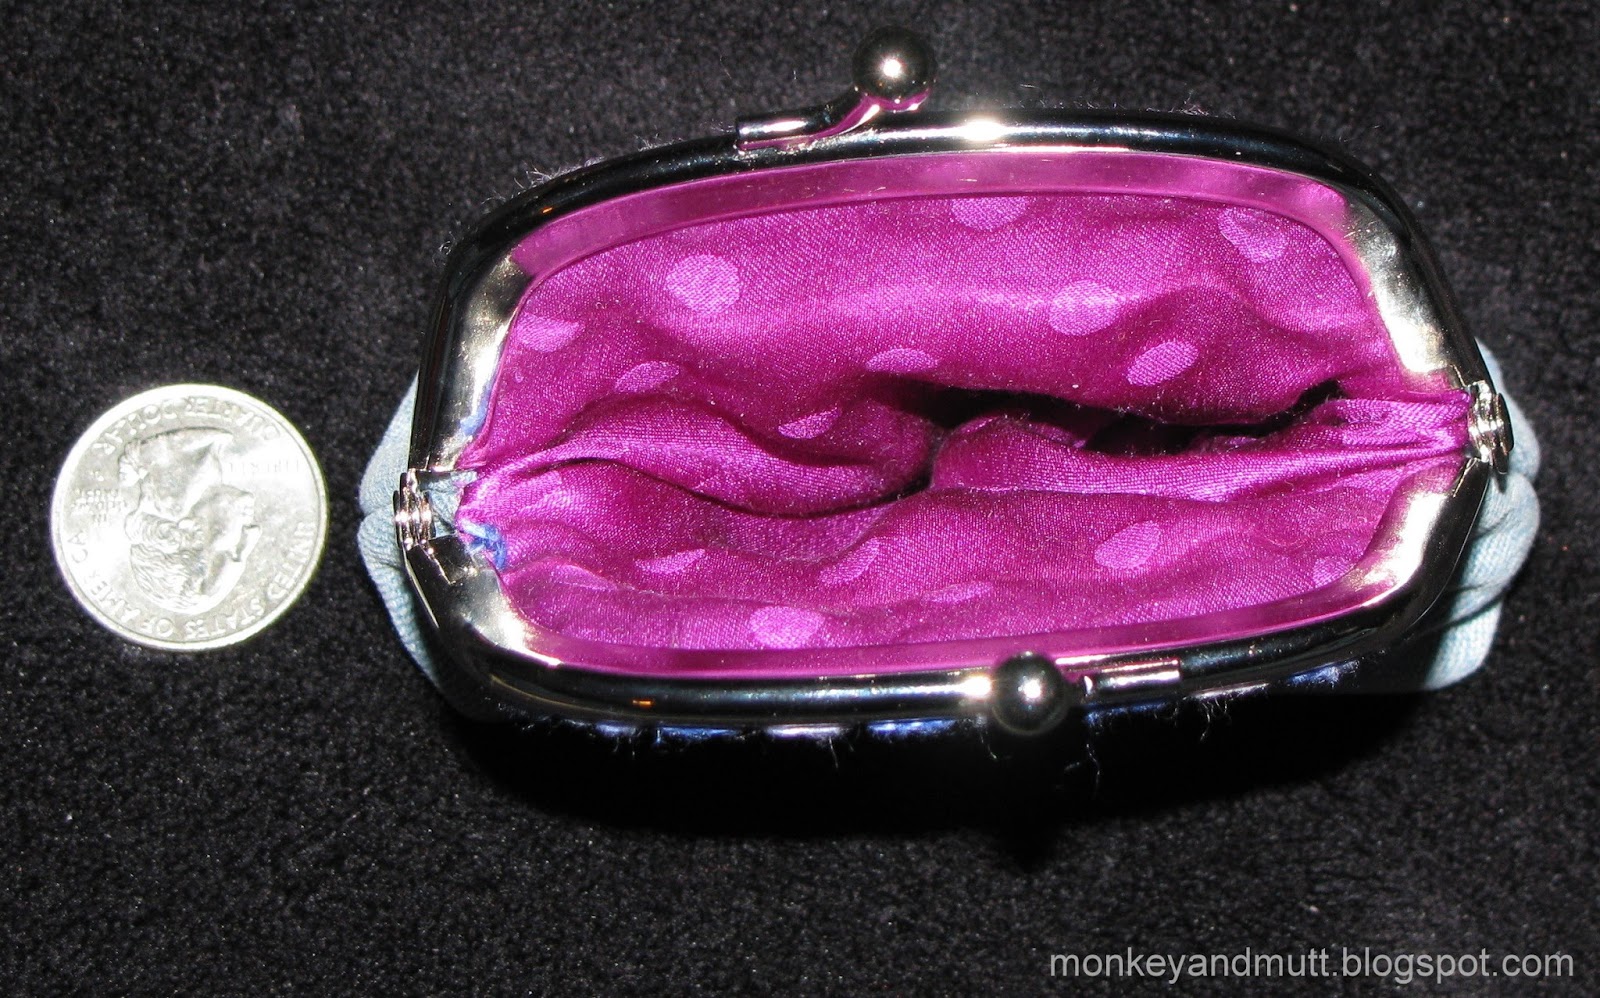
In January, I completed this and one other project (that will be shared soon - it will also be a gift.) I used the same variegated pearl cotton used to embroider the heart to sew the fabric onto the purse frame. The coin purse was created following this tutorial at Sweet Bee Buzzings.


For the inside lining, I used 100% silk in a purple polka dot print upcycled from the lining of a dress found at a thrift store.

While visiting us this year, a 12-year-old Dutch relative was sadly disappointed when her zipper-pouch coin purse broke. I was not sure if she would like this as a replacement or not, but I offered it to her. Her sweet reaction and the way she lovingly admired the spider and its web truly warmed my heart.

Thank you so much for stopping by! If you have any time for crafts right now, I would love to know what you are working on  - assuming it is not secret stuff. It is that secretive time of year!

-Renee

Monday, October 19, 2015

CQJP 2014 October Purse Completed!

Some of you may remember the We Support You Blog Hop I participated in way back in January.

For that blog hop, I made a quilt, a change purse and attempted to make a sew-in-frame purse for a dear person in our life that was battling cancer.

The purse I tried to make was my first attempt at making a pattern for a beautiful heart clasp frame I purchased from crazyquiltingsupplies.com

I accidentally sewed the top together with a 3/8-inch seam instead of a 1/4-inch seam, making the purse too small to fit the frame.

Front
Fear of failure kept this project on the shelf until this weekend. I dreaded it still may not fit the frame - even after a date with my seam ripper. Luckily, it did fit! 

Back


This was a learning experience though. Next time, I would angle the bottom out more. Boxing the bottom brought it in further than I hoped, so the frame appears to stick out a bit at the hinges. I do hope the recipient likes it anyway!

I just love Riley Blake Designs Think Pink fabric line.

Here, you can see a tiny bit of the pocket I added inside the purse. The stitches holding the frame in place are mostly hidden. I am trying to perfect that skill.

I found a silver chain and clasps to attach it to the purse in the jewelry section at Jo-Ann Fabric. 

This was my October block for the Crazy Quilt Journal Project (CQJP) 2014. My goal with CQJP 2014 was to make 12 purses using the blocks for each month of the challenge. One more is now complete and marked off of my mental To Do List!

I believe the sign ups for CQJP 2016 will begin in November. The challenge is to complete one crazy quilt block a month (the block must be a minimum 8-inch square size this year.) The idea is to assemble them into a quilt at the end of the year to "promote the art of crazy quilting".  I plan to finally finish up my CQJP 2014 projects so I feel comfortable participating in CQJP 2016.  If you want to see some more eye candy being created this year, take a look through the CQJP 2015 blog.

Today, I am joining the Monday Stitchery Link Party at Super Mom - No Cape! I do hope you will pop over to see the free embroidery pattern and to see the lovely work others have shared this week. If you have done any hand embroidery and have a blog, feel free to link up and join the fun!

Thank you for stopping by!
Renee

Wednesday, April 15, 2015

Have a Latte Blog Hop Day 4 - My Day to Present


When Madame Samm at Sew We Quilt announced the Have a Latte Blog Hop, I simply had to sign up! And, I do not know about the rest of you, but I always find myself in awe of Joan's work at Moose Stash Quilting, so finding out she would be our cheerleader was an added bonus.


Have a Latte Fabric designed by Dan DiPaolo for Clothworks
I fell in love with this gorgeous line of fabrics designed by Dan DiPaolo for Clothworks. I purchased the 6 prints pictured above, but only used 2 for this blog hop. However, I do have plans for the others! 


Have a Latte Grab Bag
I have seen a few Japanese Grab Bags showcased on blogs recently. They intrigued me, as they are unlike any other purse I have used. So, I searched Pinterest and discovered this free pattern from Better Homes and Gardens. It was designed by Bonnie Kozowski. (The handle directions were a little confusing for a novice like me, but in the end I figured it out!)


Have a Latte Glasses Case
This matching eye glasses case was created using this Easy Sunglasses Case Pattern at Crazy Little Projects. I found this on Pinterest, too. It was such a quick and easy project! It is also roomy enough for a much larger pair of glasses.

The quotes on this fabric make me smile. :)


Have a Latte Tissue-Pack Cover Front
Have a Latte Tissue-Pack Cover Back
My third project was this tissue-pack cover. I have wanted to make one for a while now, and what better excuse than to make it a matching accessory to a new bag?! When I found a link on Pinterest to the free pattern and realized it was also a Better Homes and Gardens pattern. It felt destined to be. (I do confess, I wish BHG would do away with the pop-ups. Once you get past them, the patterns are great!)


Have a Latte Set - Grab Bag, Tissue-Pack Cover, and Eyeglasses Case
I just love the aroma of fresh brewed coffee. (To be honest, I love the smell more than the flavor.) In my home, we tend to drink Yuban Dark Roast ground coffee. 


Tissue-Pack Cover and Eye Glasses Case in the Grab Bag
However, I believe my favorite coffee is roasted by Caravan Coffee in Newberg, Oregon. If you are ever in the area on a Friday morning, you may be lucky enough to visit one of their Public Coffee Cuppings. Their blog's News and Upcoming Events tab will let you know if one is being offered. I found the coffee cupping I attended at Caravan Coffee to be incredibly informative and rather fun. It was my first experience comparing unroasted coffee beans to roasted coffee beans; not to mention intentionally tasting black coffee. It also made me want to try roasting our own coffee beans. Some day... 


Have a Latte Set - Grab Bag, Tissue-Pack Cover, and Glasses Case
I know some of you are purists and love your coffee black. I need my flavored creamer. Now that I cannot have any dairy, I am incredibly thankful for So Delicious French Vanilla Coconut Milk Creamer and Silk Vanilla Almond Creamer. In fact, on the rare occasions my hubby and I go out of town, I make sure I take the coffee cup pictured above (a gift from my youngest son) with me. If we go out for breakfast, I pour some of my dairy-free coffee creamer into the cup so I can enjoy a cup of coffee with some fresh fruit and a side of bacon while my hubby enjoys a more traditional breakfast. (Gluten-free, dairy-free, egg-free breakfasts out can be tricky, but I try to make it work!) Now, I will have a bag and accessories to match my cup!

Special thanks to Clothworks and Dan DiPaolo for this fantastic line of fabric, to Madame Samm for organizing this blog hop, and to Joan at Moose Stash Quilting for cheering us along!

I hope you will pour yourself another cup of coffee and visit the other presenters today.


 April 16
Living my Dream - you are here

If you leave a comment, I am curious... 
How do you take your coffee?
Have you ever used a grab bag? If so, how did you like it?