Showing posts with label Crazy Quilt Quarterly Magazine. Show all posts

Monday, February 4, 2019

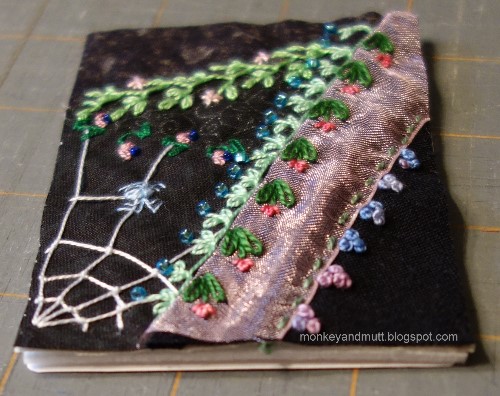
Simple Heart Block


The Spring 2019 edition of the Crazy Quilt Quarterly Magazine is now available through MagCloud here.

The block in the photo above is featured on pages 14-15. The article shares how the block was pieced and how each section was embellished, using 8 basic embroidery stitches. 


The cover of the magazine features the gorgeous work of Margreet De Reus. (Note: This photo was borrowed from Pamela Kellogg's blog, Kitty and Me Designs.)

I must admit, it is a bit unreal to see my work in print with so many talented crazy quilting artists. There are a few tutorials in the magazine that I hope to try out and share soon.

If you crazy quilt at all, I encourage you to contact Pamela Kellogg about submitting photos of your work. My goal is to work on a Fall/Halloween piece to submit before May 1st for the Fall edition.

Thank you for visiting!
Renee

Saturday, May 12, 2018

Artist Trading Cards (ATCs) Sent and Received


Crazy Quilt Quarterly Magazine hosted a 2018 ATC Swap. 
(An ATC is an Artist Trading Card.) 

For shipping reasons, the swap was only open to residents of the United States. Entries needed to be received by January 31st. 


I created 3 ATCs for the swap.
My ATC tutorial shared step-by-step instructions for creating "The Blue Spider" (pictured above.)


"I Love Good Coffee" was a fun way to use several scraps of fabric in my stash from the Clothworks "Have a Latte" fabric line designed by Dan DiPaolo.


And I was delighted to hear that "Spring Tree" was received by my blogging friend at Createology

The ATCs I received from the swap arrived in the colorful envelopes shared at the beginning of this post.
Here they are, shared in the order in which I opened them.


"Bonjour"
This beauty was created by Paula Brown.
I was surprised to learn it was her first miniature crazy quilt piece.
It is absolutely lovely! 


"Spring"
This beautiful ATC was created by Lisa Buckley.
Fun Fact: I have another beautiful piece of work Lisa created from the very first fabric postcard swap I participated in through the Yahoo CQ for Newbies Group. 
Receiving her work in my first ATC Swap made me grin.


"A Spring Garden"
This lovely ATC was created by Alice McClelland. The stitching is beautiful and I love the crystal butterflies.

Six of the ATCs submitted for the swap were selected as winners and the creators of those ATCs received an additional ATC created by a member of the Crazy Quilt Quarterly Magazine's staff.

One of the ATCs I received was selected as a winner.
However, I will not share which one and spoil the surprise for those of you that have yet to see the Summer 2018 Crazy Quilt Quarterly Magazine.

I am not affiliated with the magazine.
It is available digitally or in print at Magcloud.com.
It is also available in print at Kittyandme at Etsy.

If you crazy quilt, submissions for the Winter 2018 Crazy Quilt Quarterly Magazine are accepted through August 1, 2018.
You may find more details here, at Kitty and Me Designs.

If you would like to make a crazy quilted artist trading card, the 3 part tutorial I shared begins here.

Thank you so much for visiting!
Renee


Wednesday, May 9, 2018

2018 ATC Swap Published!


The Summer 2018 edition of the Crazy Quilt Quarterly Magazine is now available through Magcloud in digital or print formats, or in print only at Kittyandme on Etsy. (Note: the photo above is from Pamela Kellogg's blog, Kitty and Me Designs.)

The cover photo features work by Shirlee Fassell. Her work is featured in this issue of the magazine. She also shared a photo of the full quilt on her blog, Needle and Hook

Please note, I am not affiliated with the magazine. 

Just a few of the wonderful treats in this edition include:
* Photos of all of the Artist Trading Cards (ATCs) that were created for the Crazy Quilt Quarterly Magazine 2018 ATC Swap!

* How to make a Butterfly Dreams Crazy Quilt like the one Mary Anne Richardson created. (It is exquisite, as you may see here.)

* Close up photos of Carol Kramer's Rainbow Quilt. (I feel quite lucky to have a crazy quilted postcard Carol made. You may see it here. Her work is lovely!)


Tomorrow, I will share photos of the 3 Artist Trading Cards I created for the swap and of the 3 beauties I recieved. 

Thank you for stopping by!
Renee


Related blog posts:
Crazy Quilt ATC Tutorial
Part 1 - Piecing 
Part 2 - Embellishing
Part 3 - Finishing


Friday, October 13, 2017

2017 CQI Halloween/Autumn Fabric Postcard Swap

As mentioned in my last post, Wilma organized a Halloween/Autumn Fabric Postcard Swap for the Crazy Quilting International Facebook members. October 5th was the deadline to sign up and postcards need to be mailed before October 14th. 

I signed up to swap an Autumn themed postcard and this one went into the mail today. I do hope the recipient likes it!

If you have followed my blog long, you may recall that I used waste canvas to cross-stitch a pumpkin Pamela Kellogg designed and shared in the Autumn 2015 Crazy Quilt Quarterly Magazine. I am afraid my stitches using waste canvas are not as neat as I would like them to be, but the pattern is darling! (My post from last year may be found here.)

I do love autumn! I love the large harvest moons, pumpkins, colorful leaves, pumpkins, crisp fall air, pumpkins... 

 For the back, I printed this template onto cardstock. 

I was thrilled to find a white, yellow, and orange variegated rayon thread in my stash to finish the edges with.

If you are interested in making a crazy quilted fabric postcard, you may find a tutorial on the Crazy Quilting International blog, here. If you use cardstock instead of a fabric backing, remember that the zigzag stitches do perforate the edges of the cardstock. 

For this card, I set my machine to sew a zigzag stitch with 3.5 wide and 0.3 long stitches and went around the edges once. Without breaking the thread, I switched the setting to straight stitches and went around the edge of the zigzag stitch once before knotting the thread and trimming the thread. (The finishing method was inspired by this tutorial at Quilted Delights.)

These postcards need to be hand cancelled at the post office. In the USA, this requires an additional stamp (that costs $0.21 at the time of this post.) I send my postcards in a clear plastic envelope approved by USPS that I found and purchased through Amazon. With the envelope, I have to pay for a regular postage stamp instead of a postcard stamp. Some post offices will hand cancel the the fabric postcard and then allow you to put it into the clear envelope to post it. The 2 post offices I have been to will only hand cancel directly on the postcard if it is mailed as is - without the plastic envelope. 

Thank you for stopping by!
Renee


Sunday, September 17, 2017

Crazy Quilt ATC Tutorial Part 3 - Finishing


The Crazy Quilt Quarterly Magazine is hosting an Artist's Trading Card (ATC) Swap - crazy quilt style. You may read more details about the swap at Kitty and Me Designs, here.


On Friday, I shared a tutorial explaining how to piece a crazy quilted ATC. That post is here.

Yesterday, I shared how to embellish a crazy quilted ATC. That post is here.

The final step is finishing the artist's trading card.

If you make more than one ATC, I recommend that you embellish them all and then finish them all at the same time. Also, keep in mind that sewing through cardstock will dull your needle more quickly than sewing through fabric does.

Materials used in this step of the tutorial:
Pieced and Embellished ATC block
Peltex or Timtex (I used Pellon 72F Double Fusible Peltex II)
Cardstock printout downloaded from Kitty and Me Designs (printed in Part 1 of this tutorial.)
Cutting mat, rotary cutter, and ruler
Seam ripper
Scissors
Sewing machine with needle for sewing heavy fabrics
Thread

Click any photo for a larger image.


1. I cut this ATC block off of the strip of muslin the other ATC blocks were on (as seen in the photo above.)

2. Using a seam ripper, I removed the seam basted around the outline of the block. 

Tip: Use care not to cut your embroidery stitches.


3. I cut the backing card off of the cardstock. (This and the envelope were printed in Part 1 of the tutorial.) Then, I filled in the information. 

Please read through the full tutorial before you cut this card out.


4. I cut out the cardstock envelope.

5. My scissors do not have a sharp point, so I pierced the slit line with my seam ripper.


6. Then, I slipped my scissors through that hole and cut along the line.


7. I used Double Fusible Peltex II. It is about 20-inches wide. If you cut a 3 1/2" strip, you may cut up to 8 ATCs from that strip. 


I cut 3 rectangles measuring 2 1/2" x 3 1/2". (1 is for this tutorial. The other 2 are for the other ATC blocks I pieced.)


8. Cut your embellished block to 3" x 4" (adding an extra 1/4" to each side), as I SHOULD have done. This will save heartache if the block shifts while fusing to the Peltex.

Tip: When cutting your block, be sure you do not cut any of the knots or embroidery on the back. (I shared this photo of the back of my block so you can see the ends of my threads are close to the edge, but I did not cut through them.)


 9. Sandwich your cardstock backing, stabilizer (Peltex or Timtex), and embellished block. 

Tip 1: Be sure the top/bottom of the cardstock printout is oriented in the position you want it. (My spider hangs down, making a "top" to this block. So, I oriented the cardstock top so the "2018 ATC Swap..." wording was along that same edge on the back.)

Tip 2: If your embellished block is cut slightly larger, be sure the Peltex or Timtex covers all of your embroidery. You do not want to cut through the embroidery threads when you trim your block.

10. Following the instructions on your stabilizer, fuse the "sandwich" together. I put my "sandwich" on the ironing board with the cardstock on the bottom and the embellished block on top. To avoid damaging the ribbon, I put a clean wash cloth over the block and then pressed the piece with my iron (on the highest dry setting) for 5 seconds. I turned the piece over and covered the cardstock with the wash cloth and pressed it for 5 seconds.

11. Once fused, place your ATC on your cutting mat with the cardstock side up. Trim the excess fabric from your embellished block. Clip any threads that may be sticking out.

12. Finishing the edges.

Looking at the back, I realized I was going to have a bit of a problem with my finishing method. My zig zag stitch was going to cover part of the text at the top of this card. 

For the next card, I plan to cut a little above the top line, and a bit farther to the left. I also plan to wait to write in my email address until after the edges are finished.

 There are several ways the edges may be finished.

A. Some people hand embroider a buttonhole stitch around the entire piece. 

B. Others bind the ATC as they would bind a quilt. (If you use this method be sure the edges do not exceed 1/4" in thickness.) 

C. In this fabric postcard tutorial at Needled Mom, fabric is attached to the edges with fusible web and then sewn in place.

D. Lace is sometimes folded around the edge and sewn in place.


E. You may glue the card to the back. (Updated May 12, 2018 to add that I used a fabric backing on 2 of my ATCs and finished the edges with a zigzag stitch. Then I used Fabric Fuse Quick Bond Fabric Adhesive to glue the cardstock to the back of the ATCs. It worked really well. My friend, Cris Ruckman, found that Aleene's Original Tacky Glue worked well, too.)

F. Annet at Fat Quarter has this great tutorial showing how to couch yarn around the edges of your ATC. 

G. Zig Zag stitch around the edges. This is the method I used. Inspired by the final steps in this fabric postcard tutorial at Quilted Delights. I altered mine slightly. I only zig zag stitched around the card 1 time (not twice) with my stitching width set at 3.5 and the length at 0.3. Leah did a great job explaining the process step-by-step.


The zig zag stitches cut off a bit of the text. I used a black pen to touch it up slightly. I love this print that the CQ Quarterly staff put together.


The beads were far enough from the edges that the block fed through my sewing machine easily.

As you can see, the finished ATC fits perfectly within the fold lines of the cute envelope.


If you are anything like me, you may look at your finished ATC and notice all of the things you wish you had done differently.

I hope you will take a good moment to look at your work and celebrate your accomplishments. We are truly all our own worst critics.

If you have any questions or find any part of this tutorial unclear, please do not hesitate to ask. I reply to every comment left on my blog. If you do not receive an emailed reply, you have your settings as a no-reply blogger. I will reply within the comments of the post. 

Fun facts?
1. It took me longer to select my fabrics than it took me to piece my ATC cards (even with the photo shoot for this tutorial.)
2. It took me longer to decide how to embellish the block than it took me to embroider it.
3. This was the first ATC card I created. (They are pretty similar to CQ fabric postcards.)
4. ATCs are a lot of fun to make!

I want to thank the staff of the Crazy Quilt Quarterly Magazine for organizing this ATC swap. And, I want to thank Pamela Kellogg for allowing me to share this tutorial. It is my hope that the goal of 300 ATCs for the swap is met.

Thank you for stopping by!
Renee

Related Posts:
Crazy Quilt ATC Tutorial Part 1 - Piecing
Crazy Quilt ATC Tutorial Part 2 - Embellishing

I apologize for the blurry photos. They appear more crisp in my photo software than they do on my blog. I am working to figure that out.

9/18/17 - Updated to correct the way my postcard was finished. (Thank you, Cris!)

9/24/17 - Updated to add a link to tutorial at Fat Quarter, showing how to finish an ATC by couching yarn.


Friday, September 15, 2017

Crazy Quilt ATC Tutorial Part 1 - Piecing

Have you heard about the 2018 ATC (Artist Trading Card) Swap hosted by Crazy Quilt Quarterly Magazine? 

If not, I encourage you to read about it here at Kitty and Me Designs. Please note, due to postage expenses it is only open to participants within the USA.

As ATCs are only 2 1/2" x 3 1/2", some friends have asked how to go about making such a small crazy quilt. It is my hope that this 3 part tutorial will help answer that question. You may click on any image for a larger view.

CQ ATC Tutorial Part 1 will cover piecing the block.
CQ ATC Tutorial Part 2 will cover embellishing  the block.
CQ ATC Tutorial Part 3 will cover finishing the ATC.


Supplies you will need:

Sewing machine (or you may hand sew your fabrics)
Sewing machine needle (I use the size recommended for denim on my machine.)
Iron and ironing board
Thread
Rotary cutter, cutting mat & ruler
Scissors
Fabric-safe marker or pencil (I use a Pigma Micron 05)
Download of instructions, ATC backing, and envelope - link below
8 1/2" x 11" Cardstock (you need 1 sheet for each ATC)
Muslin
Scraps of fabric
Timtex or Peltex
Embroidery needle(s)
Embroidery floss
Optional: ribbon, lace, flat buttons (no shank buttons), ric rac, trims, seed beads, sequins.


Step 1: Print Instructions, ATC Back, and ATC Envelope

1. Download the PDF file here at Kitty and Me Designs.
2. Print page 1 of the PDF on regular paper.
3. Print page 2 of the PDF onto cardstock.
Note: If you do not have a printer, you may be able to save the PDF to a flash drive and take it to a business that provides printing services to have them print it for you. Remember page 2 needs to be on cardstock and you need a copy for each ATC you make.

How to print?
A. Open the "ATC-Challenge" PDF File.
B. Click the printer icon in the upper-right corner. (If you do not see this, move your mouse over the page, it should appear.)
C. Under "Pages", you will see "All" is automatically selected. Click the button beneath "All".
D. Type 1 in the box beneath "All".
E. With regular paper in your printer, click "Print".
F. Click the printer icon in the upper-right corner again.
G. Put 8 1/2" x 11" cardstock in the printer.
H. Under "Pages" click the button beneath "All".
I. Type 2 in the box beneath "All."
J. Do NOT check the "Fit to Page" box. It may affect the size of your envelope and ATC backing.
H. Click "Print".

Note: If you are making more than one ATC card, you may print the cardstock for them at the same time. For example, if you are making 3 ATCs, put 3 sheets of cardstock in the printer at step G. Before you click "Print" change the number following "Copies" to 3. All 3 copies should print.

Step 2: Select Your Fabrics

Gather:
1. Muslin for the foundation. 
2. 4 to 5 coordinating fabric scraps. 
3. Optional: ribbon, lace or fabric trims.

For this tutorial, I pieced a basic block and shared step-by-step instructions. I also pieced a landscape block and a block using a fussy-cut fabric to provide more ideas. These are the fabrics I pulled for each:

Black fabrics and a pink ribbon for a basic CQ block.

I prefer mostly solids or light prints that let my stitching shine. You may prefer bolder prints.

Greens and blues for a landscape block.

For a coffee-themed block, I pulled two prints and fabrics that go well with them. There is also a piece of gold ribbon.

Notes: 
If using a print, remember it needs to be relatively small to fit your ATC.

Lay the fabrics next to one another to be sure the colors go well with one another and do not clash.

Step 3: Piece the Block

This may be done a number of ways. Some stitchers like to use the flip-and-sew method to cover a larger foundation piece. Afterward, they cut sections of that to embellish. I tend to mark the back of my foundation and piece each block individually, using the flip-and-sew method. 

Before piecing your block, there are a few things to consider:
1. Will you be using a hoop? If so, make sure you cut the foundation strip wide enough to fit your hoop. (I cut mine 6" wide, and wish I had made it 7".)
2. Some embroidery stitches will pull your fabric, causing "shrinkage" in size. I always recommend piecing fabric to extend at least 1/2" beyond your block outline.
3. Although we will be marking on the back of the foundation, some inks run when wet. I recommend using light pencil marks or a fabric safe marker. Personally, I like to use a Pigma Micron marker because the ink sets permanently with the heat of an iron.

I followed these steps to piece my ATCs:

1. Cut a strip of muslin. (I cut mine 6"-wide. Be sure yours wide enough to fit your hoop.)


2. Using a ruler and a pencil or fabric safe marker, draw a rectangle that is 2 1/2" x 3 1/2". If making more than one ATC, you may choose to put them on the same strip of muslin. I marked 3 rectangles, leaving 2 inches between each one. 

3. Place the muslin so the rectangles do not show. They are the back of the foundation.

4. Cut one fabric into a triangular shape.

5. Select a second fabric that extends the full length of one edge of the triangle.

6. Place the triangle and the 2nd fabric on the muslin. 
Tip 1: Hold it to the light to be sure the triangle fits within in the rectangle on the back of the muslin.
Tip 2: Fabrics on the edge of your ATC outline should extend 1/4" to 1/2" beyond your outline, as seen in this photo. (It is frustrating to piece your block and then realize part of the foundation was not covered.)

7. Place the two fabrics right-sides-together on the right side of your muslin. Once they are where you want them, sew in place with a 1/4" seam. 
Note: Do not sew the full length of the longer edge. Only sew along the edge of the two fabrics, as seen with the blue line in the photo.
8. Iron the fabrics flat. 
Tip 1: Do not skip this step. Every time you add a fabric, you will need to iron it flat to avoid a bumpy block.
Tip 2: To avoid damaging some fabrics, you may need to place another piece of fabric over your block before ironing. I used cotton fabrics, so this was only a concern when adding ribbons.


9. Trim the fabric. This part can be tricky, because you do not want to cut the foundation by mistake. You will trim the new fabric, following the lines of the triangle, as seen with the blue lines in the photo. (Just pretend my blue lines are straight!)


A. Put the block on your cutting mat so the fabrics lay flat and the back of the muslin is facing you. 
B. Fold the muslin out of the way and line your ruler along one edge of your triangle. 
C. Look to be sure your muslin is safely tucked away (as in this photo) and trim the fabric.

D. Repeat with the other edge of the triangle.


10. Select a 3rd fabric to sew along an edge of the triangle.
Tip 1: Think about what the size the new fabric will be after you sew it and trim it. 
Tip 2: Use a piece of fabric large enough to extend over the edge of your outline and that extends the length of the triangle seam. 

11. Place the fabrics right-side-together and sew with a 1/4" seam. 

12. Iron flat.

13. Trim as you did in step 9. 

14. If your fabrics extend beyond the edge of your foundation, place the piece on your cutting mat, right-side-down. Fold the foundation fabric back about an inch away from the outline for your block. Place the ruler so that it covers the edge of your foundation (so you cannot cut it in error.) And trim the excess fabric with your rotary cutter.

15. Select a 4th fabric to sew along the next edge of your triangle. I added a ribbon along this seam, too.

16. If using ribbon, place it right-side down, lining it up along the edge of the fabric on your block. Place the 4th fabric over this, lining it up along the same edge. 

17. Sew together with a 1/4" seam.

18. Iron flat.
NOTE: I placed a cloth between my iron and my ribbon to avoid damaging the ribbon.

19. Trim excess fabric.

20. If necessary, add another fabric following the same steps: check the placement, sew it on, iron and trim. 

For this ATC, 4 fabrics filled the outline on my foundation.


Step 4: Baste the Outline

1. Place the block right-side-down. You should be looking at the outline you drew.

2. If necessary, pin the foundation to the fabric outside of the rectangle to hold it flat.

3. Set your sewing machine to a long stitch length to make the basted stitches easier to remove when finishing the ATC.

4. Sew along the outline drawn on the back of your foundation.

5. This allows you to see the outer edges of your ATC.

All embellishing should be within those lines. Any stitching outside those lines will be cut and your stitching may unravel.

Any beads, sequins, etc. within 1/4" of those lines may interfere with finishing your card.

This landscape ATC block was pieced in the same manner, beginning with the blue triangle.

For the coffee ATC, I found a printed section of fabric that would fit within the outline and still leave room for other fabrics.

I started with the "Good Coffee" (from the Have a Latte fabric line Clothworks released in 2015) and worked out from there. 

Note: I made sure the print was at least 1/8" away from the edge of the outline. (This will be important with finishing.) 

If you have any questions, or any of my steps are unclear, please leave a comment and let me know. I reply to every comment. If you do not receive an emailed reply from me, you may be a no-reply blogger. If that is the case, my reply will be left in the comments to this post.

I do hope you will consider making an ATC for this swap! It should be fun. :)

I will take photographs as I embellish my black ATC to share in the 2nd part of this tutorial. 

Thank you for stopping by!

Renee

Updated September 18th to include the following links:
Crazy Quilt ATC Tutorial Part 2 - Embellishing
Crazy Quilt ATC Tutorial Part 3 - Finishing