Sunday, September 30, 2012

Halloween Crazy Quilted Glasses Case Progress

Panel of Halloween Glasses Case
My Halloween crazy quilted glasses case is coming along nicely!  It is my hope to have it finished this week. 

There was an ironic moment this morning, when I stepped outside to take pictures to share with you (the lighting on the patio is so much better than the lighting in the house.)  I opened the door to the patio and startled a black cat; he stared at me for a moment and then dashed off.  It still makes me chuckle.  Really, what are the odds of stepping outside to photograph a Halloween themed block and finding a black cat?


(Not so) Spooky Tree
 The spooky tree (which, sadly, is not all that spooky) was made with DMC 801 size 5 perle cotton.  I went by memory to replicate the tree I made on my sister's glasses case using the Easy, Breezy Trees tutorial from Shaw K L Designs Blog.

I LOVE the way the black and orange beaded seam looks.  That being said, if I ever decide to embellish a seam with beads again, it will be a SHORT seam.  I secure every bead with a single strand of floss by looping it through the bead three times.  Then, I make three tiny knots on the back before moving on to the next bead.  I am also alternating between a needle threaded with orange floss, and one with black floss; so, I have to be careful not to catch the thread I am not using while securing each bead.  I think about 10 more beads ought to finish this seam up.


My first beaded spider.
The spider consists of two pearl beads and white straight stitches for the legs.


My broom
For the broom, the handle was chain stitched with 2 strands of DMC 801 embroidery floss.  Long lazy daisy stitches using 1 strand each of DMC 743 and 745 made the bristles of the broom.  A couple loops of DMC 801 tied the bristles to the broomstick.  (This case will be for me.  I told my husband, "I'm a witch, so I need my broom!"  His reply?  "Yep."  I love that man.)

My next seam is going to be fun - if it turns out the way I see it in my head, anyway.  It will be a seam treatment created by my own imagination, so I am excited to give it a try!


Thanks so much for stopping by,
Renee

Thursday, September 20, 2012

My First Round Robin Post #5

It is time for a happy dance!  Crystal's block arrived in the mail today.  She made such a romantic block with the loveliest shades of yellows, purples, greens and pinks.  The stitching at the top was done by Hazel and the stitching in the lower-left corner was done by Mardeen. 

Crystal's block after Hazel and Mardeen

Unfortunately, my photo does not do this block justice.  It fails to capture the sparkles from the beads, the metallic flosses and the silvery shimmer of the bow.  The stitches on this block are exquisite.

Ideas for embellishing are rolling through my mind already!

Have a fantastic day,
Renee

Wednesday, September 19, 2012

Crazy Quilt Day 37

March Naked Block
Yesterday, I kept myself quite busy!  It was time to make my next crazy quilt block.  As there will be 3 blocks per row, and January and February were already finished, I decided to work on March next.

While I was at it, I decided to piece the blocks for a couple more glasses cases I planned to make.  It is safe to say, I will not be lacking items to stitch while unwinding in the evening!

In addition to future gift items I am not posting (as I am not sure if the recipients check my blog or not), I made the following items.

Halloween Glasses Case Panels
October is nearly here, and I could really use a new case for my glasses.  So, this will be for me.  The eyes on the right actually glow in the dark.  Oh!  I also found DMC glow-in-the-dark embroidery floss at Jo-Ann Fabric this weekend.  This will be a fun one!

Black and White Glasses Case Panels


I also plan to make a crazy quilt purse at some point in the future.  I am toying with the idea of using black and white fabrics, so decided to  make a glasses case first.  Whether the embellishments will also be only black and white has yet to be determined.  I think I am leaning toward color with the embellishments.

Blue and purple panels for my niece.
This one will be for my niece.  (I do not think she knows about my blog, so it should be safe to post pictures here.)  Her favorite colors are blue and purple.  I found a few adorable embellishments for this one.  Of all the projects I have, this is the one I am longing to work on.  Having two boys, girly projects are a rare treat.


Thank you for stopping by!

Hugs,
Renee


Monday, September 17, 2012

Crazy Quilt Days 35 and 36

It took longer than I had hoped, but the January block for my first crazy quilt is finally finished!

After using two strands of white to finish the tassels, it was time to finish up the house scene in the lower-right corner.

I used two strands of DMC 3024 to make a sidewalk leading away from the house.  Next, I combined one strand each of DMC 640 and 642 to make the tree.  The trunk was made with small chain stitches.  Straight stitches were used for the bare branches.  The last step was adding Mill Hill Petite Glass Beads (#42010) with a single strand of DMC 762.  The tiny, clear beads made delicate, shimmering snowflakes.

The final touch was the addition of snowflake buttons (Favorite Findings Snow Reflections) to cover the corners of the rick rack border in the center.

Now, I just need to decide which block to work on next.  Oh... and I need to piece blocks for a couple more birthday gifts.  Should be fun!

Have a wonderful week!
Renee

Saturday, September 15, 2012

Crazy Quilt Day 34

I am so happy I found time for stitching this week!  Yesterday, I managed to make some progress on my January block.  With any luck, this block will be completed by Monday, and I will be able to begin the 4th of 12 blocks.
First, I added a couple of windows to the house using DMC 3078.  I want the majority of the block to really focus on blue, white and silver, so I chose a pale shade of yellow that would not overpower the other colors.  I outlined the windows with DMC 823, the same dark shade of blue used to stitch around the roof.  A lighter shade of blue, DMC 334, was used to make a front door.  And a French knot of DMC 823 made a doorknob. 

I still have a couple of ideas rattling around in my mind about the next step in this section.  So, I decided to mull them over while adding the tassels to the scarves spelling out JANUARY.  First, I made silver snowflakes to cross the A's.
In my opinion, the end result has been worth the time of adding the tassels.  Only three more letters to go!

On a side note, I have been taking my photos on our patio table because the lighting outside is so much better.  This requires walking past sunflowers my boys planted with me last spring.  Let me just say, the bees LOVE those sunflowers.  And they are not tiny bees, by any means.  These fellows are big, and the buzz of their wings has startled me on more than one occasion, as it is so loud.  There were about five of these big guys buzzing less than two feet behind me while I took my photos this morning.  (I suppose I could say my day began with a buzz...)


Thank you for stopping by! 
Renee

Thursday, September 13, 2012

My First Round Robin Post #4

I was eager to work on Hazel's block the first moment I saw its picture.  And the work Mardeen did on the block was absolutely gorgeous.  Every time I looked at it, I admired another detail I had missed.

Hazel's block after Mardeen's work.
There were SO many ideas in my mind for this block.  I expected it to be an easy one to embellish.  It began that way, but then I struggled and felt more like a novice than I have felt to date.

Many of my ideas were so involved, I feared they would overpower the frog prince, so I decided to try to keep it a bit more simple.  I planned to cross-stitch a frog on the small gray triangle, add a flower border and a dragonfly to the light green triangle, and add a silk ribbon butterfly to the red above the frog.

I made the frog using the Baby Afghan Safari cross-stitch pattern I used to make my oldest son's baby blanket.  I added a pale yellow butterfly (similar to the shade of fabric to the right of the frog) to fill up the gray section.

Next, I used DMC 895 (a dark green similar to the fabric above the gray section) to make stems and leaves and DMC 4077 (a variegated yellow pulling colors from the frog) to make the yellow flowers.  Yellow glass seed beads (size 11/0) added a pretty sparkle.  

The read patch looked challenging to me.  I wanted to embellish the seam between it and the blue block below, without pulling the eye away from the frog's crown.  So, I used DMC 666 (the closest red I could find) to make a chain-stitch along the seam.  The silk ribbon butterfly followed a pattern for an Australian Beak Butterfly from The Silk Ribbon Embroidery Bible: The Essential Illustrated Reference to Designs and Techniques.
At this point, I requested advice from a friend.


Next, I added the dragonfly to the green block.  Then, I panicked. Both butterflies and the dragonfly were flying in the same direction.  I also feared there was too much yellow.  In addition, I hoped to add an orange dragonfly, but I feared it would stand out too much with all of the softer colors.  So, I conspired with my friend, Crystal.  (I love her work, you can see why at Crystal's Crafty Adventures.)  I shared a few photos, my concerns, my ideas, and requested her opinion.


I loved Crystal's idea of combining yellow and orange; so, I made a couple of butterflies using one strand of yellow and one strand of orange floss, in addition to adding the orange dragonfly.  Then, I found a shade of green similar to that of the fabric to stitch in the flight patterns for each insect.


On the red block, I wanted to add some blue and add something to the seam; however, I really did not want to compete with the frog's crown.  So, I ended up making a few small blue and green flowers.  Next, I added a smaller, white butterfly.  In red, I stitched in the flight patterns.


I hope Hazel likes the additions to her block.  I mail it on tomorrow and look forward to seeing how Shannon and Crystal bring the rest of the block to life.

Hugs,
Renee

Tuesday, September 11, 2012

Warrior Dash 2012

The final obstacle on the course.

In a few of the goals I have posted, I mentioned training for the Warrior Dash.  The Oregon Warrior Dash was held last weekend, September 8th and 9th.  It is a 5K run (3.1 miles) with several obstacles along the way.  It looked challenging and I heard it was fun; so, I decided to give it a try.  I ran with 3 of my favorite people, and had a blast!

Let me just say, I am not an athlete.  In school, I was always thrilled to have a friend chosen as a team captain in PE, because it meant I would not be one of the last 3 students chosen.  I saw a t-shirt at an Under Armour outlet store that read, "I don't jog, I run."  Well, I am the opposite.  I don't run, I jog - if you want to call it that!

We heard the course had a lot of hills.  I guess I was picturing something like the Portland Shamrock Run (in previous years, they changed the course this year), running up Broadway - a slow steep slope.  Um, nope.  This was a course of fine, loose dirt and steep, steep hills.

Jogging up one hill, someone behind me commented to their friend, "Remind me why we are doing this."  The same thought was running through my mind, but I was not about voice it out loud.  Shortly after, we reached the 0.5 mile sign.  (Sad, right?!)

The first obstacle was crossing "logs" in water.  Large plastic squares were roped together to form our "logs."  We carefully stepped down the muddy bank of the water.  Our third step in, we realized the mud beneath us was uneven.  It dropped more than a foot in depth.  Strangers behind me, grabbed my shirt to catch their balance.  Some apologized, others just raced forward.  Pulling yourself up onto the log and crossing over was not tricky in itself.  The hard part was having so many people trying to cross at once, as it made the logs roll backwards.  Some kind souls held the ropes from the other side, to hold it steady for those crossing.  My sister-in-law was almost over the second log when a team counted to three and all tried to climb on at once.  She felt the log begin to roll back.  Not wanting to climb up again, she dove forward and went under water, face first.  It was awesome.  We all had muddy streaks drying upon our faces as we trudged forward.

I will be honest, I am horribly afraid of heights.  On our way to the race, I remembered trips my sister and I made to the playground about six blocks from our home when we were children.  I would climb up the big dome bars, and then freeze, terrified I would fall, until some kind dad climbed up and walked me through the steps of reaching the ground below.  "Put your foot here, now grab on here..."  Well, you get the idea.  So, I was nervous about the tall obstacles.

We reached the wall and I reminded myself it was mind over matter.  There were knotted ropes hanging over a wall of wood.  Small strips of wood were interspersed along the wall - our footholds - or toeholds?  They seemed way too narrow for my slippery, muddy shoes.  I took a look, gulped, and grabbed the rope next to my son (Monkey - my 15-year-old ran was within our group.)  The second knot in the rope was too high for me to reach.  I stepped back down, looked at the other ropes and moved over to use the one Monkey had climbed.  I could reach that knot.  My descent attracted the attention of a volunteer.  He approached and told me to use my legs, not my arms.  I commented, "And pretend I'm not afraid of heights!"  He told me it was a 3-foot wall.  I replied, "Built on another 3-foot wall."  (In reality, I imagine it was at least 8-feet tall.)  For me, the creepy part was feeling my body swing back away from the wall as I pushed up to the next knot in the rope.  I have no upper body strength, so I did not want to lose what little bit of footing I had.  The rope ended at the top, and the board along the top was too wide to feel I could really get a good hold of it. I took a deep breath and prepared to swing one leg up and over, praying I would not lose my grip.  Imagine my surprise, as the volunteer's head popped up on the backside of the wall.  He had climbed up to guide me down.  He instructed me to swing my leg over, find the wooden rung below, get my balance and bring my other foot down.  Mind you, I knew those were the next steps to take, but my inner-child grinned.  I climbed down the ladder of wooden rungs on the other side and met my group with a grin.  "It was just like being on the playground again!" I laughed.

We went on to pull ourselves over barricades, to crawl and sometimes roll under barbed wire.  I walked up the hills, and jogged down them.  We went through tires, and a web of elastic.  Just before we reached the cargo nets, I heard my husband yell my name.  He and Mutt (my 12-year-old, he chose the nickname because he does not like me to use my nickname for him in public) had been waiting for us for over an hour.  That would be my fault.  I kept encouraging my wonderful group of warriors to go on ahead, but they patiently waited for me at each obstacle.  At one point, I seriously wanted to sing the song "Just Put One Foot in Front of the Other" from the Christmas classic, "Santa Claus is Coming to Town."  I was just too winded to pull it off. *grins*

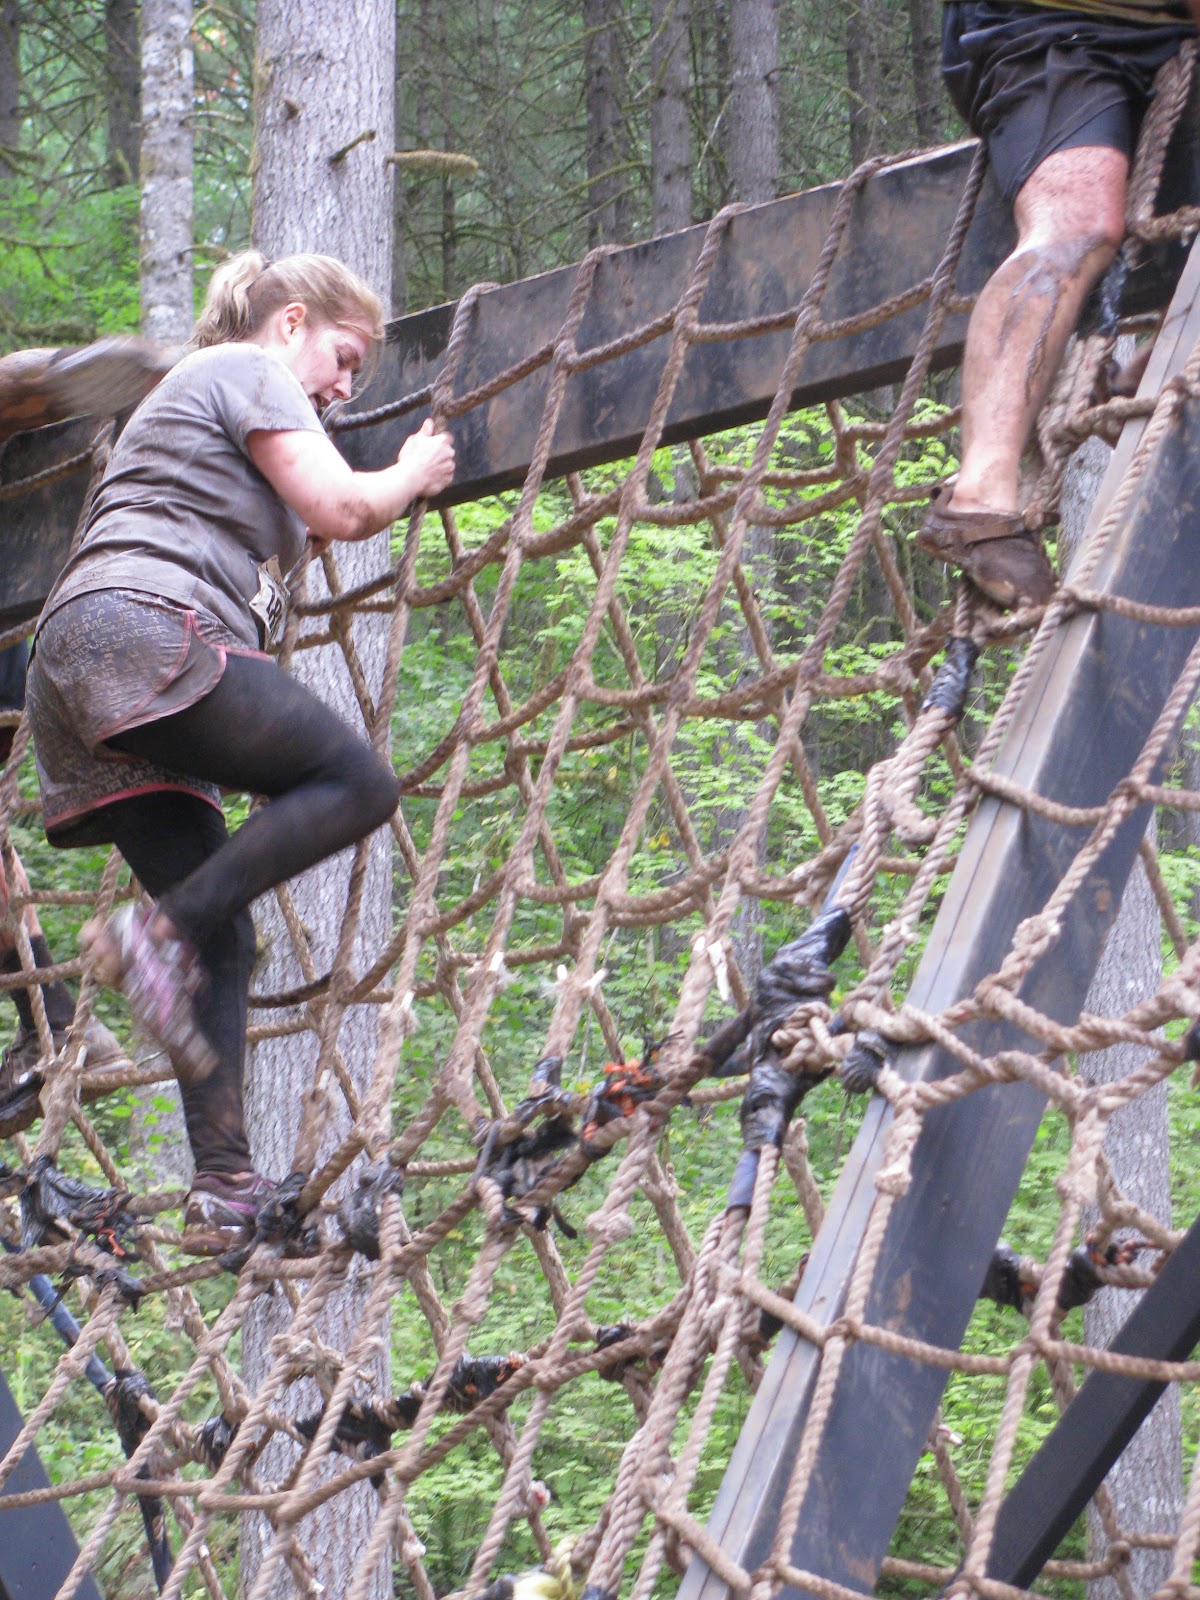
Descending the cargo net.

According to my husband, who can judge heights far better than I, the cargo net wall was at least 25 feet tall.  After making it over the rope wall, this would be cake. I had to chuckle as I got to the top.  The young man next to me reached the top and asked, "Now what do I do?"  He probably was not expecting an actual answer, but I repeated my helpful volunteer's directions from the rope wall.

The end was the most fun.  We went through a mud pit.  I found myself wishing I had a pit of mud like that to play in when I was a kid.  It would have been a HOOT!  As it was, I somehow managed to make my way through the thick muck without losing a shoe.

After the mud pit and the mud slide.  (Anyone want a hug?)


Then, I went down a mud slide.  Umm... next year, I will remember to see where the ruts lead from my beginning point.  Had I noticed the diagonal path left by the person in front of me, I would have moved.  Instead, I found myself yelling a warning to the young man to my left that I was heading his way.  At the bottom, I apologized for landing on his cape.  Oops!

With a big gulp, and mental, "I can do this!" I ran and leaped across the two rows of flames to reach the finish line.

The muddy pond we were able to rinse of in never looked so inviting.  Although, I must admit, I hesitated after a guy in the middle of the pond yelled, "If anyone plans to pee in the water, do it over here!  I'm freezing!"  Everyone laughed, as we cleaned ourselves in the filthy water.

It looks like I have a year to work on my endurance and practice running up some steep hills so the course is a little easier in 2013!

Hugs,
Renee


Crazy Quilt Days 32 and 33

Oh, Dear Blog, I have missed you so!  It has been a busy, busy couple of months trying to cram projects and activities into the end of our summer break and prepare my boys for another year of school.

My goal has been to complete my 1st crazy quilt within one year.  Thankfully, I was ahead of schedule when I began the January block, as I am now falling behind.  I should be working on my 4th block right now...  This one has been a bit challenging for me.  (And finding time to stitch has been tricky!)


I have decided to keep "January" as scarves.  I just need to add the little fringes to each end, and perhaps add a snowflake in the middle of the A's to cross them.

And, as you can see, I finally finished the snowman!  I may have liked him better without the buttons, but I let my family vote and I was overruled.  I was worried that I would have a hard time fitting in his face with the hat; but that was not too difficult.  Although, I did have a challenge with his French knots.  The mouth was overpowering his eyes.  I pulled everything out twice.  In the end, I used two strands of black (DMC 310) for his eyes, and one strand for his mouth.  This kept the mouth from overpowering his face.  The mittens look a bit large; but, I figure, mittens hanging off of sticks on a real snowman would look big too.  I am not sure how much I like his hat, but that is my family's favorite part.  (Last May, I purchased the buttons at Acorns and Threads in Portland (on Scholl's Ferry Road).  Unfortunately, I did not make notes of the names so I could share them here.)

The next challenge - the part I would do differently - was the house in the lower-right corner.  I cut out 4 separate pieces.  In the future, I would make it two.  Prior to stitching the pieces in place, all of the corners actually met up.  This week, I get to see if I can add a decent looking window and door to the house.  I will also attempt a little path from the door to an edge of the block.  I still need to decide if I want a leafless tree to the left of the house or an evergreen.  We shall see!

So, January is only a few steps away from completion: the scarves, the house area, and the addition of snowflake buttons to hide the section where the rickrack overlaps.  If I am lucky, it will be done by the end of the week!

Thanks for stopping by.

Hugs,
Renee