Showing posts with label straight stitch. Show all posts

Monday, January 15, 2024

How to Embroider a Snowman Using Chain Stitches

 
Embroidered Snowman Using Chain Stitch

It has been a couple of years since I embroidered a snowman using the chain stitch. I had a hard time remembering exactly how I did it, so I thought I would make a tutorial to refer back to in the future.

First, I used a quarter (on the bottom), a nickel (for the body), and a dime (for the head) and traced them with light pencil marks on the back of the block.

Starting from the center of a traced circle, I made a triangle with three chain stitches. Then, I continued chain stitching in a circle until it was the desired size.

I used white DMC size 5 thread.

As seen in this photo of the back, my stitched circles ended up slightly off center. However, starting in the center of each circle and chain stitching in the same direction kept all three sections of the snowman lined up.

I ended the chain stitches at the bottom of each circle.


Once the body was stitched, I needed to decide on the face. I wanted this snowman to look up towards the moon on the block. 

Using 2 strands of a variegated DMC orange floss, I made a triangle pointing up towards the sky using 3 straight stitches.

Using the same floss, I satin stitched the nose. (I have found my satin stitches are a bit more even if I create an outline to stitch over first.)

Next, I attached size 10/0 black Czech glass seed beads, using a single strand of DMC black (#310) floss, to create eyes and a nose.

For the mouth, I couched 2 strands of the same black floss down using a single strand of black to tack it down. 

To be honest, I was nervous about adding a scarf and a hat. Using a single strand of a light blue embroidery floss and back stitches, I created outlines for them both. (I traced the outlines on the back of the block first to use as a guide.)

Using a variegated blue/purple/pink size 5 DMC thread, I satin stitched the hat (starting with the brim) and the scarf.

Next, using the same thread and Turkey Knots, tassles were added to the scarf and a fluffy ball was added to the end of the hat. 


Using a variegated brown DMC floss, I removed one strand (of 6) to couch down the remaining 5 strands to make arms for the snowman. Fly stitches were added to make the hands, using the 5 strands of floss.

You may have noticed the tree branches in the photo with the arms. I knew I wanted to add a tree, and decided to make that first so the arms on the snowman would use a brown in the tree. 

The tree was created using the Easy, Breezy Trees Tutorial on Kathy Shaw's blog (found here). A variety of threads were used. I cut lengths of Kreinik Metallics Pearl #4 Very Fine Braid, DMC Metallic white/blanc floss (all 6 strands), 2 shades of DMC variegated brown flosses (all 6 strands), and white DMC perle cotton in sizes 8, 5, and 3. I used a single strand of white floss to couch down most of the tree. Some of the brown branches were couched with a single strand of one of the brown variegated flosses.

Thank you for stopping by! If you use this snowman tutorial, I would love to see your creation.

Please note: 
1. You may click on a photo to see a larger image.
2. Directions for all of the stitches used for this tutorial (except the straight stitch) may be found in the Stitch Dictionary at Pintangle(dot)com here.



Tuesday, February 5, 2019

TAST 2019 - Stitches 1 & 2


This weekend I made some time to work on the Take a Stitch Tuesday (TAST) stitches that have been shared this year at Pin Tangle. The Chain Stitch and Fly Stitch were both worked onto a Valentine Fabric Postcard I am working on.

Click any photo for a larger view.

Stitch 1: Chain Stitch
I worked this stitch with size 8 pink perle cotton. I like the way the red fabric peeks out between the stitches.

Stitch 2: Fly Stitch
Fly stitches were evenly spaced above the chain stitches with size 8 green perle cotton to create leaves.

Straight stitches were added to make stems with the same thread.

The stems were topped with pink fly stitches (also size 8 perle cotton) to create flower petals.

Mill Hill Magnifica Glass Beads #10026 topped each flower.


TAST is a personal challenge to learn a new embroidery stitch each week. The challenge is hosted by Sharon at Pin Tangle.

Thank you for visiting!
Renee


Monday, February 4, 2019

Simple Heart Block


The Spring 2019 edition of the Crazy Quilt Quarterly Magazine is now available through MagCloud here.

The block in the photo above is featured on pages 14-15. The article shares how the block was pieced and how each section was embellished, using 8 basic embroidery stitches. 


The cover of the magazine features the gorgeous work of Margreet De Reus. (Note: This photo was borrowed from Pamela Kellogg's blog, Kitty and Me Designs.)

I must admit, it is a bit unreal to see my work in print with so many talented crazy quilting artists. There are a few tutorials in the magazine that I hope to try out and share soon.

If you crazy quilt at all, I encourage you to contact Pamela Kellogg about submitting photos of your work. My goal is to work on a Fall/Halloween piece to submit before May 1st for the Fall edition.

Thank you for visiting!
Renee

Saturday, February 10, 2018

Embellished CQJP 2018 February Block


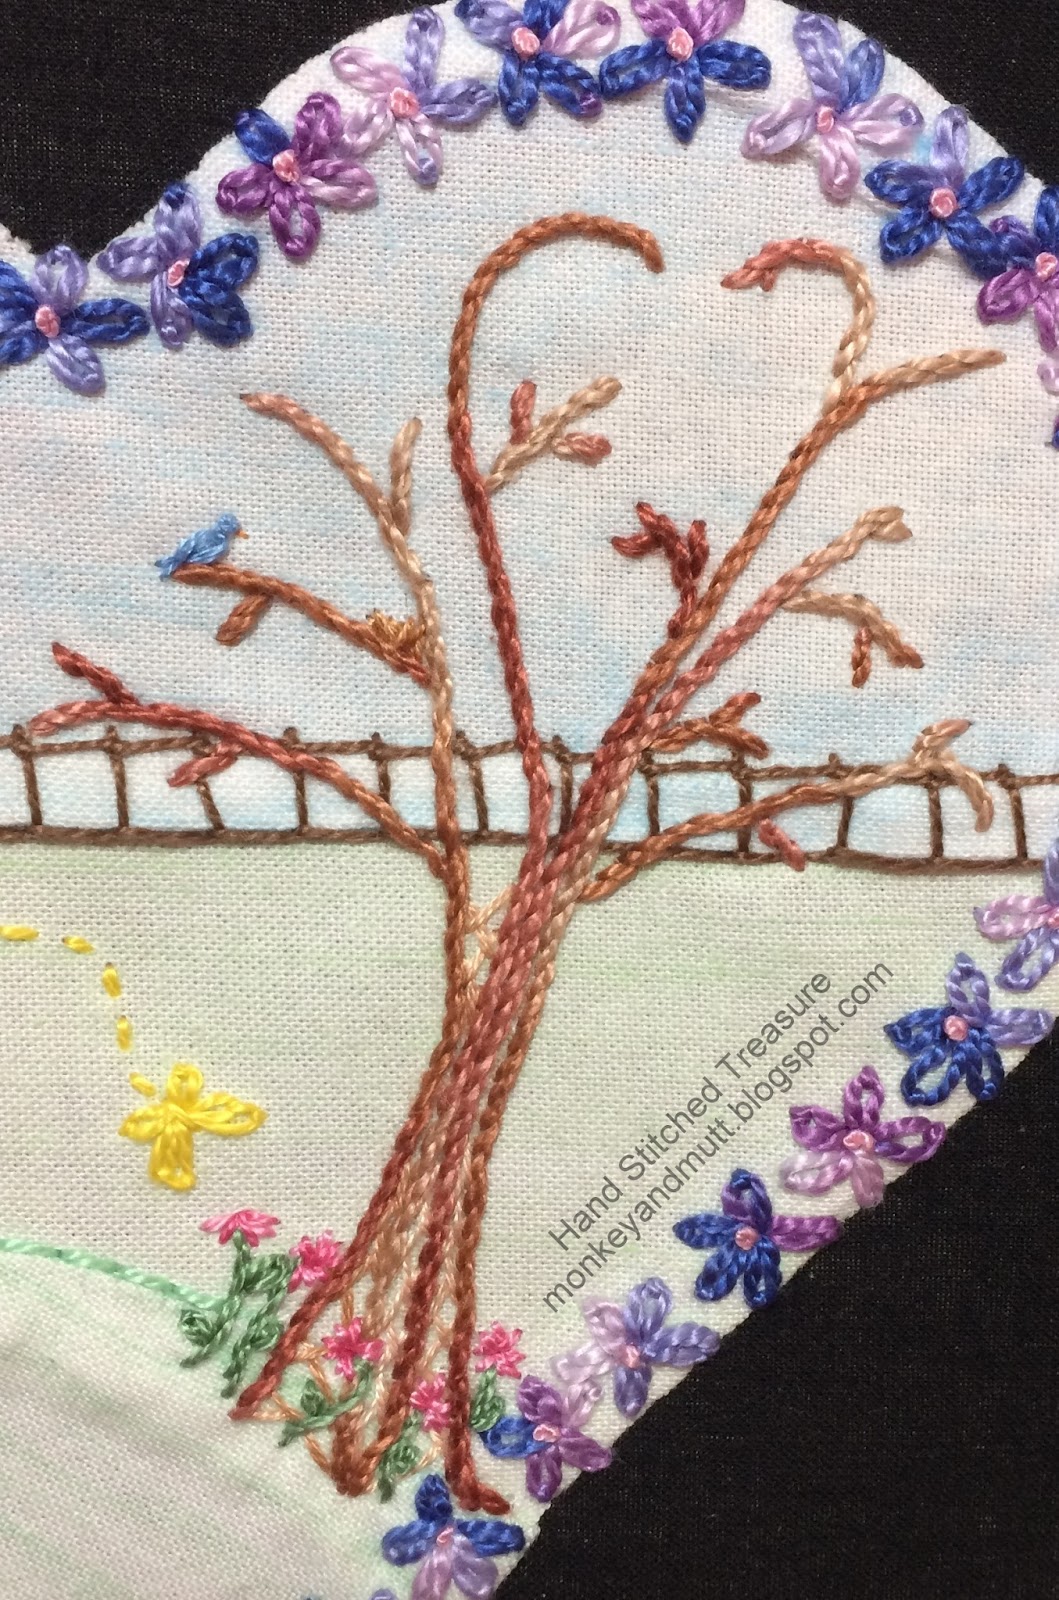
My 2nd CQJP 2018 block is now complete! The theme for my CQJP 2018 project is "My Favorite Things" and I love trees, flowers, butterflies, birds, hearts and snailmail.

Click on any photo for a larger image. 

A snail was added by couching size 5 variegated brown perle cotton in a circle. Size 8 brown perle cotton straight stitches created the snail's body.

My attempts to embroider a mailbox this small did not work out, so I drew one on the block with a black Micron pen, colored it in with a crayon and heat set the pigments.

Next, size 8 yellow perle cotton created a yellow butterfly with detached chain stitches and a straight stitch. Running stitches created a flight path. 

Size 5 variegated blue and purple perle cotton and detached chain stitches were used to make a flower border around the heart. Size 8 pink perle cotton French knots were added to the center of each flower.

Size 8 green perle cotton stem stitches created flower stems around the base of the tree. Small detached chain stitches were added to create leaves. Tiny straight stitches filled each leaf. 

Size 8 variegated pink perle cotton straight stitches creaed flower petals.

A detached chain stitch, 2 tiny straight stitches, and a French knot made with 2 strands of blue embroidery floss created the body of a bird. A tiny straight stitch with a strand of light orange floss made the beak.

Straight stitches with 2 strands of floss (one light and one medium brown) made the nest.

Running stitches created with silver metallic thread made a snail trail.

To keep these flowers subtle, I used a single strand of light green floss. The flower stems and leaves were made with a fly stitch and a straight stitch. The flower petals were made with 2 strands of a light variegated yellow and pink floss. A French knot was placed on the tip of each stem. And a tiny fly stitch was added just beneath the knot.

This completed block 2.


Thank you so much for visiting!
Renee


CQJP stands for Crazy Quilt Journal Project. It is a challenge to complete a crazy quilt block each month that is at least 8-inches square in size. You may learn more about it and see blocks others have created for CQJP 2018 here.

Related posts:
CQJP 2018 Block 2 - here
TAST Weeks 5-6 - here
Embellished CQJP 2018 January Block - here

Saturday, December 9, 2017

Another Snow Seam


Another snow seam was added to the crazy quilted stocking I am making for my eldest son. 

Three snowflakes were created using silver metallic floss and straight stitches. 

A silver bead was added to the center of each.

Thank you for stopping by!
Renee


This is day 9 of the 31 Day Blog Writing Challenge hosted by www.muppin.com. You may find more details and other participating blogs here.


Friday, December 8, 2017

Stocking Snow Seam

This snowflake seam was very simple to stitch.

Using straight stitches and size 12 white perle cotton, I stitched a "+" and then made an "x" over that.

There are 3 seams and 7 motif areas left to fill in this week on the stocking I am making for my eldest son.


Thank you so much for stopping by.
-Renee


Today is day 8 of the 31 Day Blog Writing Challenge hosted by www.muppin.com. You may read the details and find other participating blogs here.

Monday, October 30, 2017

CQJP 2017 March Block Motifs 6 & 7

Feather stitched vegetaton accented with petite glass seed beads created motif 6 on my Crazy Quilt Journal Project (CQJP) 2017 block.

Size 12 green perle cotton floss was used for the feather stitches.

Motif 7 was added to both sides of the block. 

Using size 5 variegated perle cotton, I created vines with the barred chain stitch.

The flowers were made with a variegated size 8 perle cotton by making groups of 3 bullion stitches. Straight stitches were placed between the bullion stitches and over the ends where the bullion stitches met the vines.

My progress on this block has been slow, but I am enjoying it!

I am joining the Monday Stitchery Link Party #134 at Super Mom - No Cape! 

CQJP 2017 is a challenge to create a crazy quilt block that is at least 8-inches square in size each month. You may learn more about it and see the blocks completed this year here at the CQJP 2017 blog.


Related Posts:

CQJP 2017 March Block Motif 1 and Seams 1 & 2 - here
CQJP 2017 March Block Motifs 2-4 and Seam 3 - here
CQJP 2017 March Block Motif 5 - here
CQJP 2017 February Block - here
CQJP 2017 January Block - here

My CQJP 2017 progress is all shared on this Pinterest Board.

Thank you for stopping by!
Renee

Sunday, October 22, 2017

CQJP 2017 March Block Motif 5


This is the 5th motif added to my Crazy Quilt Journal Project (CQJP) 2017 March block. I had a bit of fun playing with Sharon B.'s Stitchers Templates making this one. 

Click on any image for a larger view.


First, I traced a few of the wavy vine lines from the templates onto the back (muslin foundation) of my block with a pencil.

The vines were created with whipped chain stitches.


A chain stitch was added following the lines of one of the vines with size 8 DMC #954 perle cotton. Size 8 DMC #125 perle cotton whipped around the chain stitches.


After giving some thought to the way I wanted the vines to wrap around one another, I continued adding chain stitches to the other vines. 

In this photo of the back, you may see that I wanted the vine sketched on the left to cross over in front of the middle vine on the lower junction. So, I embroidered the middle vine first. On the upper junction, I wanted the middle vine to be in front, so I stopped just below where those lines met and embroidered the vine to the left before continuing the middle vine. 


I did not whip these two vines until both had been embroidered with chain stitches. 


You may also note that I did not follow the entire shape from this vine. I wanted leave enough room to add the flowers.


After whipping the chain stitches, I added a pearl bead to the top of each stem, and then added rice beads for each of the "spokes" I had traced on the back. For these flower petals, I added the middle "spoke" first and then added two beads to each side, to be sure they all fit together well.

Small straight stitches were added to the vines with the variegated green thread to add a bit more detail.

This was such a fun motif to create!

Thank you for stopping by!
Renee


Notes: 

I am not affiliated with Sharon B.'s templates. However, I did receive them in exchange for an honest review and have so much fun playing with them!


CQJP stands for Crazy Quilt Journal Project. You may find the CQJP 2017 blog here.


Related Blog Posts:

CQJP 2017 March Block Seams 1 & 2 and Motif 1 - here
CQJP 2017 March Block Seam 3 and Motifs 2, 3 & 4 - here
CQJP 2017 February Block Tote - here
CQJP 2017 January Block - here

On this Pinterest board, I am saving each step of my CQJP 2017 progress.