One of my UFOs (unfinished objects) is a quilt I made back in 2005.
It is going to be gifted, but needs a label and a hanging sleeve.
Tonight, I finished the label. This is how it looked before adding the recipient's name.
Sometime prior to 2005, I purchased this little book at The Stitchin' Post in Sisters, Oregon. Make Your Own Quilt Labels: Volume 4 was written by Kim Churbuck. It contains several darling sketches and easy to follow instructions.
Now, I just need to sew this and the hanging sleeve onto the quilt. (I was a complete novice when I made the quilt this will be added to. It became a UFO when I realized it needed a hanging sleeve and learned that should have been sewn on with the binding... Wish me luck!)
Thank you for visiting!
-Renee
This is day 15 of the 31 Day Blog Writing Challenge. You may find more details and other participating blogs here.
Showing posts with label books. Show all posts
Friday, December 15, 2017
Wednesday, June 14, 2017
A Floral Seam & A New Book
Last night, I had a lot of fun playing with one of Sharon B.'s Crazy Quilt Templates. (This template is from Set 1. I am not affiliated with the templates, but did receive them in return for an honest review and I truly love them!)
First, I traced the wavy line along the seam on the foundation side of my fabric using light pencil marks. (I held it up to the light to be sure it was sitting where I wanted it.)
Then, I used a stem stitch and a strand of DMC white metallic thread to embellish the seam.
After that, I stem stitched curved stems shooting off of the top of each "hill" on the wavy seam.
Detached chain stitches created leaves along the vine and flower stems.
Note: I use shorter strands of metallic threads than cotton. These threads fray easily, particularly if they are going through several layers of fabric (as found along seams). Using shorter strands decreases the likelihood the thread will fray, knot, and/or break while stitching.
Using red DMC metallic thread, I added sets of 3 detached chain stitches for petals at the tip of each stem and topped each of these flowers with a Mill Hill Petite Glass Seed Bead #42010.
Today, I am excited to say, I finished this block. I hope to get better photographs of it to share tomorrow.
(I have shared more progress photos on Instagram. And you may find links to other posts related to this project here.)
Even more exciting! Today I received my copy of Sharon Boggon's new book: The Visual Guide to Crazy Quilting Design: Simple Stitches, Stunning Results. (Please note, although I am not affiliated with the book, if you go to Amazon through my blog and make a purchase, I do earn a small credit. The cover price on the book is $29.95. At the time of this post, it is only $19.33 on Amazon here in the US and for Amazon Prime members, shipping is free. This book may be found here on Amazon.)
I have not read much of the book yet, but I have looked through all of the photographs. Just seeing all of the luscious colors and textures is inspiring me to work on more crazy quilting. So far, I would recommend the book just for the eye candy.
(Confession: I grinned seeing the template I used for the floral seam shared above on page 70 of Sharon's book.)
When I ordered the book (on the 12th), I was delighted to see it was the #1 New Release in Needlework. At the moment I am typing this post, it is listed on Amazon as the #1 Best Seller in Embroidery. Sharon, if you happen to read this post, congratulations!!! I am so excited for you.
Thank you all for stopping by!
Renee
First, I traced the wavy line along the seam on the foundation side of my fabric using light pencil marks. (I held it up to the light to be sure it was sitting where I wanted it.)
Then, I used a stem stitch and a strand of DMC white metallic thread to embellish the seam.
After that, I stem stitched curved stems shooting off of the top of each "hill" on the wavy seam.
Detached chain stitches created leaves along the vine and flower stems.
Note: I use shorter strands of metallic threads than cotton. These threads fray easily, particularly if they are going through several layers of fabric (as found along seams). Using shorter strands decreases the likelihood the thread will fray, knot, and/or break while stitching.
Using red DMC metallic thread, I added sets of 3 detached chain stitches for petals at the tip of each stem and topped each of these flowers with a Mill Hill Petite Glass Seed Bead #42010.
Today, I am excited to say, I finished this block. I hope to get better photographs of it to share tomorrow.
(I have shared more progress photos on Instagram. And you may find links to other posts related to this project here.)
Even more exciting! Today I received my copy of Sharon Boggon's new book: The Visual Guide to Crazy Quilting Design: Simple Stitches, Stunning Results. (Please note, although I am not affiliated with the book, if you go to Amazon through my blog and make a purchase, I do earn a small credit. The cover price on the book is $29.95. At the time of this post, it is only $19.33 on Amazon here in the US and for Amazon Prime members, shipping is free. This book may be found here on Amazon.)
I have not read much of the book yet, but I have looked through all of the photographs. Just seeing all of the luscious colors and textures is inspiring me to work on more crazy quilting. So far, I would recommend the book just for the eye candy.
(Confession: I grinned seeing the template I used for the floral seam shared above on page 70 of Sharon's book.)
When I ordered the book (on the 12th), I was delighted to see it was the #1 New Release in Needlework. At the moment I am typing this post, it is listed on Amazon as the #1 Best Seller in Embroidery. Sharon, if you happen to read this post, congratulations!!! I am so excited for you.
Thank you all for stopping by!
Renee
Thursday, April 21, 2016
CQJP 2016 February Block Motifs 2-3 and Seam 8
With the surrounding seams embellished, I was able to add the spider to the web on my Crazy Quilt Journal Project (CQJP) 2016 February block to complete the second motif.
Marsha Michler's book, The Magic of Crazy Quilting: A Complete Resource for Embellished Quilting, taught me how to make spiders like this one. They are my favorite spiders to stitch. (Please note: if you visit Amazon.com through my blog and make a purchase, I do earn a small percentage from the purchase.)
The 8th and final seam on this block was embellished with more embroidered flowers.
Size 8 Anchor #00230 pearl cotton was used to add a buttonhole stitch across the seam and then to add straight stitched "leaves" to some of the buttonhole "stems" along the seam. I intentionally created crooked buttonhole stitches.
Next, groups of 3 detached chain stitches were added to the stems that leaves had been added to, using a strand of size 8 Anchor #00047 pearl cotton.
I am still not sure how I feel about the 3rd motif. (You may click on the photo for a larger view.)
I wanted the text on the fabric to stand out on this section, so I traced a rectangle around it lightly in pencil and stem stitched the area with size 12 DMC #B5200 pearl cotton.
Using the same pearl cotton, I made a butterfly with 4 detached chain stitches for wings and a straight stitch for the body and then created a flight path with a running stitch.
Using a strand of size 8 DMC #B5200 pearl cotton, I added flowers to the corners of the rectangle framing the text on the fabric. These flowers were created with 5 detached chain stitches and a French knot center.
NOTE: If you use pencil on your blocks, mark the block lightly. I recommend using a hard lead pencil (rather than #2) so the marks will be lighter and so the thread is less likely to be discolored pulling through the markings on the fabric. And only mark areas that will be covered with stitches, as the pencil marks may be difficult (or impossible) to remove.
I created a Pinterest board so I can easily look back at seams and motifs created on my CQJP 2016 blocks. If you are interested, you may find the board here.
CQJP 2016 is a personal stitching challenge to complete a block a month. You may learn more about it here. If you are interested in joining next year, sign ups for CQJP generally open up in November and close in December.
Thanks for stopping by!
Renee
Marsha Michler's book, The Magic of Crazy Quilting: A Complete Resource for Embellished Quilting, taught me how to make spiders like this one. They are my favorite spiders to stitch. (Please note: if you visit Amazon.com through my blog and make a purchase, I do earn a small percentage from the purchase.)
The 8th and final seam on this block was embellished with more embroidered flowers.
Size 8 Anchor #00230 pearl cotton was used to add a buttonhole stitch across the seam and then to add straight stitched "leaves" to some of the buttonhole "stems" along the seam. I intentionally created crooked buttonhole stitches.
Next, groups of 3 detached chain stitches were added to the stems that leaves had been added to, using a strand of size 8 Anchor #00047 pearl cotton.
I am still not sure how I feel about the 3rd motif. (You may click on the photo for a larger view.)
I wanted the text on the fabric to stand out on this section, so I traced a rectangle around it lightly in pencil and stem stitched the area with size 12 DMC #B5200 pearl cotton.
Using the same pearl cotton, I made a butterfly with 4 detached chain stitches for wings and a straight stitch for the body and then created a flight path with a running stitch.
Using a strand of size 8 DMC #B5200 pearl cotton, I added flowers to the corners of the rectangle framing the text on the fabric. These flowers were created with 5 detached chain stitches and a French knot center.
NOTE: If you use pencil on your blocks, mark the block lightly. I recommend using a hard lead pencil (rather than #2) so the marks will be lighter and so the thread is less likely to be discolored pulling through the markings on the fabric. And only mark areas that will be covered with stitches, as the pencil marks may be difficult (or impossible) to remove.
I created a Pinterest board so I can easily look back at seams and motifs created on my CQJP 2016 blocks. If you are interested, you may find the board here.
CQJP 2016 is a personal stitching challenge to complete a block a month. You may learn more about it here. If you are interested in joining next year, sign ups for CQJP generally open up in November and close in December.
Thanks for stopping by!
Renee
Monday, November 23, 2015
Exciting Outgoing Mail
Today, I finally finished the mermaid block I worked on as part of the free Intermediate Crazy Quilt Course (ICQC #102) I took from Kathy Shaw.
The last time I shared this piece, I was debating between making it into a fabric postcard or a mug rug. I decided on a mug rug, but then I had the only bead on the mug rug I made for myself last year fall off and opted to make a postcard instead.
This was the 3rd fabric postcard I made.
The first had a "state" theme for a swap with the CQ for Newbies Yahoo! Group. We mailed our postcards in an envelope to our swap hostess and she mailed them out to the recipients for us. We did not write on those postcards.
It took a bit of courage to write my message and the address on this one! Then there was the big question: How do I mail it?! An on-line friend puts the stamp on hers, has it hand-canceled and then mails it in a clear envelope. I asked at our post office. It costs a bit extra to mail it in a clear envelope. My post office said the stamp needed to be on the outside of the envelope and that they would have to be stamped by hand as they should not go through the machine. It was a learning experience for me! This postcard is off to a sweet friend.
The 2nd fabric postcard I made also went into the mail today. This was created for a swap in the Crazy Quilting International group that meets on Facebook and on Yahoo!
I planned to mail it last week, but I could not bring myself to write on the back. I guess I was not alone... My husband saw me writing a note to the recipient and told me he didn't know how I could mark on it. He felt I should just mail it blank and address the envelope.
I am quite excited to have both projects mailed out and on their way to their new homes. I had so much fun with them that I am working on another one. Later this week, I will share my progress and details about the fun mail I received in the mail last Monday! (I'm still squealing with delight!)
This post is linked with the Monday Stitchery Link Party #33 at Super Mom - No Cape!
More exciting news: Those of you that have expressed interest in Kathy Shaw's crazy quilting classes might like to know that she has released her book, Crazy Quilting Volume 1: Beyond the Basics. It is available on Amazon.com now. The Kindle version is free to those with subscriptions to Kindle and Amazon Prime members may borrow it for free. The paperback version is also available for purchase. (Disclaimers: I am not affiliated with the book. I admire Kathy and all of the time she has dedicated to teaching others the art of crazy quilting. If you do make a purchase from Amazon through my blog, I do earn a small credit.)
Thanks so much for stopping by!
Renee
The last time I shared this piece, I was debating between making it into a fabric postcard or a mug rug. I decided on a mug rug, but then I had the only bead on the mug rug I made for myself last year fall off and opted to make a postcard instead.
This was the 3rd fabric postcard I made.
The first had a "state" theme for a swap with the CQ for Newbies Yahoo! Group. We mailed our postcards in an envelope to our swap hostess and she mailed them out to the recipients for us. We did not write on those postcards.
It took a bit of courage to write my message and the address on this one! Then there was the big question: How do I mail it?! An on-line friend puts the stamp on hers, has it hand-canceled and then mails it in a clear envelope. I asked at our post office. It costs a bit extra to mail it in a clear envelope. My post office said the stamp needed to be on the outside of the envelope and that they would have to be stamped by hand as they should not go through the machine. It was a learning experience for me! This postcard is off to a sweet friend.
The 2nd fabric postcard I made also went into the mail today. This was created for a swap in the Crazy Quilting International group that meets on Facebook and on Yahoo!
I planned to mail it last week, but I could not bring myself to write on the back. I guess I was not alone... My husband saw me writing a note to the recipient and told me he didn't know how I could mark on it. He felt I should just mail it blank and address the envelope.
I am quite excited to have both projects mailed out and on their way to their new homes. I had so much fun with them that I am working on another one. Later this week, I will share my progress and details about the fun mail I received in the mail last Monday! (I'm still squealing with delight!)
This post is linked with the Monday Stitchery Link Party #33 at Super Mom - No Cape!
More exciting news: Those of you that have expressed interest in Kathy Shaw's crazy quilting classes might like to know that she has released her book, Crazy Quilting Volume 1: Beyond the Basics. It is available on Amazon.com now. The Kindle version is free to those with subscriptions to Kindle and Amazon Prime members may borrow it for free. The paperback version is also available for purchase. (Disclaimers: I am not affiliated with the book. I admire Kathy and all of the time she has dedicated to teaching others the art of crazy quilting. If you do make a purchase from Amazon through my blog, I do earn a small credit.)
Thanks so much for stopping by!
Renee
Wednesday, November 11, 2015
A Sweet Surprise and a Few Notes of Interest
How often does someone knock on your door, unexpected, with a gift for you just because they saw it and you immediately came to their mind? If your answer is not often, so was mine - until earlier this week.
A friend and her daughter stopped by to give me this darling tea towel.
Just look at the delicate embroidery! If you look closely (clicking on the photo will enlarge the image), you may be able to tell that the green fabric is sheer. I cannot even begin to explain how tiny the stitches are. I feel completely spoiled!
My friend pointed out that she had not seen anything like these pink sections in the stitching I have shared. Although I have learned a lot in the past 3 years, I am still a beginner in SO many aspects of embroidery. I have seen things like this on other works, but have no clue what they are called or how to make them. I assume these and this section in the photo below are a form of stump work? (I would love to know!)
It is just lovely!
On another note... I opted to give up my WIP Wednesday posts. I figured a recap near the end of the month might have more to share.
These next few weeks I should have some fun finishes to show you! I am participating in a Christmas crazy quilt fabric postcard swap and with a Christmas blog hop.
A friend and her daughter stopped by to give me this darling tea towel.
Just look at the delicate embroidery! If you look closely (clicking on the photo will enlarge the image), you may be able to tell that the green fabric is sheer. I cannot even begin to explain how tiny the stitches are. I feel completely spoiled!
My friend pointed out that she had not seen anything like these pink sections in the stitching I have shared. Although I have learned a lot in the past 3 years, I am still a beginner in SO many aspects of embroidery. I have seen things like this on other works, but have no clue what they are called or how to make them. I assume these and this section in the photo below are a form of stump work? (I would love to know!)
It is just lovely!
On another note... I opted to give up my WIP Wednesday posts. I figured a recap near the end of the month might have more to share.
These next few weeks I should have some fun finishes to show you! I am participating in a Christmas crazy quilt fabric postcard swap and with a Christmas blog hop.
A few notes that may be of interest:
- The Christmas is in My Heart Blog Hop hosted by Marian at Seams to be Sew begins tomorrow. The Fat Quarter Shop is sponsoring the hop and is generously providing a giveaway each day of the hop!
- Kathy Shaw has announced some changes with her free crazy quilt classes. You may read more about those changes at Shawkl Designs.
- Kathy also has a new book coming out! Pre-orders are available at a discounted price through the end of November. Learn more about it here. (I am not affiliated with the book, but I am excited about it!)
- Sharon B. at Pintangle has a second set of templates that are now available! If you are interested or curious, you can check them out here. (Again, I am not affiliated with these templates. However, I have heard loads of good things about the first set.)
- Registration for Crazy Quilt Journal Project (CQJP) 2016 will be open from Friday, November 13th - Sunday, December 20th. You may learn more about CQJP 2016 here. (You may want to see what participants have been creating this year at the CQJP 2015 blog.)
If you decide to participate in CQJP 2016, please let me know! I will be joining the fun and am determined to finish on time next year. (I have a tendency to let projects for me to slip aside so I can focus on gifts for others... That being said, my completed blocks from CQJP 2013 will be finished into projects soon. And, almost all of my CQJP 2014 blocks have been embellished and most have been made into purses or totes. For CQJP 2016 I plan to make a real crazy quilt, just for me!)
Monday, August 10, 2015
Snowball Swap with Donna July/August 2015
Last week, I finished up the "snowball" I made for Donna through the Crazy Quilting International Snowball Swap.
This was the Halloween themed snowball that Donna made for me. I just love it!
Donna requested a snowball with a flower/garden theme or an under the sea theme. In case you did not notice (I am typing with a giggle), I have worked on a few under the sea themed blocks lately. So, I chose the flower/garden theme.
After stitching the fence (with a stem stitch and perle cotton), I added a tiny little line of buttonhole stitches (with 2 strands of green DMC floss.) These were the stems for tiny dandelions growing along the fence line. Using the same floss, I added a straight stitch to each side of the stems to create little leaves. A tiny French knot (using 2 strands of yellow DMC floss) topped each flower. To give you a bit of size perspective, the fence is about 3/8-inch tall. The little dandelions are 1/8-inch tall.
I had a hard time deciding what to do next. Then I saw a sketch of a tree from the book Doodle Stitching: The Motif Collection by Aimee Ray. (My mother-in-law gave the book to me for Christmas a couple of years ago and the trees are my favorites.) I used brown Anchor size 8 perle cotton and a stem stitch to outline the tree and fill in the trunk. (Had I planned better, I would not have had to stitch over part of the fence and a dandelion. Thankfully, you cannot tell looking at the finished piece!)
Next, I added English daisies following directions in Embroidery for all Seasons by Diana Lampe. (This is one of my favorite embroidery books.)
Using the same book, I added English bluebells (which I still need to practice) and forget-me-nots.
Tiny chain stitched leaves on the tree, a small purple butterfly and a small white butterfly completed the piece.
I just love embroidery! I am happy to say Donna likes her snowball and it is on its way to her now.
About the books I used: the following links should take you to them at Amazon.com. I am always curious about what books and resources other people use, so I thought I would add these. Disclaimer: I am not associated with the books, but I do receive a small credit with Amazon if you visit their website through my blog and make a purchase. Doodle Stitching is here and Embroidery for all Seasons is here.
For readers new to my blog, Crazy Quilting International (CQI) is a crazy quilting group I discovered on the Yahoo groups several years ago through their blog. CQI also meets on Facebook now (as Crazy Quilt International.) The snowball swap is a friendship swap that is open to all members in the group.
I am linking this post with the Monday Stitchery Link Party #18 at Super Mom - No Cape! If you stitch and have a blog, I encourage you to link up. If you do not stitch or have a blog, I still encourage you to check out what others have been up to this week. There is always a free embroidery pattern too.
Thanks for stopping by!
Renee
Monday, October 20, 2014
A Snowball for Kathy S. in MD
Last week, I finally finished the snowball I made for Kathy S. (a.k.a. Clothqueen) and mailed it to her in Maryland. (Click on any photo for a larger view.)
Our goal was to swap in September, but I failed miserably with our deadline. Thankfully, Kathy was quite patient. She asked for an African themed block, which was completely new to me. I had a few ideas, but failed to find a fabric that even closely fit what I had in mind. So, I took a different approach.
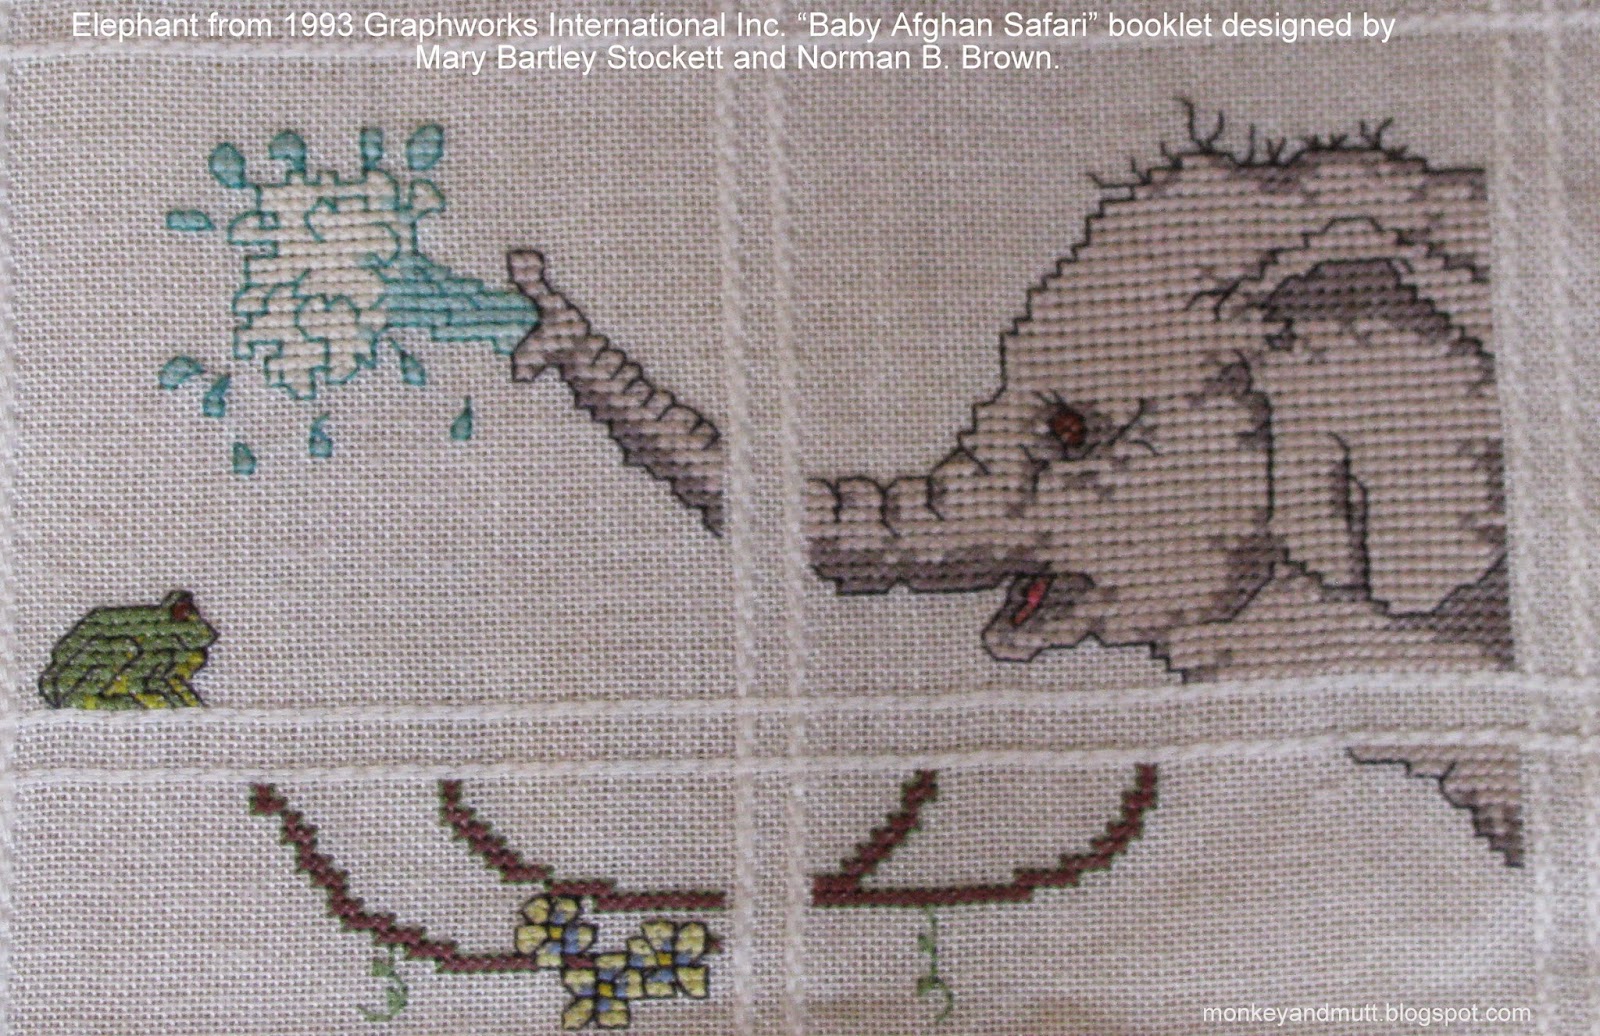
In 1999, a friend and I both cross-stitched a baby blanket for our sons following the 1993 Graphworks International Inc. booklet "Baby Afghan Safari" designed by Mary Bartley Stockett and Norman B. Brown. (Please note, I am not affiliated with the book. However, if you access Amazon.com through my website to make a purchase, I earn a small credit toward a gift card.)
I made a few adjustments to the trunk, so it would connect, and did not complete the lower section of the elephant for this project. (Apparently, I also failed to note the back-stitching on the water spray was blue in the pattern. Oops!)
Confession time. I don't know why I thought it would work this time, but I decided to try cross-stitching over a single square with 2 strands of floss on 32-count linen again (because it would fit onto my snowball stitched so small.) The only other time I made that insane attempt, I threw in the towel. Every row of stitching squishes the fabric below it together, making it almost impossible to see where to place the needle. By the time I was 1/4th of the way done with the elephant, I almost tossed it and started over. But, there was so much time invested, I opted to keep going. It was s-l-o-w progress, further hindered by the fact that I could only see to work on it at all near the window in the early morning light. I am not about to point out all of my mistakes. (I might confess a few x's actually go over one strand from side-to-side, but may have caught 2 strands from top-to-bottom. Removing threads to fix the errors was literally not possible.) In the end, I think the errors were hidden well enough. I was still quite happy with him when he was finally completed!
The seam along the right side of the elephant was embellished with a simple stem stitch in a similar shade to the fabric. Blue size 8 perle cotton was used to create "waves" beneath the elephant using the triangular buttonhole stitch. And the section at the bottom was embellished with a Cretan stitch and topaz seed beads.
The tree was the element I was most excited - and intimidated - to try. I did a Google search for "African trees" and looked through the great variety of photos and sketches. Then, I set to work creating my own. I couched down two brown shades of size 5 perle cotton for the trunk and branches. At the base, small straight stitches of "grass" were added using the same variegated green I used for the leaves.
If the elephant had not taken me so long and put me behind schedule, I believe the tree tops would have been made with French knots. To save time, I couched down 3 strands of a green variegated floss, beginning at the bottom and folding it back and forth to create the desired set of leaves. I love the way that turned out.
Kathy, I do hope you like it! Thank you SO much for swapping snowballs with me! I just love the snowball you sent me, and I look forward to swapping again the beginning of next year!
Hugs,
Renee
Our goal was to swap in September, but I failed miserably with our deadline. Thankfully, Kathy was quite patient. She asked for an African themed block, which was completely new to me. I had a few ideas, but failed to find a fabric that even closely fit what I had in mind. So, I took a different approach.
In 1999, a friend and I both cross-stitched a baby blanket for our sons following the 1993 Graphworks International Inc. booklet "Baby Afghan Safari" designed by Mary Bartley Stockett and Norman B. Brown. (Please note, I am not affiliated with the book. However, if you access Amazon.com through my website to make a purchase, I earn a small credit toward a gift card.)
I made a few adjustments to the trunk, so it would connect, and did not complete the lower section of the elephant for this project. (Apparently, I also failed to note the back-stitching on the water spray was blue in the pattern. Oops!)
Confession time. I don't know why I thought it would work this time, but I decided to try cross-stitching over a single square with 2 strands of floss on 32-count linen again (because it would fit onto my snowball stitched so small.) The only other time I made that insane attempt, I threw in the towel. Every row of stitching squishes the fabric below it together, making it almost impossible to see where to place the needle. By the time I was 1/4th of the way done with the elephant, I almost tossed it and started over. But, there was so much time invested, I opted to keep going. It was s-l-o-w progress, further hindered by the fact that I could only see to work on it at all near the window in the early morning light. I am not about to point out all of my mistakes. (I might confess a few x's actually go over one strand from side-to-side, but may have caught 2 strands from top-to-bottom. Removing threads to fix the errors was literally not possible.) In the end, I think the errors were hidden well enough. I was still quite happy with him when he was finally completed!
The seam along the right side of the elephant was embellished with a simple stem stitch in a similar shade to the fabric. Blue size 8 perle cotton was used to create "waves" beneath the elephant using the triangular buttonhole stitch. And the section at the bottom was embellished with a Cretan stitch and topaz seed beads.
The tree was the element I was most excited - and intimidated - to try. I did a Google search for "African trees" and looked through the great variety of photos and sketches. Then, I set to work creating my own. I couched down two brown shades of size 5 perle cotton for the trunk and branches. At the base, small straight stitches of "grass" were added using the same variegated green I used for the leaves.
If the elephant had not taken me so long and put me behind schedule, I believe the tree tops would have been made with French knots. To save time, I couched down 3 strands of a green variegated floss, beginning at the bottom and folding it back and forth to create the desired set of leaves. I love the way that turned out.
Kathy, I do hope you like it! Thank you SO much for swapping snowballs with me! I just love the snowball you sent me, and I look forward to swapping again the beginning of next year!
Hugs,
Renee
Friday, August 29, 2014
CQJP 2014 June Block - A Purse for My Sister
| Crazy quilted purse for my sister using a sew-in purse frame and my CQJP 2014 June block. |
The "C" monogram was taken from one of two fonts in Marsha Michler's book The Magic of Crazy Quilting: A Complete Resource for Embellished Quilting. (I am not affiliated with the book or the author. However, I do receive a small credit if you go to Amazon.com through my site to order the book. My husband bought this book for me for Christmas one year and it is one of my most used crazy quilting resources.)
This is the first purse I have made with a sew-in frame of this size, and I had a lot of fun putting it together. I do hope my sister likes it. (If not, I sent her a not telling her she could trade it in. I suppose for her, I could take a special request - lol! Black, purple and green are her favorite colors, so I hope she likes this one!)
Now... to see if I can catch up and stop running 2-3 months behind with the CQJP 2014 challenge. To see tons of beautiful eye candy, or to learn more about the CQJP 2014 Challenge, check out CQJP2014.blogspot.com.
Thanks for stopping by!
Renee
Labels:
books,
CQJP 2014,
Crazy Quilt,
Embroidery,
Frames,
purse
Friday, July 25, 2014
Another Snowball for Rita in KS!
| A "snowball" for Rita in KS from Renee Y. |
| Rose bush directions are in Embroidery for all Seasons by Diana Lampe. |
A small white fence stands along the "horizon" behind the rosebush. And, a light pink butterfly is flying over to check out a rose.
The bottom of the snowball consists of a flower seam, small pink flowers and a beaded pink butterfly.
I really enjoyed watching this block come together. I do hope Rita likes it!
In case you missed my earlier post, here is the snowball Rita sent me. It is just darling! To see more of her work, check out her blog: fibermaidensartwork.blogspot.com.
Thank you for stopping by.
Renee
Tuesday, July 15, 2014
CQI Garden and Flowers DYB Round Robin - Flora's Block
A week ago, I received Flora's beautiful set of blocks for the Crazy Quilting International Garden and Flowers DYB Round Robin.
I signed up as an "angel" for the round robin. An angel steps in to help complete a block if life happens and someone in the round robin is unable to complete a block during the rotation of the round robin. This was my first time signing up as an angel, and I admit, I was quite nervous about doing so. After all, I have only been crazy quilting for about two years. I am still quite a novice on so many levels.
This month, I was honored to be able to step in and help out by embellishing one of Flora's blocks. Below are pictures of the blocks I received and was able to choose from. Dana completed the first block in the round robin and it is absolutely gorgeous. I struggle with printed fabrics, and she embellished them so well. (You can see more of Dana's beautiful work at urbanfrog1.blogspot.com.)
Click on any photo for a larger view.
I was nervous about working on these blocks, because printed fabrics are not my strong point. However, the blocks are all so incredibly pretty that I was also very excited to embellish one. The hard part was choosing which one. After a day of waffling between 3 different blocks, I opted for the block in the last photo above. I know the pretty lady is looking at a little bird flying above her, but every time I looked at this block, I saw a tree branch along that seam and a bird flying above.
Dana did such a pretty job without making her block look too busy. I am afraid my work looks busy. My bluebells and dragonfly wings show I am still a novice. That being said, my work on this spring themed block is pictured below and I do hope Flora is pleased.
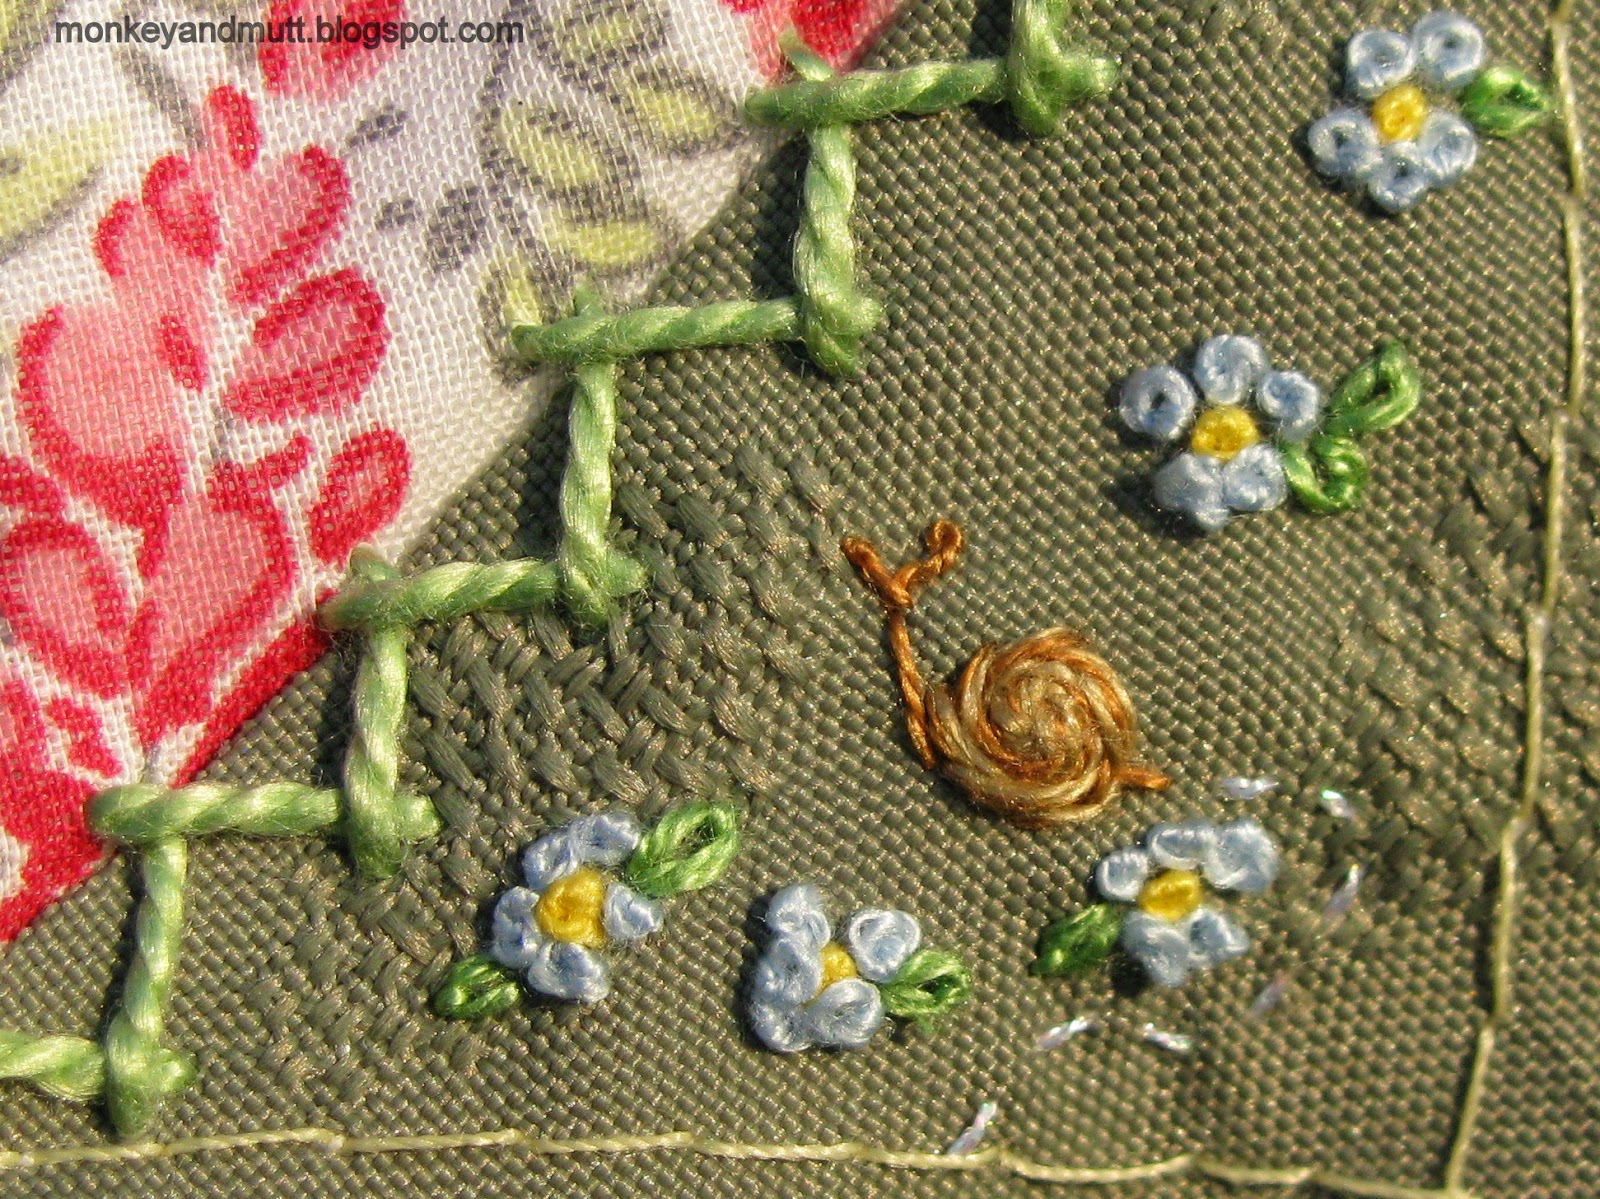
The bluebells, cyclamen, snail and forget-me-nots were all made following instructions in my book by Diana Lampe, Embroidery for all Seasons. (I am not affiliated with the book. However, if you purchase it through Amazon from my blog, I do receive a small credit.)
The butterfly above the birdhouse in the photo above is a 6mm Swararovski crystal bead.
I purchased several of these tulip beads a short time ago from crazyquiltingsupplies.com ( I am not affiliated with the website.) With a spring theme, this block provided the perfect opportunity to use one.
I have wanted to make a dragonfly using one of these lovely red heart beads (Mill Hill Glass Treasures #12082) since I purchased them a year or so ago at Acorns and Threads. (My wings need more practice. I do hope Flora likes him anyway!)
I was hesitant to put my spider web on the upper-right section of the block, as that is where Dana put hers. I almost added a tiny web beneath the tree and added a tiny spider lowering itself toward the birdhouse. But, this white triangular patch of fabric just screamed for a web. And, I do so love this spider from Marsha Michler's book, The Magic of Crazy Quilting: A Complete Resource for Embellishing Quilting. (Again, this is another favorite of my few crazy quilting books that I am not affiliated with, but do receive a small credit if you visit Amazon from my site to purchase it.)
The addition of pink roses felt like a necessity, with all of the pretty pink roses in the centerpiece.
Here is the completed block:
I discovered the lace I added to the upper-right-corner at the Button Emporium in Portland. I look forward to using it again.
I do hope Flora is pleased with the block! (I encourage you to check out her stunning work at Flora's Bee Crazy Quilter.)
Oh, a very dear friend thinks I should name the spider in my block. Fluffy is the only thing that comes to mind - lol! Any ideas?
Have a great day!
Renee

I signed up as an "angel" for the round robin. An angel steps in to help complete a block if life happens and someone in the round robin is unable to complete a block during the rotation of the round robin. This was my first time signing up as an angel, and I admit, I was quite nervous about doing so. After all, I have only been crazy quilting for about two years. I am still quite a novice on so many levels.
This month, I was honored to be able to step in and help out by embellishing one of Flora's blocks. Below are pictures of the blocks I received and was able to choose from. Dana completed the first block in the round robin and it is absolutely gorgeous. I struggle with printed fabrics, and she embellished them so well. (You can see more of Dana's beautiful work at urbanfrog1.blogspot.com.)
Click on any photo for a larger view.
| Dana's lovely work on Flora's Block |
I was nervous about working on these blocks, because printed fabrics are not my strong point. However, the blocks are all so incredibly pretty that I was also very excited to embellish one. The hard part was choosing which one. After a day of waffling between 3 different blocks, I opted for the block in the last photo above. I know the pretty lady is looking at a little bird flying above her, but every time I looked at this block, I saw a tree branch along that seam and a bird flying above.
Dana did such a pretty job without making her block look too busy. I am afraid my work looks busy. My bluebells and dragonfly wings show I am still a novice. That being said, my work on this spring themed block is pictured below and I do hope Flora is pleased.
The bluebells, cyclamen, snail and forget-me-nots were all made following instructions in my book by Diana Lampe, Embroidery for all Seasons. (I am not affiliated with the book. However, if you purchase it through Amazon from my blog, I do receive a small credit.)
The butterfly above the birdhouse in the photo above is a 6mm Swararovski crystal bead.
I purchased several of these tulip beads a short time ago from crazyquiltingsupplies.com ( I am not affiliated with the website.) With a spring theme, this block provided the perfect opportunity to use one.
I have wanted to make a dragonfly using one of these lovely red heart beads (Mill Hill Glass Treasures #12082) since I purchased them a year or so ago at Acorns and Threads. (My wings need more practice. I do hope Flora likes him anyway!)
I was hesitant to put my spider web on the upper-right section of the block, as that is where Dana put hers. I almost added a tiny web beneath the tree and added a tiny spider lowering itself toward the birdhouse. But, this white triangular patch of fabric just screamed for a web. And, I do so love this spider from Marsha Michler's book, The Magic of Crazy Quilting: A Complete Resource for Embellishing Quilting. (Again, this is another favorite of my few crazy quilting books that I am not affiliated with, but do receive a small credit if you visit Amazon from my site to purchase it.)
The addition of pink roses felt like a necessity, with all of the pretty pink roses in the centerpiece.
Here is the completed block:
I discovered the lace I added to the upper-right-corner at the Button Emporium in Portland. I look forward to using it again.
I do hope Flora is pleased with the block! (I encourage you to check out her stunning work at Flora's Bee Crazy Quilter.)
Oh, a very dear friend thinks I should name the spider in my block. Fluffy is the only thing that comes to mind - lol! Any ideas?
Have a great day!
Renee
Subscribe to:
Posts (Atom)