Showing posts with label January. Show all posts

Monday, February 20, 2017

Completed CQJP 2017 January Block

CQJP 2017 January Block

My January block for the Crazy Quilt Journal Project (CQJP) 2017 is finally finished! Wow is it PINK!?!

You may remember, I planned to add more to Seam 1 and to add silk ribbon leaves to Seam 12. 

For Seam 1, 3 straight stitches were added with size 12 DMC #699 perle cotton and cross-stitches were added with size 8 DMC #605 perle cotton.

For Seam 12, River Silks #43 silk ribbon was used to make ribbon stitched leaves that I tacked down with a strand of DMC #704 floss.

Motif 4 is a Bliss Beads Sterling Silver Plated Love Charm attached with clear quilting thread.

Motif 5 was a fun one. (It has been too long since I played with silk ribbon embroidery!)
Using a strand of DMC 818 floss, I created 3 sets of 5 spokes. River Silks #18 silk ribbon was woven between the spokes to make spiderweb silk ribbon roses. Next, River Silks #65 silk ribbon was used to create ribbon stitched leaves that were tacked in place with a strand of DMC #369 floss. Little feather stitches with a strand of size 8 DMC #954 perle cotton filled in the motif. And I added a few size 10/0 hot pink seed beads with a strand of DMC #604 floss.

Motif 6 was a simple butterfly created with size 12 DMC #B5200 perle cotton. 

The wings are 4 detached chain stitches, the body is a straight stitch and the antennae are 2 pistil stitches. A running stitch created the flight path.

Motif 7 is a bullion stitched rose. First, I attached 3 clear pink size 10/0 Czech beads in the center with a strand of DMC #818 floss. Next, I added bullion knots in a circular motion, with each round being larger than the last, using size 8 Anchor #01201 variegated pink perle cotton. 4 leaves were added using fly stitches made with size 8 DMC #954 perle cotton floss. 

I loved being able to plan this block in my bullet journal and being able to record how I created each seam and motif. (Note: I did not create each seam and motif in the same order they were numbered in my bullet journal, so on the next page, I kept records correlating to the numbers assigned to each step here on my blog.)

Not every addition matched the original plan, but the plan was definitely helpful!

CQJP stands for Crazy Quilt Journal Project. It is a personal challenge to create a crazy quilt block each month in 2017 that measures at least 8x8-inches. You may learn more about the rules here and see the blocks that have been completed this year here


Other posts related to this block include:

Every step of my CQJP 2017 project is being saved to this board on Pinterest.

Sneak peeks of my projects are sometimes shared on my Instagram account, here, and on my Facebook page, here.

This post is linked to the Monday Stitchery Link Party #98 at Super Mom - No Cape. If you do hand embroidery of any form and have a blog, I encourage you to join the fun!

Friday, October 4, 2013

2013 Winter Challenge Results Posted at Evening Star Designs!

Remember the beautiful kit I received on June 18th for the Evening Star Designs 2013 Winter Challenge?  Well, I finished my project on the deadline - September 15th - and mailed my pictures in to enter.  The results were posted today! 


Last year, I decided I wanted to make a stocking for myself.  When I heard about the winter challenge, I decided it was just the push I needed to complete the project this year.

To see the other beautiful entries, just CLICK HERE.  I love seeing the different way the same materials were used! 

There was also an Evening Star Designs 2013 Miniature Challenge.  To see those beauties, CLICK HERE.

I did not win a prize through Evening Star Designs, but I had a lot of fun, tried some new techniques, and ended up with a stocking that will become a family heirloom someday. 

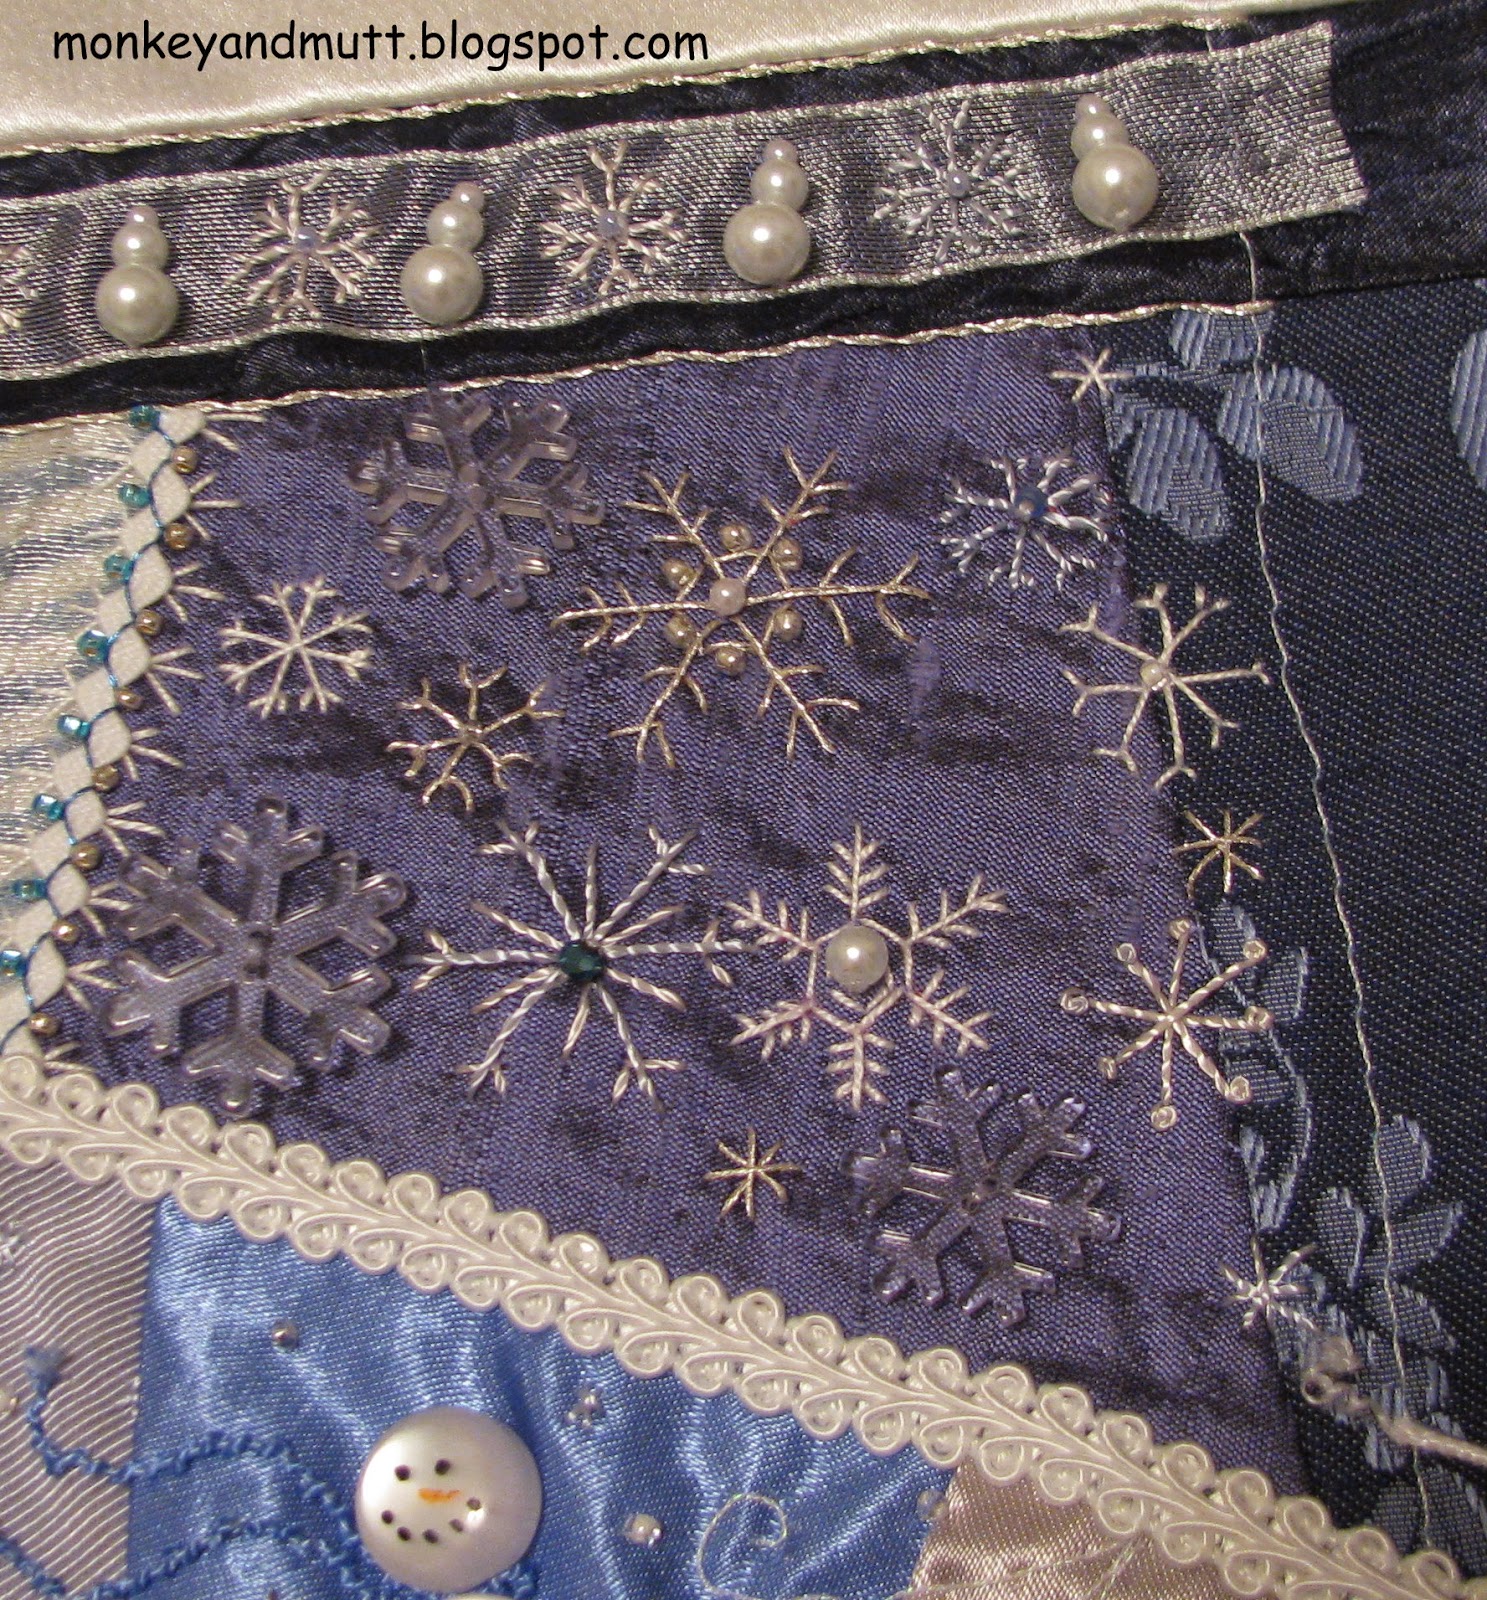
Top Close-Up
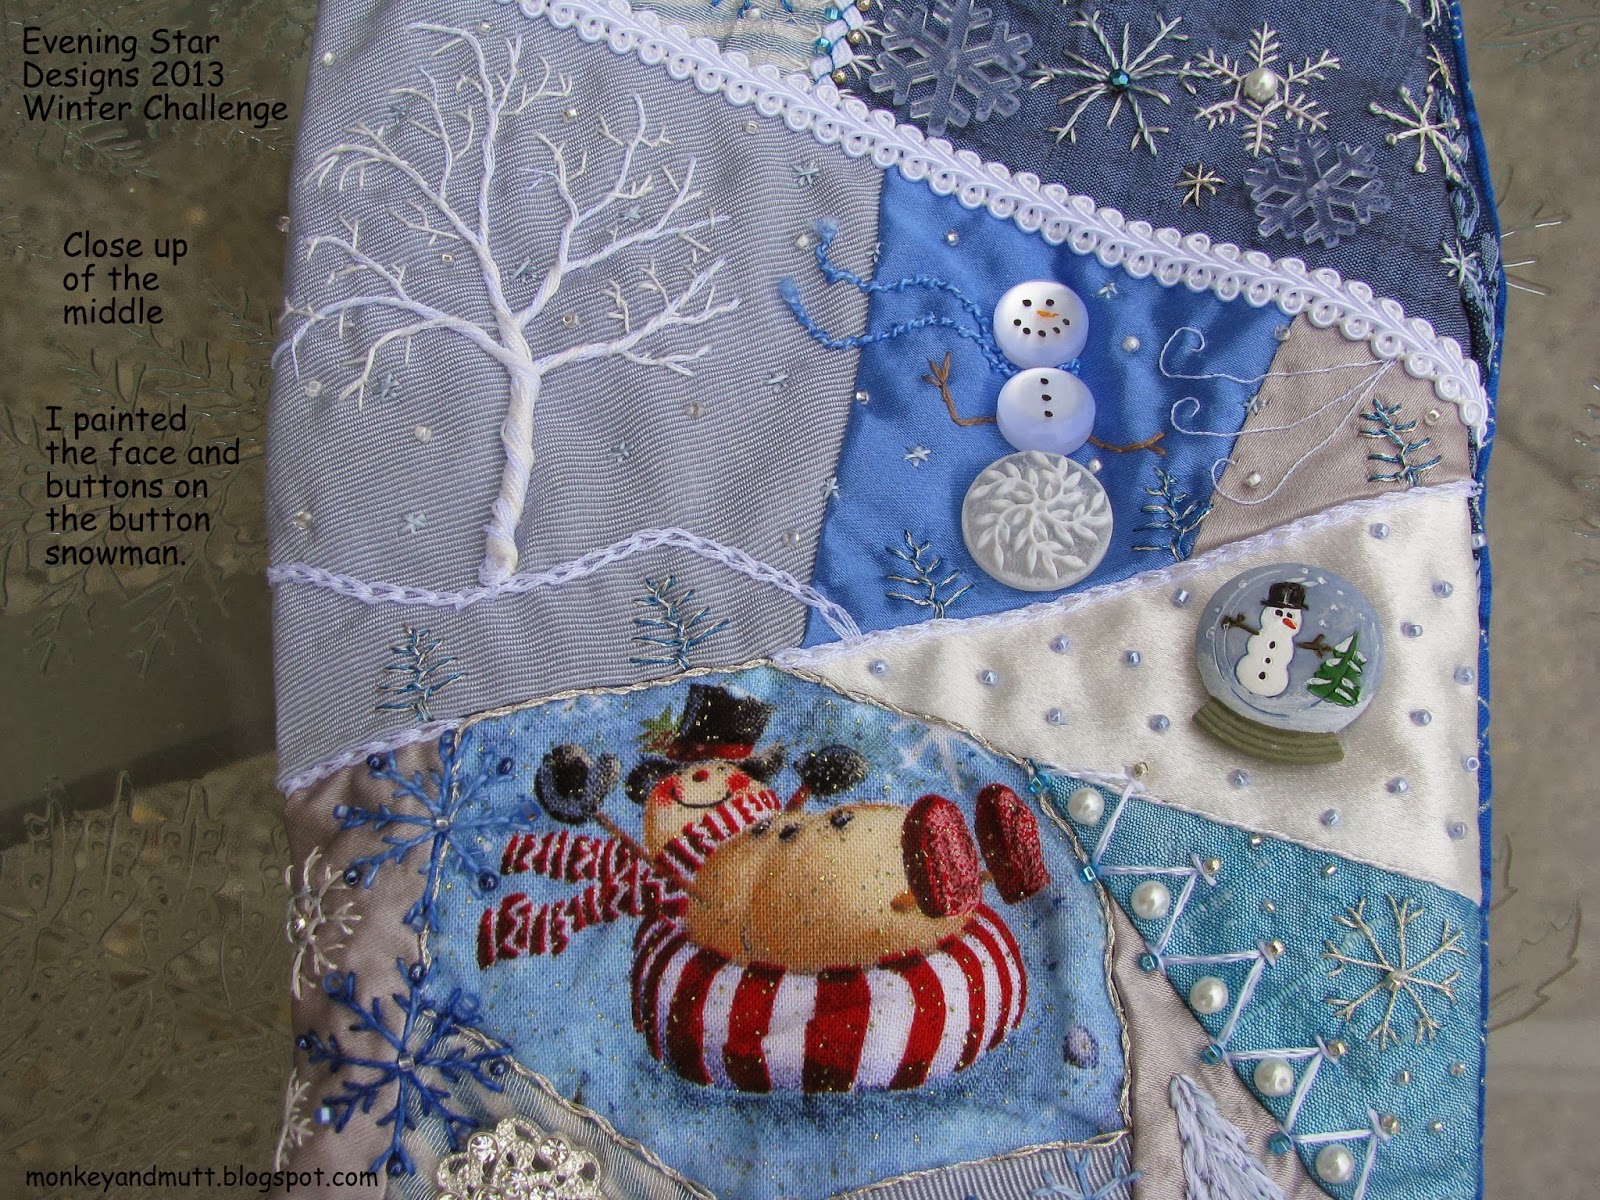
Middle Close-Up
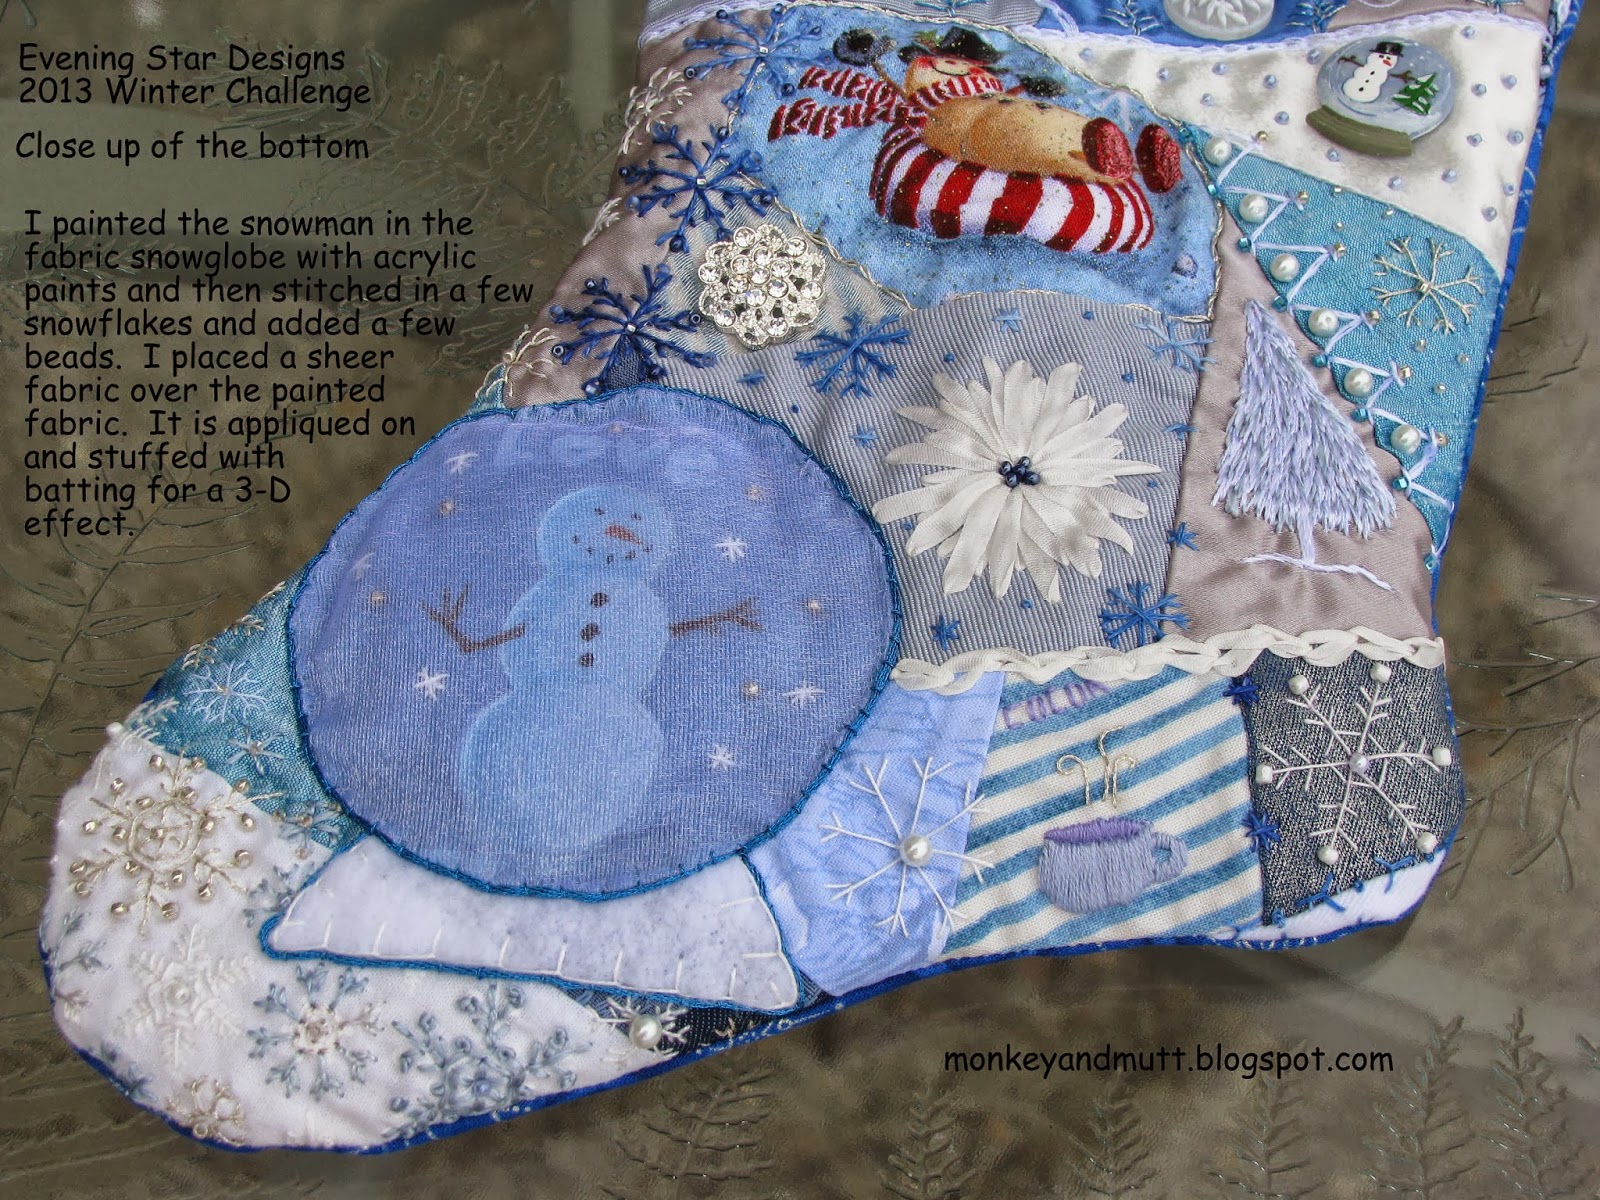
Bottom Close-Up

Here was the block after it was pieced.  I traced a stocking I liked the shape of onto muslin and then added a few inches to the height so it would meet the 100 square-inch requirement for the challenge.  (It was just over 102 sq. in.)

The snowman in the center is from a fabric in my stash that I really like, but have been unable to use.  Of course, once I began stitching, I had to keep reminding myself I was limited to a winter theme.  (Christmas ideas kept popping into my mind!)

One of my favorite seams.
When I painted the stenciled words onto my blocks for the CQI Winter/Christmas DYB RR, I also made my first attempt to paint a motif on fabric with acrylic paints.  Once the paint was dry, I set it with the heat of a dryer.

I checked a painting book out of the library and read about shading fruit.  The book used black paint beneath the color used for the fruit.  I opted to use a blue paint.  I let each layer of paint dry for a day before moving on to the next step.
I stuffed some batting beneath the circle so it would round out like a real snow globe.  To be honest, I was not sure I was happy with this addition, but opted to leave it anyway.  I added metallic blue thread around the border so it would stand out a bit better.


I wanted to add a button cluster, but could not find a combination that pleased me.  While moving the buttons around I was struck with the idea of this snowman.  I was so happy with this little fellow (pictured here without his scarf) that I added one to Kathy's block in our round robin.

I had a hard time thinking of something to stitch on the snowflake fabric, so I opted to embellish the snowflakes on the fabric.

I traced a few of those snowflakes onto tissue paper and stitched them onto this section near the top of the stocking.
 The tree in the little scene above (with the wind blowing in from the right) is my husband's favorite addition.  I just happened to find the little snow globe button stashed away with a few beads I purchased for a Christmas project a few years ago.


 The snowflake/snowman border along the ribbon was fun to make!  And, I do love snow days - as long as I do not have to drive anywhere!


I adapted the poinsettia from a motif design in The Silk Ribbon Embroidery Bible by Joan Gordon.

The tree was adapted from the pencil pine in Diana Lampe's book Embroidery for all Seasons.  (If it looks familiar, I stitched a pencil pine onto Barbara's block in our round robin.)

A few more snowflakes and a sparkly button I picked up at JoAnn Fabrics finished up this section.
It is hard to think about winter without picturing a nice cup of cocoa to warm up with!  I do not think of myself as an artist, so I was quite pleased that I was able to sketch this cup and the steam and actually stitch it so it looked half decent! (It is the little things in life...)
This blue snowflake fabric I found in my stash was perfect for the back.


I enjoyed this challenge so much that I signed up to receive the Evening Star Design Newsletter so I will not miss hearing about next year's challenge.


Monday, September 2, 2013

CQI Winter/Christmas DYB RR - Completed Block for Kathy S.

The block I chose to embellish.

The beautiful landscape Barbara W. created on the first block completed for Kathy S. made my decision a no-brainer on this round robin.  I have a fondness for landscapes and embroidered trees.  I also love snowmen.  So, I needed a landscape with a tree and a snowman.  Oh, and maybe a cardinal to better coordinate with the block Barbara embellished!

One of the tricky parts of a round robin, for a Newbie like me, is coordinating my work to mesh well with the work the others have done in the round robin.

With my first round robin, we all made one block and the other 4 members divided the seams and spaces by 4 to complete one-fourth of the work.  Coordinating with the colors and styles of stitching and fitting my ideas into the remaining space was quite the challenge sometimes.

My sketch to embellish the block.
This is my first DYB (Do Your Block) round robin, and I think I prefer the opportunity to embellish a complete 6-inch block.  Planning out the entire block without worrying if I am leaving enough space for others to fill in their seam treatments or to add a motif is kind of nice.   (Not that I always make a plan, but for this round robin, I have so far!)

I searched the Internet for "Winter Tree Images" and found a whimsical tree covered in snowflakes.  I loved the curve of the tree, so I sketched a similar tree with slightly different branches.  I thought a birdhouse would be a fun touch, but I had no idea how I would make one.  And, I was not sure how I wanted to add a snowman to the block.  Felt applique?  Satin stitch? (I worried the long threads would snag.)  Short and long stitch? (I am still struggling with my CQJP 2013 block using that method.)  Decisions, decisions.

Beginning of chain-stitched tree.
Using a strand of a dark brown and a strand of a light brown and a chain-stitch, I started with the tree.  By the end of that evening, I felt a pit of dread in my stomach.  I seriously wondered if I might need to contact Kathy and apologize for ruining her block.  Seriously.  (Maybe she could stitch a seventh block?  Maybe?  Could I take out all of those tiny chain-stitches without ruining the fabric?  I doubted it.)  Embroidery invaded my dreams that night.  In the morning, I looked at the tree and felt the same dread.  When I mentioned my concern to my 13-year-old, he commented, "Well, it is a weird design for a tree."  Sigh.  It wasn't just me...

My only option was to keep going and see if it would improve.  (After all, I wanted to throw away my current CQJP 2013 block for quite a while, and now I am kind of pleased with how it is going...)
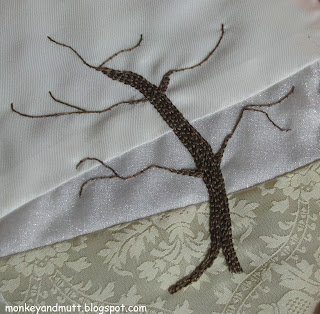
Progress on the tree - I was not happy with the way it looked.
So, I finished the tree as I had sketched it, but it did not look as whimsical on the fabric as it had on paper.  It looked... off.  There was too much empty space in the middle.

Adding a few more branches helped a bit.  I just worried my whimsical tree was going to end up better suited for a Halloween block...

Tree completed.
It looked better.  I could work with this.  Now, the challenge was going to be adding a birdhouse!  I pulled out my doodle cloth and attempted a satin-stitched birdhouse.  A padded satin-stitch worked!  I used two strands of a light blue rayon floss and a split stitch to outline the shape.  Next, I made satin-stitches in the longer direction, so the top stitches would be shorter and less likely to snag.

Once the stitches were complete, I used 3 strands of a dark brownish-gray cotton floss and 3 straight stitches to create the roof and the base of the birdhouse.  A straight stitch using a strand of a light brown (lighter than the lighter shade used in the tree) connected the birdhouse to the tree-branch.

While creating my "practice" birdhouse, I discovered a French knot hole for the bird's entrance sunk through all of the stitching.  Adding a colonial knot on top of the French knot still sunk through.  So, I added a small seed bead.  I'm not sure how I could have added it without disrupting some of the satin stitches.  Yet, overall, I was happy with the outcome.

Then, using 2 strands of a light brown cotton floss and straight stitches, I added a fence along the bottom seam.  Because the white fabric was so sheer, I tucked each stitch down in the back.  In essence, the fence was a reverse button-hole stitch.  (The back of the fabric showed a button-hole stitch, whereas the front was simple fence posts.)  Tiny stitches connected the posts together.

Now, it was time for the snowman.  I used acrylic paints in black and orange to paint a face on one button and two buttons on a second button for the snowman's head and torso.  Using clear quilting thread, I sewed the buttons on with a third, larger, button at the base.  After sewing the larger button on, I managed to sew a black seed bead into each button hole (which I placed in a vertical position) to look like more buttons on the snowman.  A couple of twig arms were couched down, and a ribbon scarf (in blue to coordinate with the birdhouse - as I feared red was too bright) finished him up.

Button Snowman
It took me a couple of attempts on my doodle cloth, but I did manage to make a cardinal by copying the one Barbara W. created for Kathy S.  I put him on a different branch than I had in my sketch.  If I kept him on the top branch, he would have been further toward the center.  Most of the movement flowed from the upper-right to the lower-left of the block and I did not want to distract from that.  So, I put the bird a bit closer to the upper-right corner.  (I also opted not to stitch a bird on the snowman's arm, as I feared the bottom corner would begin to look too cramped.)

I also added a few French knots using white rayon floss to add some snow to the branches of the tree.
Tree for Kathy's Block.
The last step was to add snowflakes.  I used white metallic floss for some snowflakes and white rayon floss for others.  No two snowflakes were the same.  I thought this final step would be rather quick, but it took almost as long as it had to create all of the other embellishments.  Trying to figure out placement and how to make this one differ from that one probably took me the longest!

This is how the block looked when I finished.  I do hope Kathy S. will be pleased with this wintery scene.  Below you can see the both of the completed blocks.


This was such a fun block to create.  Kathy S., thank you for the beautiful canvas!  Your blocks are gorgeous and the fabrics were so fun to stitch.



Monday, September 17, 2012

Crazy Quilt Days 35 and 36

It took longer than I had hoped, but the January block for my first crazy quilt is finally finished!

After using two strands of white to finish the tassels, it was time to finish up the house scene in the lower-right corner.

I used two strands of DMC 3024 to make a sidewalk leading away from the house.  Next, I combined one strand each of DMC 640 and 642 to make the tree.  The trunk was made with small chain stitches.  Straight stitches were used for the bare branches.  The last step was adding Mill Hill Petite Glass Beads (#42010) with a single strand of DMC 762.  The tiny, clear beads made delicate, shimmering snowflakes.

The final touch was the addition of snowflake buttons (Favorite Findings Snow Reflections) to cover the corners of the rick rack border in the center.

Now, I just need to decide which block to work on next.  Oh... and I need to piece blocks for a couple more birthday gifts.  Should be fun!

Have a wonderful week!
Renee

Saturday, September 15, 2012

Crazy Quilt Day 34

I am so happy I found time for stitching this week!  Yesterday, I managed to make some progress on my January block.  With any luck, this block will be completed by Monday, and I will be able to begin the 4th of 12 blocks.
First, I added a couple of windows to the house using DMC 3078.  I want the majority of the block to really focus on blue, white and silver, so I chose a pale shade of yellow that would not overpower the other colors.  I outlined the windows with DMC 823, the same dark shade of blue used to stitch around the roof.  A lighter shade of blue, DMC 334, was used to make a front door.  And a French knot of DMC 823 made a doorknob. 

I still have a couple of ideas rattling around in my mind about the next step in this section.  So, I decided to mull them over while adding the tassels to the scarves spelling out JANUARY.  First, I made silver snowflakes to cross the A's.
In my opinion, the end result has been worth the time of adding the tassels.  Only three more letters to go!

On a side note, I have been taking my photos on our patio table because the lighting outside is so much better.  This requires walking past sunflowers my boys planted with me last spring.  Let me just say, the bees LOVE those sunflowers.  And they are not tiny bees, by any means.  These fellows are big, and the buzz of their wings has startled me on more than one occasion, as it is so loud.  There were about five of these big guys buzzing less than two feet behind me while I took my photos this morning.  (I suppose I could say my day began with a buzz...)


Thank you for stopping by! 
Renee

Tuesday, September 11, 2012

Crazy Quilt Days 32 and 33

Oh, Dear Blog, I have missed you so!  It has been a busy, busy couple of months trying to cram projects and activities into the end of our summer break and prepare my boys for another year of school.

My goal has been to complete my 1st crazy quilt within one year.  Thankfully, I was ahead of schedule when I began the January block, as I am now falling behind.  I should be working on my 4th block right now...  This one has been a bit challenging for me.  (And finding time to stitch has been tricky!)


I have decided to keep "January" as scarves.  I just need to add the little fringes to each end, and perhaps add a snowflake in the middle of the A's to cross them.

And, as you can see, I finally finished the snowman!  I may have liked him better without the buttons, but I let my family vote and I was overruled.  I was worried that I would have a hard time fitting in his face with the hat; but that was not too difficult.  Although, I did have a challenge with his French knots.  The mouth was overpowering his eyes.  I pulled everything out twice.  In the end, I used two strands of black (DMC 310) for his eyes, and one strand for his mouth.  This kept the mouth from overpowering his face.  The mittens look a bit large; but, I figure, mittens hanging off of sticks on a real snowman would look big too.  I am not sure how much I like his hat, but that is my family's favorite part.  (Last May, I purchased the buttons at Acorns and Threads in Portland (on Scholl's Ferry Road).  Unfortunately, I did not make notes of the names so I could share them here.)

The next challenge - the part I would do differently - was the house in the lower-right corner.  I cut out 4 separate pieces.  In the future, I would make it two.  Prior to stitching the pieces in place, all of the corners actually met up.  This week, I get to see if I can add a decent looking window and door to the house.  I will also attempt a little path from the door to an edge of the block.  I still need to decide if I want a leafless tree to the left of the house or an evergreen.  We shall see!

So, January is only a few steps away from completion: the scarves, the house area, and the addition of snowflake buttons to hide the section where the rickrack overlaps.  If I am lucky, it will be done by the end of the week!

Thanks for stopping by.

Hugs,
Renee

Tuesday, August 14, 2012

Crazy Quilt Day 31

I decided to take some time to figure out how I wanted to finish "January" on the block.  So, I moved on to the last sections and fused the applique items onto the block. 

The fuzzy snowman is going to be quite the challenge for me, for reasons soon to be revealed.  My next step will be finding DMC cotton flosses that closely match the blues in the little house to stitch it into place.  I sure hope I can make both of these sections look the way I picture them in my head!  (If only those pictured ideas would stop changing!)

Thanks for visiting!  I hope you have a wonderful week.

-Renee

Thursday, August 9, 2012

Crazy Quilt Day 30

Yikes!  I have been neglecting my blog recently...  Between summer activities, participating in my first round robin, spending time with my family and trying to complete some projects around the house, I suppose that is understandable.  I need to update my goals, but posting about crazy quilting is so much more fun!

I must confess, I have not made much progress on my January block.  However, I did finally stitch the scarf-letters on to spell out the name of the month.  (The R and Y required so much twisting and such that I actually whip-stitched the two raw edges in the back together; a step I did not find necessary for the other letters.  It took a while, but I finally manipulated them into shape.) 

Next, I need to decide, do I add the snowmen, or leave them as scarves?  Once I decide that, I will be able to start adding the tassels onto the ends of the scarves.  If I do not add snowmen, I need to figure out how to cross the A's.  Hmmm.... tricky, tricky.  I am most tempted to switch to another section of the block so I can mull that one over.

And, I have another confession.  I failed at my resolution not to begin another project until I finished two UFOs.  But I have a great excuse!  (Don't I always?  Hmmm...)  I have been working on a couple of birthday gifts.  Once they the recipients have received them, I will post pictures.

Have a wonderful day, and thank you for stopping by!

-Renee

Wednesday, July 18, 2012

Crazy Quilt Day 29

Beginning "JANUARY"
Yesterday, I did manage to make some progress on this block!  In the past, any applique I had done was with the use of double-sided fusible webbing and stitching over the raw edges.  In this case, I really wanted the letters to look as much like scarves as I could manage.  So, I folded the raw edges underneath and pinned the letters on.  Each letter used a single strip of fabric, manipulated into the desired shape.  I began with a longer strip of fabric than I needed, to make sure I had enough length to make the letter.  Next, I trimmed it, leaving enough at each end to turn the fabric under to cover the raw edges.  This process felt like it took longer than actually stitching the letters on.

My attempt at "scarf letters."
Obviously, my stitches are not evenly spaced (I need to work on that!)  There are more stitches at the ends, where the edges have been tucked under, to keep any fraying threads from escaping.  And, I used fewer stitches on the sections of letters I hope to cover with snowmen.  (I have yet to attempt that!)  I decided to wait to add the fringes to the scarves until after the snowmen have been put in place.

The letters would probably be much easier to manipulate into shape, had I cut the fabric on the bias (diagonally.)  I guess I am a glutton for punishment.  I really wanted the stripes to line up this way for the letters, so a bias cut just was not going to work for me. 

Thanks for checking in!

Hugs,
Renee