Showing posts with label Whipped Chain Stitch. Show all posts
Tuesday, March 3, 2020
TAST 2020 Chain Stitch
A new round of Take a Stitch Tuesday (TAST) began in January.
TAST is a personal challenge to learn a new hand embroidery stitch each week. The challenge is offered by Sharon Boggon of Pin Tangle. You may learn more about the challenge here.
Beyond TAST offers a more complex stitch for those that have completed TAST in the past or are more experienced embroiderers. (I have not worked these yet.)
TAST Week 1: Chain Stitch
This stitch was worked with size 8 Anchor red floss.
I then added size 12 cream Presencia Finca floss to create a whipped chain stitch (as seen in the photo at the beginning of this post.)
TAST Week 2: Fly Stitch
Eight fly stitches worked with size 12 DMC pearl cotton made a snowflake.
A size 10/0 crystal glass seed bead was added to the center.
I need to work on my spacing, but I also worked a beaded fly stitched snowflake with the same DMC pearl cotton and crystal glass beads.
TAST Week 4: Stem Stitch
I traced a heart (using one of Sharon Boggon's Stitchers Templates Set 1) onto the foundation on the back of the block with a pencil (as seen below.)
Next, I used a pink Anchor size 8 pearl cotton to stem stitch around the heart.
TAST Week 3 was the Buttonhole Stitch. I have not used it yet this year, but I tend to use it to make flower stems (as seen in 2 of the seams surrounding the heart in my Stem Stitch photo.)
Do you have a favorite way to use the the Chain Stitch, Fly Stitch or Stem Stitch?
Wednesday, February 7, 2018
TAST Weeks 5-6
Week 5: Herringbone Stitch
Inspired by the work of Annie Bowers on the Facebook TAST Group, I used the herringbone stitch as a filler on my tree. It was a fun idea that I would not have come up with myself.
The outline of the tree was added to my Crazy Quilt Journal Project 2018 February block with a stem stitch, but I did not like all of the open space. This was a great solution!
This arched seam was created with size 12 black perle cotton and chain stitches.
First, I traced the arches from one of Sharon B.'s crazy quilt templates. (Regular readers may recall I received them in exchange for an honest review. I still love using them!)
Next, I whipped the chain stitch with a variegated pink size 8 perle cotton.
Working with these stitches was so much fun, I kept playing!
Using another stencil, I marked the foundation fabric on the back of the block.
I used these dots as guides to create another herringbone stitched seam.
On one side of the herringbone stitched seam, I added small bullion knots. Small fly stitches were placed beneath each bullion. These were all made with size 8 variegated pink perle cotton. Blue seed beads were added to the other side of the seam.
Using size 8 green perle cotton, I chain stitched the stem.
Next, I whipped the chain stitches and couched the same thread around the shapes of the leaves. Herringbone stitches filled them in.
A pink lace flower that I purchased from Raviolee Dreams a couple of years ago inspired me to create the stem and leaves. I couched it onto the block with a matching strand of pink floss and filled the center with blue seed beads.
Thank you for stopping by!
Renee
TAST stands for Take a Stitch Tuesday. It is a personal challenge to learn a new embroidery stitch every week.
You may learn more about TAST here and find the Facebook group here.
CQJP stands for Crazy Quilt Journal Project. This is a personal challenge to complete a crazy quilt block each month that is at least 8-inches square. You may learn more about CQJP 2018 and see the beautiful blocks other participants have created here.
Saturday, January 6, 2018
Embellished CQJP 2018 January Block
| CQJP 2018 Block 1 "Love You" |
If you follow me on Instagram or on Facebook, you have seen a few sneak peeks of this piece. This was such a fun block to embellish!
This is a photo heavy post.
If you want to know how each part was embellished, keep reading. If not, feel free to skim through the photos!
The heart was created with white fabric that I colored in with shades of pink using crayons. (The process is better explained in this post.) It was applied to the block with Therm O Web Heat-n-Bond Lite.
After adding basic stitches to the 2 seams, I covered the edge of the appliqued heart with a whipped chain stitch. There were a few fibers along the seams that were not caught beneath those stitches, so I couched down a strand of black perle cotton. That almost solved the problem. Couching 6 strands of variegated pink embroidery floss covered those last few fibers.
I wanted to add the spider web to the pale pink section before adding the flowers to the feather stitched seam. (You may have noticed, I added detached chain stitch leaves first.)
The heart center was created with fly stitches extending from the 3 points of the heart to the edges of the pink section. 4 more long straight stitches were added to give me more spokes to attach the central web to.
"Love you!" was added with a stem stitch and black perle cotton.
Raised cross stitch flowers were added beneath the chevron stitched seam.
Straight stitches with 2 detached chain stitched leaves were worked above the chevron stitch, and 2 detached chain stitched leaves were added to each flower below.
Flower petals were created with sets of 3 detached chain stitches or with a fly stitch added to the top of each stem.
This butterfly was added with detached chain stitches and a straight stitch. The running stitch made a flight path.
Beads were added to both seams and a few more detached chain stitch leaves were added to the second seam to complete the block.
I am incredibly pleased with the results!
Thank you so much for stopping by!
-Renee
| CQJP 2018 January Block Seam 1 |
| CQJP 2018 January Block Seam 2 |
| CQJP 2018 January Block Motif 1 |
| CQJP 2018 January Block Motif 2 |
| CQJP 2018 January Motif 3 |
Related blog posts:
CQJP 2018 Block 1 Pieced - here
CQJP 2018 - 2 Basic Seams - here
CQJP 2018 seam and motif photos are beig saved to this Pinterest board.
Click any photo above for a larger image. (I am not sure if it is a Picassa issue or a blogger issue, but the images are blurrier in the blog posts. The enlarged view is better.)
CQJP = Crazy Quilt Journal Project. It is a personal challenge to embellish a crazy quilt block each month of the year. You may see work of other participants here.
Sunday, October 22, 2017
CQJP 2017 March Block Motif 5
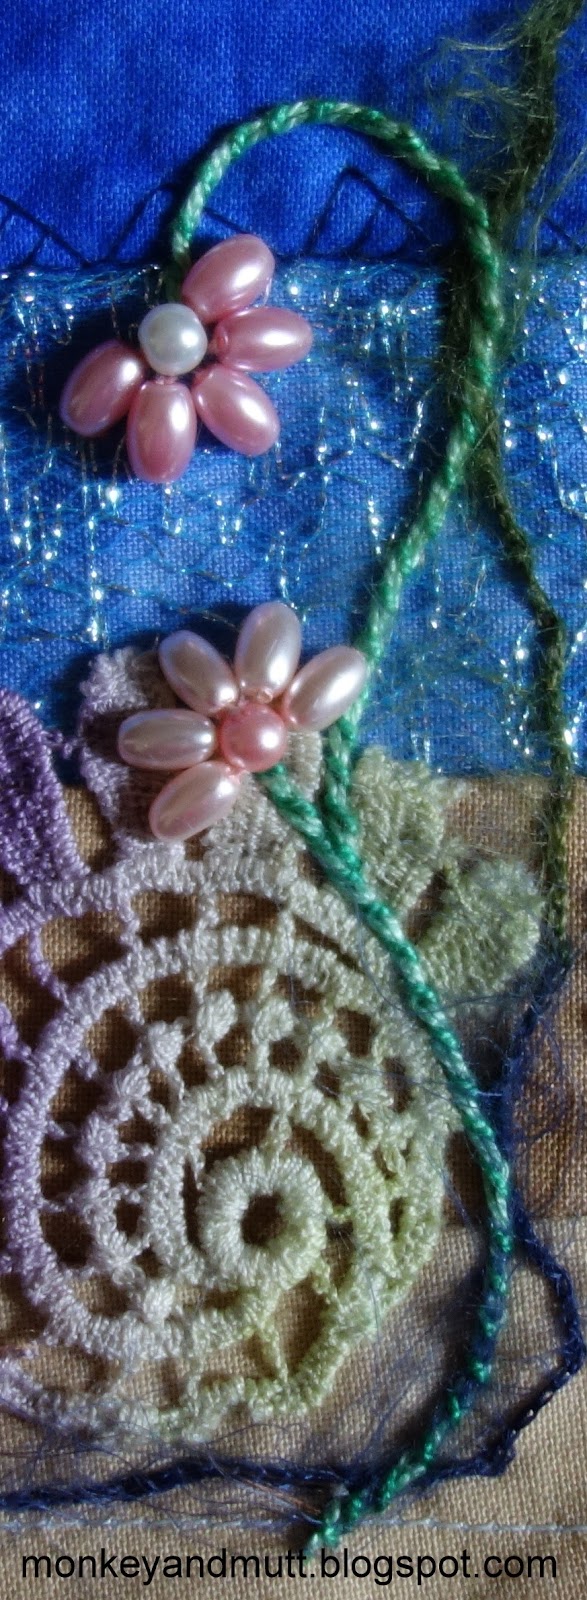
This is the 5th motif added to my Crazy Quilt Journal Project (CQJP) 2017 March block. I had a bit of fun playing with Sharon B.'s Stitchers Templates making this one.
Click on any image for a larger view.
First, I traced a few of the wavy vine lines from the templates onto the back (muslin foundation) of my block with a pencil.
The vines were created with whipped chain stitches.
A chain stitch was added following the lines of one of the vines with size 8 DMC #954 perle cotton. Size 8 DMC #125 perle cotton whipped around the chain stitches.
After giving some thought to the way I wanted the vines to wrap around one another, I continued adding chain stitches to the other vines.
In this photo of the back, you may see that I wanted the vine sketched on the left to cross over in front of the middle vine on the lower junction. So, I embroidered the middle vine first. On the upper junction, I wanted the middle vine to be in front, so I stopped just below where those lines met and embroidered the vine to the left before continuing the middle vine.
I did not whip these two vines until both had been embroidered with chain stitches.
You may also note that I did not follow the entire shape from this vine. I wanted leave enough room to add the flowers.
After whipping the chain stitches, I added a pearl bead to the top of each stem, and then added rice beads for each of the "spokes" I had traced on the back. For these flower petals, I added the middle "spoke" first and then added two beads to each side, to be sure they all fit together well.
Small straight stitches were added to the vines with the variegated green thread to add a bit more detail.
This was such a fun motif to create!
Thank you for stopping by!
Renee
Notes:
I am not affiliated with Sharon B.'s templates. However, I did receive them in exchange for an honest review and have so much fun playing with them!CQJP stands for Crazy Quilt Journal Project. You may find the CQJP 2017 blog here.
Related Blog Posts:
CQJP 2017 March Block Seams 1 & 2 and Motif 1 - here
CQJP 2017 March Block Seam 3 and Motifs 2, 3 & 4 - here
CQJP 2017 February Block Tote - here
CQJP 2017 January Block - here
On this Pinterest board, I am saving each step of my CQJP 2017 progress.
Wednesday, March 15, 2017
TAST 76
I am still playing catch up from my Internet issues earlier this week, and pretending it is Tuesday for my TAST post.
TAST 76: Whipped Chain Stitch
I traced curvy lines from Sharon B.'s Crazy Quilt Templates Sets 1 & 2 onto the back of my block for these underwater flower vines/stems. (I am not affiliated with the templates, but did receive them to review and love working with them.)
The chain stitches were worked with size 8 DMC perle cotton #954.
Size 8 DMC perle cotton #125 was whipped around the chain stitches.
Flowers were created with 5 rice bead petals and a small pearl bead in the center.
These were so fun to make, I plan to add them to another block soon!
The link in the TAST title above will take you to the tutorial for 2 versions of the whipped chain stitch. I worked the 2nd version on this block in January of 2016. You may see more photos here.
TAST stands for Take a Stitch Tuesday, a personal stitching challenge offered by Sharon B. at Pintangle.com. You may learn more about it here and find the TAST Facebook group here.
To celebrate 10 years of TAST, Sharon B. is sharing a series of interviews with TAST participants. On March 9th, she posted an interview with Maureen of CrazyQStitcher. I fell in love with Maureen's work in 2014 with the gorgeous bird blocks she created for the Crazy Quilt Journal Project (CQJP). You may find the interview here and see Maureen's CQJP 2014 blocks here.
A few fun notes that may be of interest:
1. Sharon Boggon's new book, The Visual Guide to Crazy Quilting Design: Simple Stitches, Stunning Results, will be released in August. It is available for pre-sale at Amazon, and for the moment it is at a reduced price. (I am not affiliated with the book, but do receive a small credit from Amazon if you visit through my blog and make a purchase.) You may find it here.
2. There is a giveaway for the Spring Flowers Collection of floss at Victorian Motto Sampler Shoppe. (I have no affiliation.) You may learn more here.
3. Pamela Kellogg of Kitty and Me Designs will be making cross stitch designs for Kreinik and she offered a free St. Patrick's Day pattern you may find here.
4. I have 3 pieces embellished and ready to sew into projects for my currently empty Etsy shop. Once they are aded to the shop, I will announce it on my Hand Stitched Treasure Facebook page.
Thank you for stopping by!
Renee

Saturday, January 9, 2016
CQJP 2016 January Block Seam 3
The third seam on my Crazy Quilt Journal Project (CQJP) 2016 was partly inspired by the need to fix an oops and then embellished with a seam inspired by Valerie Bothell's Joyful Embellishment Stitch #161.
I added the trim along the seam because I oopsed when piecing this block. When the seam was sewn together, I did not realize I was too close to the edge of the bottom fabric. When I began stitching, the fabric above the trim pulled out of the seam. So, I hand stitched the fabric down and then sewed this trim down over the full length of the seam. It secured the fabric and dressed up the seam.
No ideas that I liked sprung to mind to further enhance this seam, so I looked through several seams from the Joyful Embellishment group Valerie Bothell set up last year and really liked #161. I did change it slightly by whipping the chain-stitched arches.
I think my version of this seam would look better if the pistil stitches were a bit longer, but this block will be for a lap quilt I plan to wash and dry, so I am trying to avoid long stitches that may catch on anything in the future.
Sharon B.'s template set #2 came in very handy for this seam. I lined it up along the seam so the arches would not quite meet, leaving space for the pistil stitches in between. One of the only complaints I heard about Sharon's first set of templates was that they could be hard to find in your work station because they are clear plastic. One solution was to place a small sticker on each template, making them easier to spot. I keep mine in a plastic bag and put them back immediately after use, so I have not had that issue. The clear plastic did make it easier to line this seam up the way I wanted it!
Threads used: black Anchor size 8 pearl cotton + red (#00047) Anchor size 8 pearl cotton.
Stitches used: whipped chain stitched = chain stitched black arches whipped with red & red pistil stiches
As some of you may remember, I was kindly sent a set of Sharon B.'s Crazy Quilt Templates Set #2 and agreed to write an honest review of anything I liked or did not like. My biggest hurdle so far has been my hesitation to mark on the front of my blocks. By following Sharon's advice to only mark where my stitches will cover the markings, I have overcome my hesitations. Using the stencils on this block has been great fun! (In fact, my hubby was asking what I might like for my birthday this year and the first set of stencils was my reply.)
Thanks for stopping by!
Subscribe to:
Posts (Atom)