Showing posts with label Buttonhole Stitch. Show all posts

Sunday, February 25, 2024

TAST 2024 Weeks 5 and 8: Buttonhole and Detached Chain Stitch

 
Buttonhole Stitch, Detached Chain Stitch, and Seed Beads

The Take A Stitch Tuesday (TAST) stitches I work with may be increasingly out of order, as I try to work them into my Crazy Quilt Journal Project (CQJP) 2024 blocks.


The TAST Week 8 stitch shared at Pintangle(dot)com was the Buttonhole Stitch. (The lighting was not very good when I took this photo, so the colors are off.) 

Using a strand of Impressions by Caron thread (a blend of silk and wool) in color 0000, I worked the buttonhole stitch along a seam. My stitches were intentionally unevenly spaced and frequently slightly angled.


The Beyond TAST Stitch for Week 8 was the Closed Buttonhole Stitch. I have not worked this stitch for 2024, but I have used it in the past with Detached Chain Stitches and French Knots to create an angel seam, as seen in the photo above. There is more information in this post.


The stitch introduced for TAST 2024 Week 5 was the Detached Chain Stitch, which is sometimes called a Lazy Daisy Stitch. I worked this with the Buttonhole Stitch to create one of my favorite crazy quilt seam embellishment. I added pairs of Detached Chain Stitches to each side of my Buttonhole Stitches to create leaves.


Here is a closer view.


To complete this seam, I used a single strand of DMC #225 embroidery floss to add Mill Hill Petite Glass Seed Beads #42027. The full combination of stitches and beads created a seam of little flowers.


The TAST 2024 Week 5 Beyond TAST stitch was the Long Tail Chain Stitch (plain, beaded or whipped), which I plan to work into a future CQJP 2024 block to make snowflakes, similar to these that I created in 2016. You may read more about those in this post.


Thank you for stopping by!
Renee

Tuesday, March 19, 2019

TAST 2019 - Stitches 3, 4, 7 & 11


I hoped to share this last Tuesday, but was unable to download photos from my email and blogger would not let me upload photos. Thankfully, things are working properly now! 

Click any image for a larger view.

My Take A Stitch Tuesday (TAST) Stitches are being added to a few of the UFOs (unfinished objects) on my list for the 2019 UFO Challenge. The seam above was created using three TAST Stitches.


Stitch 3: Buttonhole Stitch was added with green perle cotton floss to create flower stems.
Stitch 7: Detached Chain Stitch - Pairs of detached chain stitches were added using the same thread to create leaves.
Stitch 11: French Knots were added at the top of each stem with 2 strands of red embroidery floss to create tiny flowers.

Now 2 seams are complete on project #12 of my UFO list. (The first seam may be seen in my previous TAST post, here.)

Stitch 4: Stem Stitch Project #6 was selected to complete in February for the 2019 UFO Challenge. My project #6 required me to finish quilting a Halloween Mug Rug with a stem stitch before adding binding. The stitching is now complete!


Below are links to a few of my favorite works incorporating these 4 TAST stitches.

Buttonhole Stitch and Detached Chain Stitches - I love the combination of these stitches to create a seam of flower stems, leaves and flower petals on the 2nd seam of my January 2017 Crazy Quilt Journal Project (CQJP) block shared in this blog post.

French Knots - I love the way they worked in a monogram and as a blanket of snow in works you may find in this blog post.

Stem Stitch and Detached Chain Stitches - The combination of these two stitches on the seam shared in this blog post is one of my very favorites. I also love the stem-stitched words added to the quilt shared in this post that I made for someone dear that battled breast cancer.

Thank you so much for visiting!
Renee


My 2019 TAST Progress:
Completed Stitches: 1-4, 7 & 11
Need to Stitch: 5-6, 8-10 & 12


Monday, February 4, 2019

Simple Heart Block


The Spring 2019 edition of the Crazy Quilt Quarterly Magazine is now available through MagCloud here.

The block in the photo above is featured on pages 14-15. The article shares how the block was pieced and how each section was embellished, using 8 basic embroidery stitches. 


The cover of the magazine features the gorgeous work of Margreet De Reus. (Note: This photo was borrowed from Pamela Kellogg's blog, Kitty and Me Designs.)

I must admit, it is a bit unreal to see my work in print with so many talented crazy quilting artists. There are a few tutorials in the magazine that I hope to try out and share soon.

If you crazy quilt at all, I encourage you to contact Pamela Kellogg about submitting photos of your work. My goal is to work on a Fall/Halloween piece to submit before May 1st for the Fall edition.

Thank you for visiting!
Renee

Saturday, October 13, 2018

CQJP 2018 April Block


The 4th block for my Crazy Quilt Journal Project 2018 is finished! 

Once again, the fabrics were colored and heat set with Crayola crayons. (That process is explained here.) You may click on any photo for a larger view.


The first seam was rather simple with cross stitches that I spaced evenly using waste canvas. 

Next, I added seed beads.


The second seam used one of my favorite combinations - buttonhole stitches, detached chain stitches, and beads.

One of the templates I received from Sharon B. helped me evenly space these stitches. (I am not affiliated with the templates. They were received in return for an honest review. I love using them! My full review is shared in the Summer 2016 Crazy Quilt Quarterly Magazine. I am not affiliated with the magazine.)


For the first motif, I poked holes in the sketch of my block and created a dotted outline of the heart on the wrong side of my fabric with light pencil marks.


The flight path was created with a strand of purple embroidery floss and a running stitch. The butterfly was added with detached chain stitches, straight stitches and 2 French knots on the antennae. 


For the second motif, I created another dot-to-dot guide. This time, I was not confident I could line it up properly on the back side of the block, so I marked the front fabric (which always makes me nervous.) 


I still wonder if I should have used a computer font and printed out the words, rather than relying on my own handwriting for this section... The words were embroidered with size 12 black perle cotton and a stem stitch.


The last motif was created with green and purple size 8 perle cotton. Two straight stitches and 3 detached chain stitches created stems and leaves. Two sets of fly stitches created heart-shaped flowers.


Rather than individually stitching beads around the heart-shape on this block, I strung beads on a strand of floss and then couched that floss down between each bead. It was fun to try something new.


This block turned out very close to the sketch I made during the planning stage.

Four of my CQJP 2018 blocks are now complete.

Crazy Quilt Journal Project 2018 (CQJP 2018) is a personal challenge to complete a crazy quilt block each month that measures at least 8 x 8 inches. You may learn more about it here. You may see the work others have created this year on the CQJP 2018 blog here or shared on the Facebook page here. Sign ups for CQJP usually open in November.

Thank you for visiting!
Renee


Related Posts:
Embellished CQJP 2018 January Block - here
Embellished CQJP 2018 February Block - here
Embellished CQJP 2018 March Block - here

My CQJP 2018 progress may be followed on this Pinterest board.

Sneak peeks of my progress are shared on my Instagram account


Sunday, September 16, 2018

CQJP 2018 March Block


If you follow me on Instagram or if you follow the Crazy Quilt Journal Project 2018 blog, then you have probably seen this block.

My theme for this year's Crazy Quilt Journal Project (CQJP) is my favorite things. I love the beach and had so much fun creating this block.

First, I colored white fabric with Crayola crayons and set the color. (The process I use was explained in this post.)

Then, I cut the fabric between the sky and water sections and between the water and sand sections. I sewed each section together. 

Next, I traced a heart on the paper side of ThermOWeb HeatnBond Lite and adhered it to the fabric. I cut the heart out leaving 1/4-inch extra. I clipped the curves of the extra fabric and carefully ironed them toward the back of the heart. Then I fused the heart to the black background fabric and used a slip stitch to tack the edges down.

The sandy beach section was a bit smaller than the sketch I drew to plan out the block, but I think it all worked out okay.

Figuring out how to create the foamy waves on the beach was tricky. In the end, I decided to use French knots using 2 strands of floss. First, I used DMC 4020.

Then, I added white French knots.

A bullion stitched starfish was added next, using 2 strands of DMC 4120 variegated floss.

Feeling the ocean needed something more, a few straight stitches were added with size 5 DMC 4140 perle cotton to create a boat.

A straight stitch with size 5 DMC white perle cotton, and 2 straight stitches and a few satin stitches with size 12 DMC white perle cotton completed the sailboat.

Stem stitches with 2 strands of DMC 4020 floss created ripples of waves on the calm ocean.

A single strand of black DMC floss created this island and palm tree. The island was outlined with a split-stitch and then filled with a satin stitch. Stem stitches created the palm tree. (This island was inspired by the one Sandra Todd added to one of my blocks in an Under-the-Sea Round Robin in 2015. You may see it here.)

For the sun, I lightly traced a half circle around a spool of thread with a pencil.

Using a single strand of DMC 4077 floss, I followed the outline for the sun with a split-stitch.

The sun was then filled in using a single strand of the same floss and a satin stitch.

The seagulls were created with 2 strands of DMC 648. Using a needle, I punched holes through the birds in the sketch I had drawn (pictured above). I positioned the sketch over the heart on this block and made light pencil marks on the sky fabric through the holes in the paper. Those tiny marks were the guides used to make the birds.


Using 2 strands of DMC 4160, the heart was outlined with buttonhole stitches. To keep these stitches even, I used one of the templates I received from Sharon B. 

(I received the templates in return for an honest review and I love using mine! The full product review may be found in the Summer 2016 Crazy Quilt Quarterly Magazine, available at Magcloud.com. I am not affiliated with the templates or the magazine.)

The Crazy Quilt Journal Project (CQJP) is a challenge to create one crazy quilt block each month. The goal is to complete a 12-block crazy quilt by the end of the year. It is a personal challenge. You may learn more about it here. Sign ups usually open in November, if you think you might be interested in participating in 2019.

My block looks more like it is for an art quilt than a crazy quilt, but when the blocks are all assembled, I plan to add a crazy quilted border.

My April and May blocks have both been pieced, so there is hope I might finish CQJP 2018 before 2019 arrives. We shall see...

I hope you all have an amazing week. Thank you for visiting!
Renee


Related Posts:
Embellished CQJP 2018 February block - here
Embellished CQJP 2018 January block - here

My CQJP 2018 progress may be followed on this Pinterest board.

Friday, February 2, 2018

CQJP 2018 Block 2


Earlier this week, I pieced the second block for my Crazy Quilt Journal Project. 

Click any image for a larger view.

First, I colored white cotton fabric with crayons and set the color. (Coloring fabric was explained in this post last year.)

This month, rather than using raw edge applique, I cut the heart a little larger than needed and ironed the edges under. I used HeatnBond Lite (one of the prizes I won from ThermOWeb last year through the Sun, Sand, and Sea BOM) to iron the heart in place. Then, I hand appliqued the edges to the block.

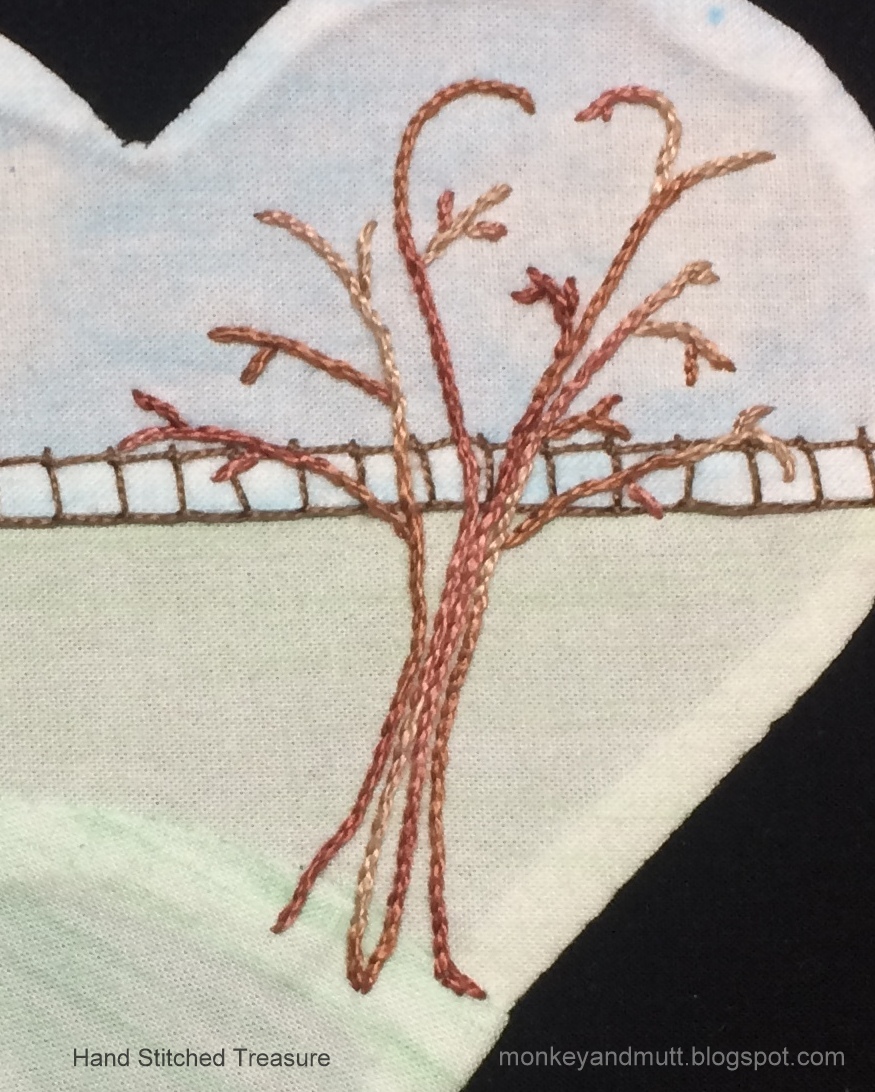
A buttonhole stitched seam, connected with straight stitches along the top, created a fence.

I lightly sketched the outline of a tree on the muslin backing of the block and embroidered it with stem stitches using size 5 DMC #4140 variegated brown perle cotton. 

The second seam was embellished with back stitches using size 8 DMC #954 green perle cotton.

Now to see if I can actually embroidere the ideas I have in mind for the rest of this block...

Thank you for visiting!
Renee

The Crazy Quilt Journal Project (CQJP) 2018 is a personal challenge to create a crazy quilt block measuring at least 8" x 8" each month of the year. You may learn more about it here and see the beautiful blocks other participants have created here.

Related post:
Embellished CQJP 2018 January Block - here

My CQJP 2018 progress is being saved on this Pinterest board.