Showing posts with label How to Piece a Block. Show all posts

Monday, July 16, 2018

Treasure Chest Tutorial Part 4: Piecing and Foundation


If you missed the first parts of this tutorial, 
links have been provided at the end of this post.

After Part 3 of this tutorial, your fabric was colored and heat set. If you have not already, remove the freezer paper from the back of your fabric.

Now to prepare the fabric for embellishment. Before adding embroidery, beads, or other embellishments, you need a foundation fabric. 

Click any photo for a larger image.

1. Cut a piece of muslin out that is at least 5" x 7" in size and is large enough to fit your embroidery hoop or frame.

2. Iron the muslin.

3. Using your fabric safe marker and a quilting ruler, draw a 4" x 6" rectangle onto the center of your piece of muslin. (I used a black Pigma Micron 05 marker and heat set the ink with the dry cotton setting of an iron, as explained in the Design Transfer part of this series.)

4. Trim the colored fabric.
  • Mixed Media Option: Trim the colored fabric to a 5" x 7" rectangle.
  • Crazy Quilt Option: Trim the fabric to a 3.5" x 4.5" rectangle.


5. Pin the postcard fabric to the muslin foundation. 
NOTES: The rectangle you drew in Step 1 will be the back side of the muslin foundation.
If needed, hold the fabrics up to a window to be sure the colored fabric is where you want it within the triangle on the back of the muslin.

Mixed Media Option: Center the 5" x 7" colored treasure chest fabric (colored-side-up) on the front side of the muslin. From the back side, pin the treasure chest fabric to the muslin. 
Skip down to Step 7.

Crazy Quilt Option: Decide how you want your postcard oriented and place the 3.5" x 4.5" rectangle on the front side of the muslin. The block needs to be pieced. See Step 6. 

6. Piece the crazy quilt fabric postcard. I chose a portrait orientation for my crazy quilt postcard and placed my treasure chest at an angle along the bottom edge.

The numbers in this image show the order in which the fabrics were added.

Fabric 1 - the colored image:
The colored fabric extends past the left side and the bottom on the bottom-left corner of the rectangle drawn on the back of the muslin.

Fabric 2: Find a scrap of tan or light brown fabric (think sand.) Be sure the scrap will extend beyond the borders on the bottom and the side of the rectangle on the back side of your muslin.

Place the fabric right-side-down on the treasure chest fabric, lining the edge with the sand-colored bottom edge of your colored fabric.

Place pins along the edges of the rectangle drawn on the back of the muslin.

Using 1/4" seam allowance, sew along this seam. (My stitched seams extend about 1/4" past the rectangle on the muslin on both sides.)

Press the seam with iron on cotton steam setting.

Open the fabric and press both fabrics flat onto the muslin foundation.

Trim the right edge even with the edge of your treasure chest rectangle.

To do this, flip the piece so the front is face down on your cutting mat.

Fold the muslin back away from the edge of the fabric. Set your ruler over the muslin, so you will not cut it by mistake. Line the edge of the ruler with the edge of the treasure chest fabric and trim the sand colored fabric.

As seen in the next photo, I also trimmed the bottom. Leaving an extra 1/2" to 1" of fabric extending beyond the rectangle drawn on the muslin, I trimmed the fabric on the bottom.


Fabric 3: Find a scrap of blue fabric.
Place the fabric right-side-down and pin it along the edge you just trimmed.
Sew the seam from the top of the treasure chest fabric down to the bottom of the sand fabric.
Iron the seam.
Open the fabric and iron the seam open.
Flip the fabric face-down, fold the muslin along the top seam of the treasure chest fabric. Place your ruler over the muslin (so you cannot accidentally cut it), line the ruler up with the top of the treasure chest fabric and trim the blue fabric. 
Trim the blue fabric so it extends about 1/2"-1" beyond the side of the rectangle drawn on the back of your muslin.

Fabric 4: Find another scrap of blue fabric. Be sure it is large enough to cover the remainder of the rectangle drawn on the back of your muslin foundation.
Place the fabric right-side-down and pin it along the top seam with the treasure chest and blue fabric.
Sew the seam.
Press the seam.
Open the fabric and press the seam open.
Without cutting the muslin foundation, trim the blue fabric so it extends about 1/2" to 1" beyond the rectangle drawn on the muslin foundation on the top and the left side of the block.

With the muslin foundation up, carefully pin the edges of fabric from the front. (It will look similar to the photo below, but with seams sewn on it.)


7. Baste the front of the postcard to the muslin foundation. This step is the same for both the mixed media and crazy quilt versions of the postcard.

I set my sewing machine to a longer stitch setting and sew along the lines of the rectangle on the muslin. This makes it easier to remove this thread after the block has been embellished.

Your postcard is now ready to embellish!
This will be covered in the next part of this tutorial. 

If you skip ahead, keep the following tips in mind:
A. Your postcard cannot be more than 1/4-inch thick and the stabilizer will add roughly 1/8-inch to that thickness. Your beads and/or charms should be small or thin.

B. After embellishing, we will be cutting the 4" x 6" rectangle. Keep all embellishing within the rectangle you drew on the muslin. The basted seam helps you visualize that area as you work.
C. You will be sewing along the edge of the postcard when it is done. Place all beads and charms at least 1/4-inch away from the outer edges of your basted rectangle.

Links to related blog posts:


Friday, September 15, 2017

Crazy Quilt ATC Tutorial Part 1 - Piecing

Have you heard about the 2018 ATC (Artist Trading Card) Swap hosted by Crazy Quilt Quarterly Magazine? 

If not, I encourage you to read about it here at Kitty and Me Designs. Please note, due to postage expenses it is only open to participants within the USA.

As ATCs are only 2 1/2" x 3 1/2", some friends have asked how to go about making such a small crazy quilt. It is my hope that this 3 part tutorial will help answer that question. You may click on any image for a larger view.

CQ ATC Tutorial Part 1 will cover piecing the block.
CQ ATC Tutorial Part 2 will cover embellishing  the block.
CQ ATC Tutorial Part 3 will cover finishing the ATC.


Supplies you will need:

Sewing machine (or you may hand sew your fabrics)
Sewing machine needle (I use the size recommended for denim on my machine.)
Iron and ironing board
Thread
Rotary cutter, cutting mat & ruler
Scissors
Fabric-safe marker or pencil (I use a Pigma Micron 05)
Download of instructions, ATC backing, and envelope - link below
8 1/2" x 11" Cardstock (you need 1 sheet for each ATC)
Muslin
Scraps of fabric
Timtex or Peltex
Embroidery needle(s)
Embroidery floss
Optional: ribbon, lace, flat buttons (no shank buttons), ric rac, trims, seed beads, sequins.


Step 1: Print Instructions, ATC Back, and ATC Envelope

1. Download the PDF file here at Kitty and Me Designs.
2. Print page 1 of the PDF on regular paper.
3. Print page 2 of the PDF onto cardstock.
Note: If you do not have a printer, you may be able to save the PDF to a flash drive and take it to a business that provides printing services to have them print it for you. Remember page 2 needs to be on cardstock and you need a copy for each ATC you make.

How to print?
A. Open the "ATC-Challenge" PDF File.
B. Click the printer icon in the upper-right corner. (If you do not see this, move your mouse over the page, it should appear.)
C. Under "Pages", you will see "All" is automatically selected. Click the button beneath "All".
D. Type 1 in the box beneath "All".
E. With regular paper in your printer, click "Print".
F. Click the printer icon in the upper-right corner again.
G. Put 8 1/2" x 11" cardstock in the printer.
H. Under "Pages" click the button beneath "All".
I. Type 2 in the box beneath "All."
J. Do NOT check the "Fit to Page" box. It may affect the size of your envelope and ATC backing.
H. Click "Print".

Note: If you are making more than one ATC card, you may print the cardstock for them at the same time. For example, if you are making 3 ATCs, put 3 sheets of cardstock in the printer at step G. Before you click "Print" change the number following "Copies" to 3. All 3 copies should print.

Step 2: Select Your Fabrics

Gather:
1. Muslin for the foundation. 
2. 4 to 5 coordinating fabric scraps. 
3. Optional: ribbon, lace or fabric trims.

For this tutorial, I pieced a basic block and shared step-by-step instructions. I also pieced a landscape block and a block using a fussy-cut fabric to provide more ideas. These are the fabrics I pulled for each:

Black fabrics and a pink ribbon for a basic CQ block.

I prefer mostly solids or light prints that let my stitching shine. You may prefer bolder prints.

Greens and blues for a landscape block.

For a coffee-themed block, I pulled two prints and fabrics that go well with them. There is also a piece of gold ribbon.

Notes: 
If using a print, remember it needs to be relatively small to fit your ATC.

Lay the fabrics next to one another to be sure the colors go well with one another and do not clash.

Step 3: Piece the Block

This may be done a number of ways. Some stitchers like to use the flip-and-sew method to cover a larger foundation piece. Afterward, they cut sections of that to embellish. I tend to mark the back of my foundation and piece each block individually, using the flip-and-sew method. 

Before piecing your block, there are a few things to consider:
1. Will you be using a hoop? If so, make sure you cut the foundation strip wide enough to fit your hoop. (I cut mine 6" wide, and wish I had made it 7".)
2. Some embroidery stitches will pull your fabric, causing "shrinkage" in size. I always recommend piecing fabric to extend at least 1/2" beyond your block outline.
3. Although we will be marking on the back of the foundation, some inks run when wet. I recommend using light pencil marks or a fabric safe marker. Personally, I like to use a Pigma Micron marker because the ink sets permanently with the heat of an iron.

I followed these steps to piece my ATCs:

1. Cut a strip of muslin. (I cut mine 6"-wide. Be sure yours wide enough to fit your hoop.)


2. Using a ruler and a pencil or fabric safe marker, draw a rectangle that is 2 1/2" x 3 1/2". If making more than one ATC, you may choose to put them on the same strip of muslin. I marked 3 rectangles, leaving 2 inches between each one. 

3. Place the muslin so the rectangles do not show. They are the back of the foundation.

4. Cut one fabric into a triangular shape.

5. Select a second fabric that extends the full length of one edge of the triangle.

6. Place the triangle and the 2nd fabric on the muslin. 
Tip 1: Hold it to the light to be sure the triangle fits within in the rectangle on the back of the muslin.
Tip 2: Fabrics on the edge of your ATC outline should extend 1/4" to 1/2" beyond your outline, as seen in this photo. (It is frustrating to piece your block and then realize part of the foundation was not covered.)

7. Place the two fabrics right-sides-together on the right side of your muslin. Once they are where you want them, sew in place with a 1/4" seam. 
Note: Do not sew the full length of the longer edge. Only sew along the edge of the two fabrics, as seen with the blue line in the photo.
8. Iron the fabrics flat. 
Tip 1: Do not skip this step. Every time you add a fabric, you will need to iron it flat to avoid a bumpy block.
Tip 2: To avoid damaging some fabrics, you may need to place another piece of fabric over your block before ironing. I used cotton fabrics, so this was only a concern when adding ribbons.


9. Trim the fabric. This part can be tricky, because you do not want to cut the foundation by mistake. You will trim the new fabric, following the lines of the triangle, as seen with the blue lines in the photo. (Just pretend my blue lines are straight!)


A. Put the block on your cutting mat so the fabrics lay flat and the back of the muslin is facing you. 
B. Fold the muslin out of the way and line your ruler along one edge of your triangle. 
C. Look to be sure your muslin is safely tucked away (as in this photo) and trim the fabric.

D. Repeat with the other edge of the triangle.


10. Select a 3rd fabric to sew along an edge of the triangle.
Tip 1: Think about what the size the new fabric will be after you sew it and trim it. 
Tip 2: Use a piece of fabric large enough to extend over the edge of your outline and that extends the length of the triangle seam. 

11. Place the fabrics right-side-together and sew with a 1/4" seam. 

12. Iron flat.

13. Trim as you did in step 9. 

14. If your fabrics extend beyond the edge of your foundation, place the piece on your cutting mat, right-side-down. Fold the foundation fabric back about an inch away from the outline for your block. Place the ruler so that it covers the edge of your foundation (so you cannot cut it in error.) And trim the excess fabric with your rotary cutter.

15. Select a 4th fabric to sew along the next edge of your triangle. I added a ribbon along this seam, too.

16. If using ribbon, place it right-side down, lining it up along the edge of the fabric on your block. Place the 4th fabric over this, lining it up along the same edge. 

17. Sew together with a 1/4" seam.

18. Iron flat.
NOTE: I placed a cloth between my iron and my ribbon to avoid damaging the ribbon.

19. Trim excess fabric.

20. If necessary, add another fabric following the same steps: check the placement, sew it on, iron and trim. 

For this ATC, 4 fabrics filled the outline on my foundation.


Step 4: Baste the Outline

1. Place the block right-side-down. You should be looking at the outline you drew.

2. If necessary, pin the foundation to the fabric outside of the rectangle to hold it flat.

3. Set your sewing machine to a long stitch length to make the basted stitches easier to remove when finishing the ATC.

4. Sew along the outline drawn on the back of your foundation.

5. This allows you to see the outer edges of your ATC.

All embellishing should be within those lines. Any stitching outside those lines will be cut and your stitching may unravel.

Any beads, sequins, etc. within 1/4" of those lines may interfere with finishing your card.

This landscape ATC block was pieced in the same manner, beginning with the blue triangle.

For the coffee ATC, I found a printed section of fabric that would fit within the outline and still leave room for other fabrics.

I started with the "Good Coffee" (from the Have a Latte fabric line Clothworks released in 2015) and worked out from there. 

Note: I made sure the print was at least 1/8" away from the edge of the outline. (This will be important with finishing.) 

If you have any questions, or any of my steps are unclear, please leave a comment and let me know. I reply to every comment. If you do not receive an emailed reply from me, you may be a no-reply blogger. If that is the case, my reply will be left in the comments to this post.

I do hope you will consider making an ATC for this swap! It should be fun. :)

I will take photographs as I embellish my black ATC to share in the 2nd part of this tutorial. 

Thank you for stopping by!
Renee

Updated September 18th to include the following links:
Crazy Quilt ATC Tutorial Part 2 - Embellishing
Crazy Quilt ATC Tutorial Part 3 - Finishing

Saturday, January 7, 2017

January CQJP 2017 - Piecing Tutorial: Oops, Now What?!

My January block is pieced for the Crazy Quilt Journal Project (CQJP) 2017

In the crazy quilt groups I belong to, new members frequently ask, "How do I piece a block?" 

Planning to write a tutorial, I photographed every step of piecing this block. 

Then, I made mistakes. 

Rather than waiting to piece a block without mistakes to share, I decided to write the tutorial anyway. After all, I cannot be the only person that has made an oops and wondered, "What now?!" (At least I hope not...)

So... this is how I pieced my block - mistakes and all. 

(This is a VERY long and photo heavy post. You may click on photos for a larger view.)

Before You Start

Think about your project.

1. What theme will your project follow?
2. What color scheme do you want to work with?
3. How many blocks to you plan to make?
4. What size will your blocks be?
5. What shape will your blocks be?
6. What kind of embellishments do you plan to add? (Consider your plans for the blocks when deciding this.)

For this project:
1. I want a heart theme with a black square in the center featuring a heart and a crazy quilted border around it.
2. I want 1 black fabric and several shades of pink. My embroidery will focus on green (for leaves/stems), pinks, and shades of white.
3. I will make 12 CQJP blocks this year. However, I plan to make 3 different wall quilts featuring 4 blocks in each. So, this project will have 4 blocks.
4. 8-inch x 8-inch blocks.
5. Square blocks.
6. This quilt will be ornamental (so it will not be washed.) This allows me to use ribbons, lace, trims, beads, buttons, charms and various embroidery threads.

This tutorial creates a finished block 8" x 8" (roughly 20 cm x 20 cm) square.

Materials

1. Rotary cutter
2. Cutting Mat
3. Cutting ruler (I used a 6" wide ruler and a 12 1/2-inch square cutting template.)
4. Muslin
5. Scraps of fabric in shades and hues that coordinate well together. (Tip: If not for the large center piece I planned for this block, I would have looked for 8-12 fabrics for this piece. I knew I only wanted a CQ border and looked for 5 coordinating pinks. The other hues I had available clashed - in my opinion - so I settled on these 3. I also want my embroidery to stand out, so I avoided printed fabrics.)
6. Ribbons, laces, trims that coordinate with your fabrics.
7. Pins
8. Fabric safe pen/pencil/marker.
9. Iron-on fabric adhesive (I used Heat'n Bond)
10. Heart template (you may make a heart on stiff paper or cardboard)


Step 1: 
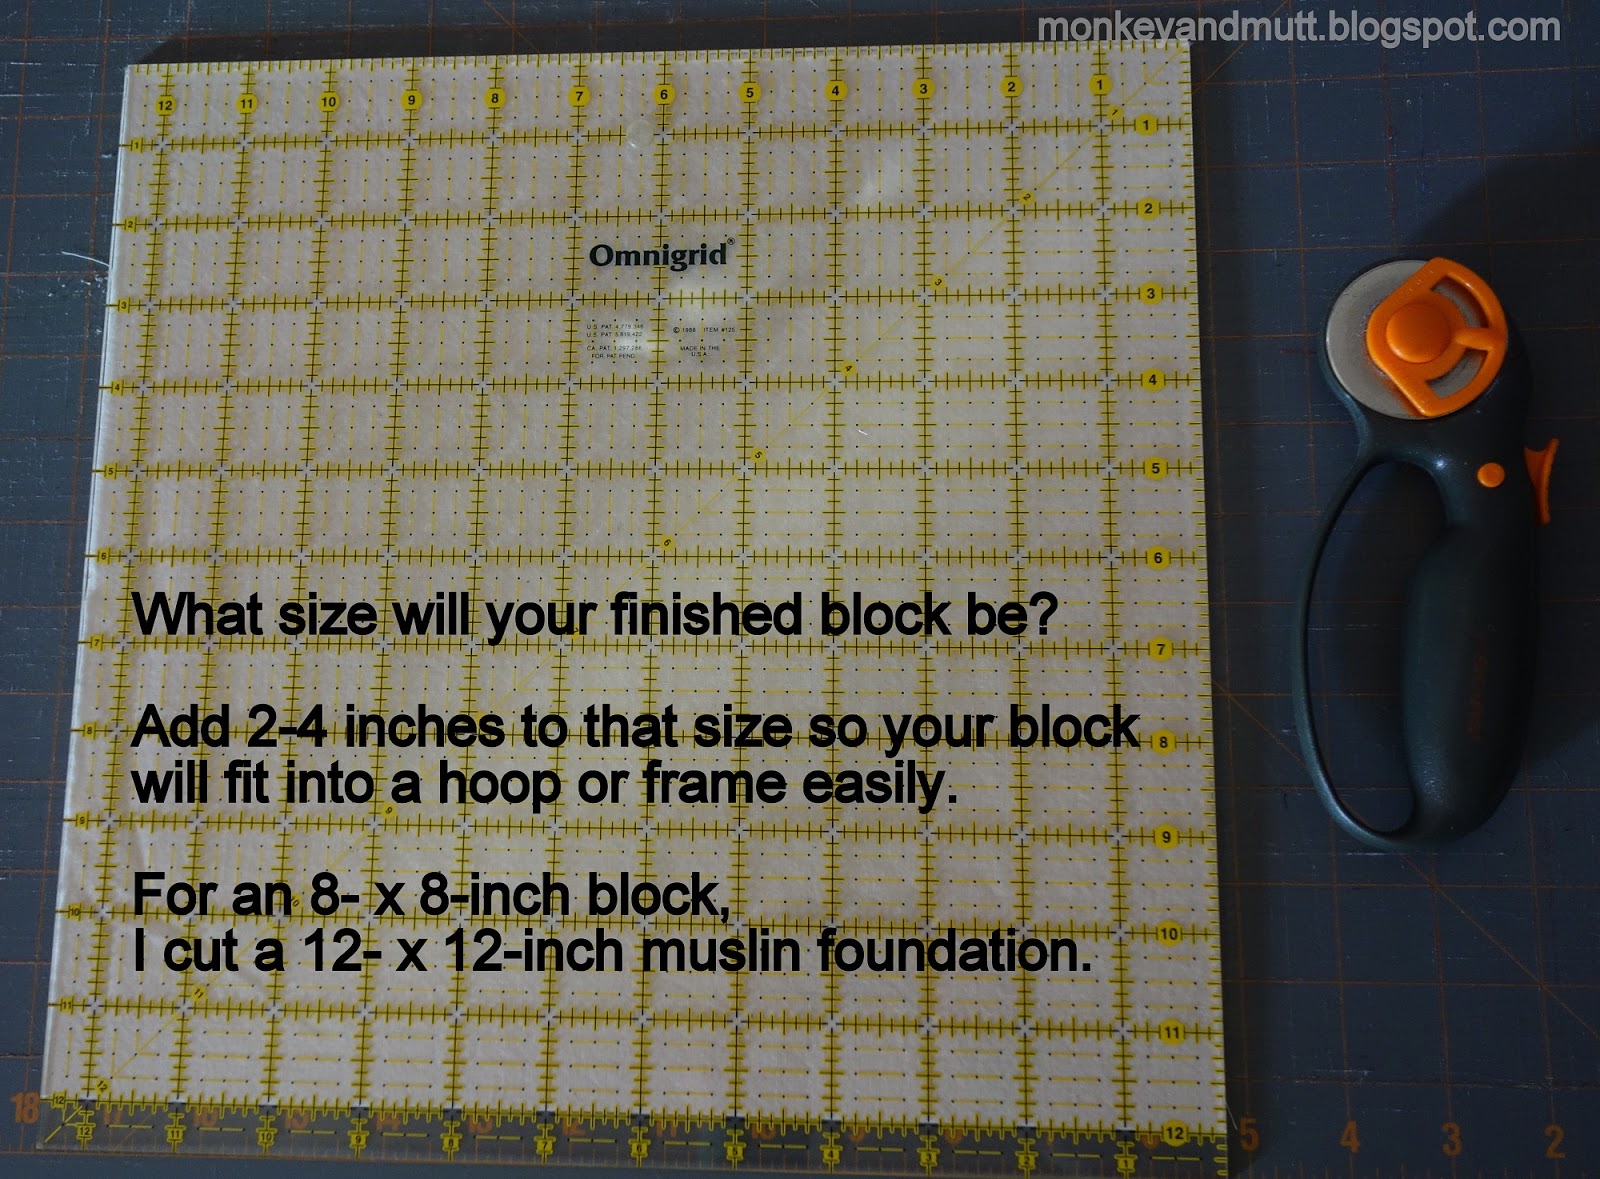
Cut a 12 x 12-inch (roughly 30 cm x 30 cm) square of muslin. 
Tip: add 2 - 4 inches to the size of your block. This allows you to easily hoop your work. Sometimes the embroidery pulls the fabric causing it to shrink. Having extra fabric allows you to cut your block to the correct size after embellishment. For my 8-inch block, I added 4-inches (2-inches on each side) and cut a 12-inch foundation.


Step 2:
Mark the seam allowances onto one side of the muslin foundation. This will be the BACK of the block.

Tip 1: I use micron pen for this step. They do not bleed and the ink is permanently set when ironed.

Tip 2: I used the markings on the square ruler for this step as described below.


Above is a close-up of the photo below. The block was 12-inches. I subtracted 2 inches (accounting for my 2-inch seam allowance) and lined the corner up with this 10-inch mark.


Beginning at the top-right corner, I traced an 8-inch line across the top and a second line down the right side of the block.


Next, I lined the 8-inch lines on the template up with the lines on my foundation. I drew 8-inch lines along the left side and the bottom of the block - completing the 8-inch square.

Step 3:
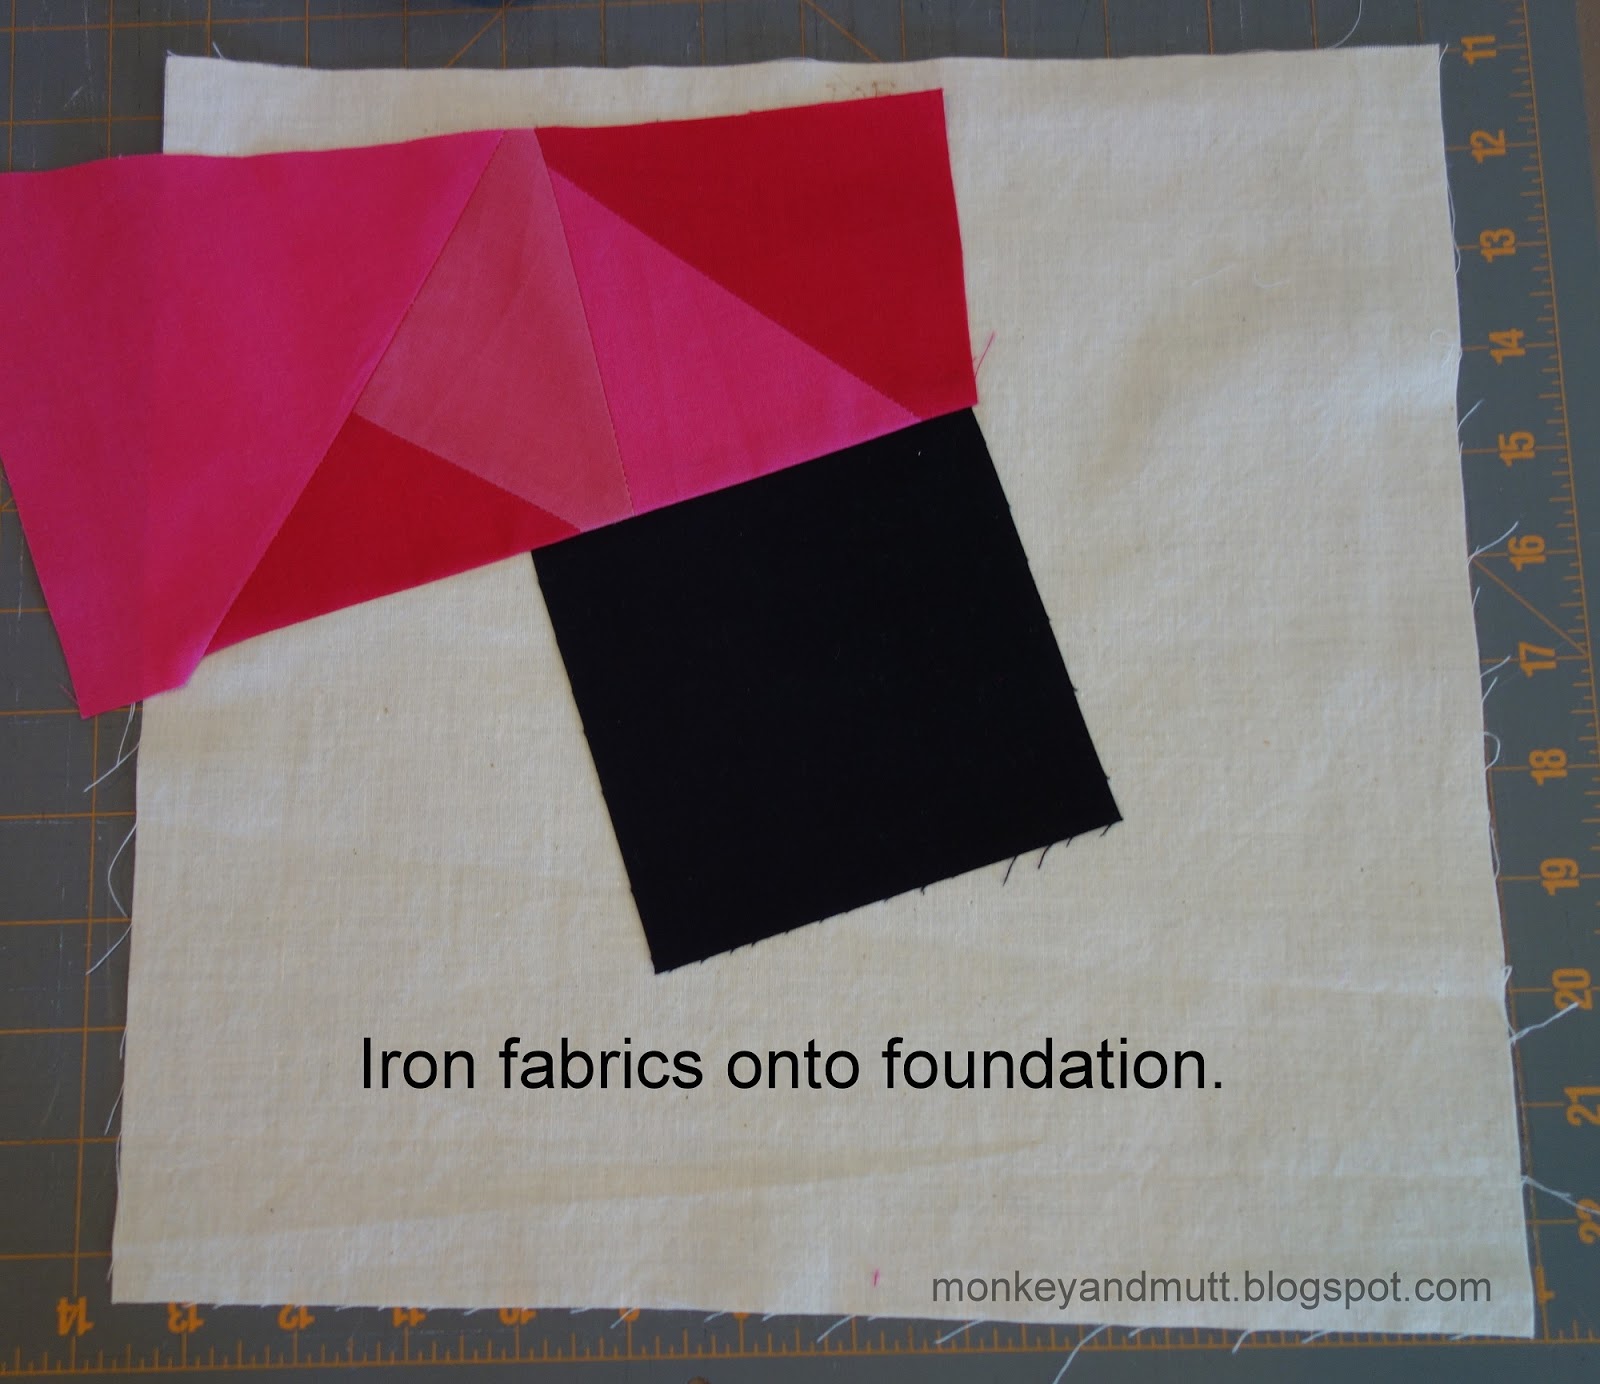
Gather and iron your fabrics.

Step 4: 
Cut your center fabric. Remember to add an extra 1/2-inch for the seam allowance.

I wanted a 4-inch center, so I cut a 4 1/2-inch square.

Tip: I find the flip-and-sew method of piecing to be easier with an odd number of sides on the center shape. As you will see, avoiding long seams is difficult with a square (or rectangle.)


Step 5:
Place the center fabric the way you want it on the FRONT of the muslin. (If you see the square you just drew, you are on the back. Flip it over.)

Tip 1: I hold my block up to a window so I can see how my fabric is lined up with the square I drew on the back.


Tip 2: If you are making multiple blocks, set them all out and make sure the center pieces are lined up the way you want them.


For this project, I want 2 blocks with the center angled in one direction and 2 blocks with the centers angled the opposite direction.

Step 6:
Sew your next fabric to the center fabric.

Please note: Normally, I would select 1 fabric, line it up with 1 edge of my center piece, sew it on, trim the fabric and move on to the next edge of the center with another fabric - as seen in this tutorial I shared on the Crazy Quilting International blog last year. Because I only have 3 other fabrics and because I hoped for more angles in the CQ border around my center piece, I made a little more work for myself.

For this block I cut 6-inch strips of each shade of pink.


I labeled each color.


Next, I sewed triangles of fabric A and B together and pressed the seams open.

NOTE: If you are using fancy fabrics, be sure your iron is on the appropriate settings.


Fabric C was sewn along the edge of fabric B. Seams were pressed open.


This process was continued with fabric A, then B and then C. The strip was trimmed after each new fabric, as needed.


When the strip was long enough, I cut one side, creating an edge to line up with my black center fabric.


Line one edge of the strip of fabric up with an edge of the black square.

Tip: If adding scraps of fabric that have been sewn together like this, be sure you look at all of the seams. Do they lay the way you want them too?  I did not realize until much later that I had a seam that was perpendicular to the center block. I prefer my seams to be more angled. Had I noticed sooner, I could have trimmed the straight edge at more of an angle.


Next, fold the fabric so the right sides are together, lining the edges up. 

Tip: Place a pin at each edge of the black fabric. You will only sew that section. (I did not do this and sewed the entire strip down. It caused problems later, as you will see.)


Sew the strips together. Only sew along the edge of your center fabric! (I forgot...)

Then, fold the new strip open and press the seams flat.


Step 7:
Trim the fabric. Place block right-side-down on cutting mat. Make sure the pieces are laying flat in the correct position when you do so. 

At one end of the seam you just sewed, fold the muslin back. You will see the center fabric and the new strip you added.


Line the cutting ruler along the edge of the black center fabric.
Be sure the muslin is all underneath the ruler. (You do NOT want to cut the foundation.) And trim the edge.


Repeat at the opposite end. When your fabric reaches the edge of the block, fold the foundation back about 1-inch (or halfway between the seam lines you drew and the outer edge of the foundation.) Place the cutting ruler along on the foundation - be sure the muslin is all under the ruler - and trim the edge.


Step 8:
Continue sewing fabrics A, B and C into strips. Line them up the way you like them. (Pay attention to how the seams will look.) Sew them to another edge of the center fabric. Trim and repeat.

IMPORTANT NOTE: If you want to add ribbons, trims, or lace to your block, it is often easiest to add it while piecing your block. (I almost always forget...) 

For this block I wanted the trims I added to extend from the center to the outer edge of the block. So, I pieced more scraps of fabric together.

When I laid the next strip on the foundation to see if I liked the way it looked, I also set a piece of lace or ribbon along a seam to see how it would look. During this process, I paid attention to the direction the trims laid on the block. (I did not want them all to slant in the same direction.)

Once I decided on an area I wanted to add the trim, I pinned it in place and then sewed that section onto the foundation.


NOTE: During this step, I realized my error in sewing my first strip all the way across the block instead of stopping at the edge of the black center fabric.

I considered ripping out part of the seam, so I could trim the fabric even with the black center piece. However, this would have left me with 3 seams running straight up and down in that small section. And, it the darker pink would have been cut into a tiny triangle.

How did I fix it? I sewed the next strip from the top of the black fabric (just beneath the Oops area) to the bottom of the black square.


After pressing the seam flat, I carefully cut the upper edge of this new strip so it extended about 3/8" over the seam above it.

I folded the raw edges under, so the fabric lined up with the edge above, pressed the fold flat, and pinned it into place.


Trim the edges.


Repeat process, sewing strips to each edge until the block is covered.


When block is fully pieced, iron it flat onto the foundation. Take care with fabrics and trims, so you do not melt or burn them.


Step 9:
Baste the block.

On the BACK of the foundation (so you can see the square you drew), pin all loose edges of the block to the foundation. Be sure ribbons or trims are also pinned in place.


Look at the front of the block to make sure everything is pinned properly in place.

Using the longest stitch setting, baste along the square you drew on the foundation.


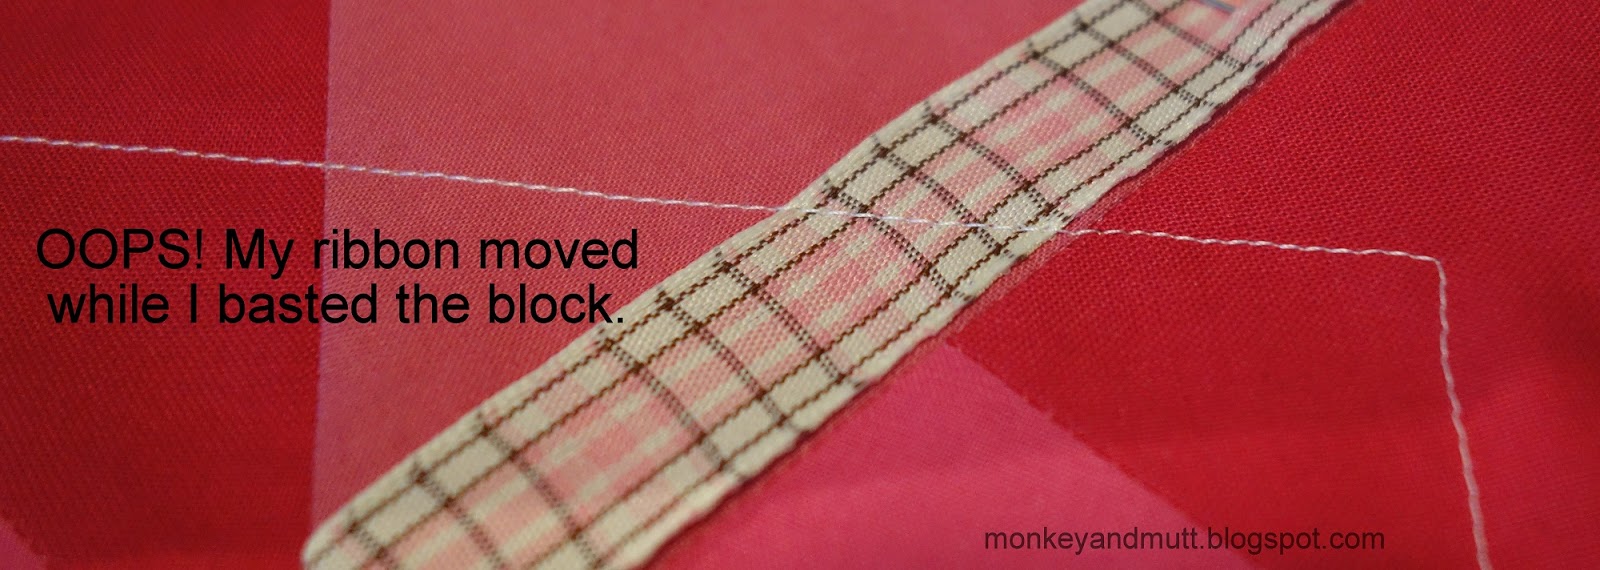
If your trims move while you are basting, find your seam ripper and
carefully remove the basting stitches along that section.

You may then pin the trim in place or baste it in the correct place. (I did both, as seen below.)


In addition to securing the edges of the block to the foundation, the basting lines are a great help when embellishing the block.

At a glance, you know any stitching outside of that square will be hidden when the crazy quilt is sewn together.

I also avoid adding any beads within 1/4-inch of the basted seam. I place larger charms or buttons even further away from the basted seam. Items placed closer may have difficulty feeding through my sewing machine while assembling the crazy quilt.


Step 10:
Applique heart to center of the black square of fabric.

Note: this step could be completed before assembling the block.

First, find a heart template that fits within the 4-inch black square of fabric in the center of the block.  (Or draw one on cardboard or card stock and cut it out to use as a template) 

Trace the heart onto the paper side of your iron-on adhesive.


Following the instructions for your iron-on adhesive, adhere the heart to the WRONG side of your favorite shade of pink fabric used on your block. 

I am making four blocks, so I traced four hearts.


Cut the hearts out.

Before adhering the heart to the black square of fabric, play with the layout until it sits the way you want it on your block.

If you are making more than one block, I suggest looking at all of the blocks together and then ironing the hearts into place the way you like them.


Now, your block is ready for embellishment!

When I work on this block, I will apply stitching to each of the trims to secure them on the block. And, I will remember I have a seam that needs to be securely stitched in place.

I do not like having 2 parallel seams along the top section of the block, so I may try to make that less obvious with my embellishments.

When embellishing, I will break up some of the longer seams (like the one extending across the bottom section of the block.) For example, adding a border around the black central fabric will help break the long seams into smaller sections.

I do hope this tutorial is helpful!

Happy Stitching!
Renee