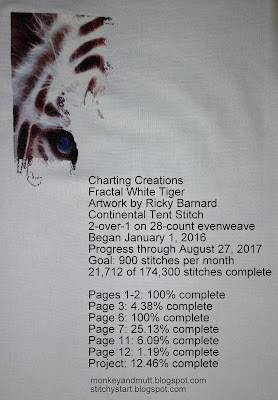
This week I was able to add 972 stitches to my Charting Creations "Fractal White Tiger" piece.
It filled in some of the top of page 7.
22,684 of 174,300 stitches are now complete.
This is how it looked in my last update.
I began this project on January 1, 2016 to participate with the Stitchy Start blog. However, I have only worked on it 74 days for the progress shown above.
Thank you for stopping by!
Renee
Tuesday, October 31, 2017
Monday, October 30, 2017
CQJP 2017 March Block Motifs 6 & 7
Feather stitched vegetaton accented with petite glass seed beads created motif 6 on my Crazy Quilt Journal Project (CQJP) 2017 block.
Size 12 green perle cotton floss was used for the feather stitches.
Motif 7 was added to both sides of the block.
Using size 5 variegated perle cotton, I created vines with the barred chain stitch.
The flowers were made with a variegated size 8 perle cotton by making groups of 3 bullion stitches. Straight stitches were placed between the bullion stitches and over the ends where the bullion stitches met the vines.
My progress on this block has been slow, but I am enjoying it!
I am joining the Monday Stitchery Link Party #134 at Super Mom - No Cape!
CQJP 2017 is a challenge to create a crazy quilt block that is at least 8-inches square in size each month. You may learn more about it and see the blocks completed this year here at the CQJP 2017 blog.
Related Posts:
CQJP 2017 March Block Motif 1 and Seams 1 & 2 - here
CQJP 2017 March Block Motifs 2-4 and Seam 3 - here
CQJP 2017 March Block Motif 5 - here
CQJP 2017 February Block - here
CQJP 2017 January Block - here
My CQJP 2017 progress is all shared on this Pinterest Board.
Thank you for stopping by!
Renee
Sunday, October 22, 2017
CQJP 2017 March Block Motif 5
This is the 5th motif added to my Crazy Quilt Journal Project (CQJP) 2017 March block. I had a bit of fun playing with Sharon B.'s Stitchers Templates making this one.
Click on any image for a larger view.
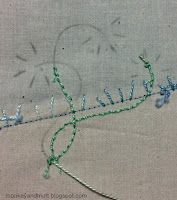
First, I traced a few of the wavy vine lines from the templates onto the back (muslin foundation) of my block with a pencil.
The vines were created with whipped chain stitches.
A chain stitch was added following the lines of one of the vines with size 8 DMC #954 perle cotton. Size 8 DMC #125 perle cotton whipped around the chain stitches.
After giving some thought to the way I wanted the vines to wrap around one another, I continued adding chain stitches to the other vines.
In this photo of the back, you may see that I wanted the vine sketched on the left to cross over in front of the middle vine on the lower junction. So, I embroidered the middle vine first. On the upper junction, I wanted the middle vine to be in front, so I stopped just below where those lines met and embroidered the vine to the left before continuing the middle vine.
I did not whip these two vines until both had been embroidered with chain stitches.
You may also note that I did not follow the entire shape from this vine. I wanted leave enough room to add the flowers.
After whipping the chain stitches, I added a pearl bead to the top of each stem, and then added rice beads for each of the "spokes" I had traced on the back. For these flower petals, I added the middle "spoke" first and then added two beads to each side, to be sure they all fit together well.
Small straight stitches were added to the vines with the variegated green thread to add a bit more detail.
This was such a fun motif to create!
Thank you for stopping by!
Renee
Notes:
I am not affiliated with Sharon B.'s templates. However, I did receive them in exchange for an honest review and have so much fun playing with them!CQJP stands for Crazy Quilt Journal Project. You may find the CQJP 2017 blog here.
Related Blog Posts:
CQJP 2017 March Block Seams 1 & 2 and Motif 1 - here
CQJP 2017 March Block Seam 3 and Motifs 2, 3 & 4 - here
CQJP 2017 February Block Tote - here
CQJP 2017 January Block - here
On this Pinterest board, I am saving each step of my CQJP 2017 progress.
Saturday, October 21, 2017
Colored Valentine Fabric Postcards
In September, I finished the last two panels I colored back in February into fabric postcards. The snail mail and mailbox themes were inspired by InCoWriMo (International Correspondence Writing Month.)
The snail was inspired by the book Embroidery for All Seasons by Diana Lampe.
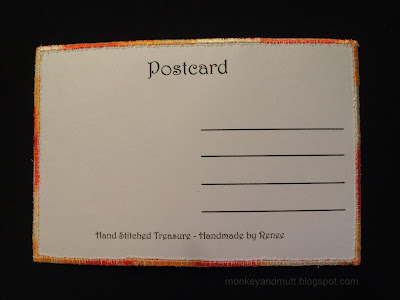
For the backs, I printed these templates onto cardstock.
In February, I do plan to participate with InCoWriMo again. (It is a challenge to write one letter, card, note or postcard every day in the month of February.) My mind is already working on ideas of what I want to mail to make the month more fun. I had thought about making 28 Artist Trading Cards, but fear I do not have the time. I am toying with a few other ideas. We'll see...
Have you made any fabric postcards recently? I would love to hear about them!
Thank you for stopping by!
Renee
Related Blog Posts:
Valentines Made with Colored Fabric - hereFabric Postcard Tutorial - here
InCoWriMo 2017 in Review - here
Love Mail Zipper Pouch Coin Purse on Etsy - here (sold)
Friday, October 20, 2017
Crazy Quilted Blue Heart Coin Purse
If you follow me on Instagram, the crazy quilted centerpiece of this zipper pouch may look familiar. It is now the front of a 5.5" by 5.5" zipper pouch coin purse.
Here is a slightly closer view. The heart was machine pieced and hand embellished. I used Therm-O-Web HeatnBond Lite to fuse the heart to black cotton fabric and then hand stitched the edges in place. After that, I added the green stem stitches around the heart and the pink flowers on the upper section of the heart.
Above is a close-up. You may click on any image for a larger view.
The back and lining of the pouch are 100% black cotton fabric.
The zipper opening is 4.25-inches long and opens up to 3.25" wide in the center.
The interior seams are raw edges finished with zigzag stitches.
This coin purse is now listed in my Hand Stitched Treasure Etsy Shop and will ship First Class for free within the United States. You may find it listed here.
I would love to hear what project(s) you are currently working on. Feel free to leave a comment letting me know!
Thank you for stopping by.
Renee
Thursday, October 19, 2017
2017 CQI Halloween/Autumn Postcard Swap Part 2
Look at the beautiful postcard I received this week!
Gayle Schipper made this beauty and I absolutely love it.
Just look at this lovely embroidery.
It is perfect for me - it even has a pumpkin!
Thank you Gayle!
It is displayed on our fireplace mantel.
The postcard was received as part of the
2017 Crazy Quilt International Halloween/Autumn Postcard Swap.
The postcard I mailed on Friday the 13th went to Gayle.
That postcard was shared in this post.
Crazy Quilt International meets here on Facebook.
Thank you for stopping by.
Renee
Monday, October 16, 2017
Red, White and Blue Hand Bag
 |
| God Bless America Clasp Purse - Front |
The clutch purse was created with my May CQJP 2014 block. Several of the seams were embellished with stitches from Take A Stitch Tuesday (TAST), which was offered by Sharon B. of Pintangle.com.
Excluding the crazy quilting, the general pattern for the bag was made following the guide shared in this tutorial at Sweet Bee Buzzings for a smaller coin purse.
Last December, I decided to participate with the All People Quilt UFO Challenge 2017. (More details are here.) This block was #5 on my list. #5 was the project selected for August.
The purse has been donated to be auctioned off later this week to raise funds for engineering scholarships in Oregon.
I do hope the new owner likes it.
Related Posts:
TAST 7/21/2014 - here
CQJP 2014 May Block - here
UFO Challenge 2017 - My List - here
Thank you for stopping by!
Renee
I am joining Monday Stitchery Link Party #132 at Super Mom No-Cape! I do hope you will stop by to see what others are working on and to see the free vintage Halloween embroidery patterns offered today.
Saturday, October 14, 2017
Sun, Sand, and Sea BOM 2017 - Block 9
"Bathing Beauty" is block 9 of the Sun, Sand, and Sea Block of the Month hosted by Sew Incredibly Crazy and Friends.
This block was designed by Amy at Sew Incredibly Crazy. You may find her post about it here and the pattern (which is free in October of 2017) may be found on Craftsy, here.
You might have noticed, I have not yet finished Block 8. I had a hard time figuring out how to add "Beach Boy Freddie" to the quilt so it would fit with the color scheme. I was not sure pink would fit in with all of that orange and black. And I was already worried about how stark the green on "Mr. Crabby" stood out.
I think I found fabrics that let Freddie rock the orange and black. And, I worked in more of the green fabric so Mr. Crabby will fit in better. I still need to hand embroider around the applique and piece the border.
This is how the blocks look together right now.
I look forward to seeing what the ladies designing the blocks for this BOM have lined up for us next month!
Related Posts:
Blocks 1 & 3 - here
Block 2 - here
Block 3 Progress - here
Block 4 - here
Blocks 5 & 6 - here
Block 7 - here
Photos and links to each of the blocks may also be found on the Sun, Sand, and Sea 2017 BOM page tab at the top of the blog.
Thank you for stopping by!
Renee
Friday, October 13, 2017
2017 CQI Halloween/Autumn Fabric Postcard Swap
As mentioned in my last post, Wilma organized a Halloween/Autumn Fabric Postcard Swap for the Crazy Quilting International Facebook members. October 5th was the deadline to sign up and postcards need to be mailed before October 14th.
I signed up to swap an Autumn themed postcard and this one went into the mail today. I do hope the recipient likes it!
If you have followed my blog long, you may recall that I used waste canvas to cross-stitch a pumpkin Pamela Kellogg designed and shared in the Autumn 2015 Crazy Quilt Quarterly Magazine. I am afraid my stitches using waste canvas are not as neat as I would like them to be, but the pattern is darling! (My post from last year may be found here.)
I do love autumn! I love the large harvest moons, pumpkins, colorful leaves, pumpkins, crisp fall air, pumpkins...
For the back, I printed this template onto cardstock.
I was thrilled to find a white, yellow, and orange variegated rayon thread in my stash to finish the edges with.
If you are interested in making a crazy quilted fabric postcard, you may find a tutorial on the Crazy Quilting International blog, here. If you use cardstock instead of a fabric backing, remember that the zigzag stitches do perforate the edges of the cardstock.
For this card, I set my machine to sew a zigzag stitch with 3.5 wide and 0.3 long stitches and went around the edges once. Without breaking the thread, I switched the setting to straight stitches and went around the edge of the zigzag stitch once before knotting the thread and trimming the thread. (The finishing method was inspired by this tutorial at Quilted Delights.)
These postcards need to be hand cancelled at the post office. In the USA, this requires an additional stamp (that costs $0.21 at the time of this post.) I send my postcards in a clear plastic envelope approved by USPS that I found and purchased through Amazon. With the envelope, I have to pay for a regular postage stamp instead of a postcard stamp. Some post offices will hand cancel the the fabric postcard and then allow you to put it into the clear envelope to post it. The 2 post offices I have been to will only hand cancel directly on the postcard if it is mailed as is - without the plastic envelope.
Thank you for stopping by!
Renee
Sunday, October 1, 2017
October 2017
Wow! September has already gone and October has arrived.
October is one of my favorite months because pumpkins are finally in season and I love the harvest moons this time of year.
October is one of my favorite months because pumpkins are finally in season and I love the harvest moons this time of year.
Progress with my September Goals:
My list of September goals may be seen here. 3 of the 8 goals were completed. However, I did finish up a few more crafts that were not on my list.
The crazy quilted under-the-sea block I embellished turned out to be too large to make into a glasses case. So, I finished it off as a wall quilt and added it to my Etsy shop. You may find the blog post here and my Etsy shop here.
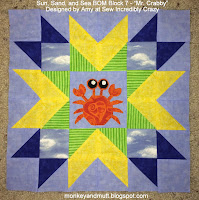
Block 7 of the Sun, Sand, and Sea Block of the Month is finished. I just love "Mr. Crabby", designed by Amy of Sew Incredibly Crazy. The blog post is here - it includes a link to the pattern for the block.
(Joan of Moosestash Quilting has shared a photo of the first 9 blocks together. You may see them here.)
(Joan of Moosestash Quilting has shared a photo of the first 9 blocks together. You may see them here.)
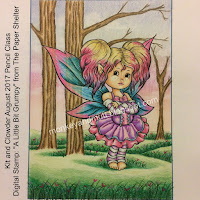
I finished my first pencil coloring class through Kit and Clowder and had so much fun! The digital stamp for the class was "A Little Bit Grumpy" from The Paper Shelter. My blog post about it is here.
I know several people living outside of the USA wish they could participate. You might be interested to know that Wilma is organizing a Halloween/Autumn Crazy Quilted Fabric Postcard Swap for members of the Crazy Quilt International Facebook Group. The group may be found here, and the deadline to sign up is October 5th and postcards need to be mailed by October 14th. (I signed up to make an Autumn themed postcard.)
I made my first Etsy sale! I do hope the new owner likes it. :)
This zipper pouch was finished and added to my Hand Stitched Treasure Etsy Shop. The blog post is here. The shop is here.
I also finished off the last two mailbox fabric panels that I colored back in February. They will be shared on the blog soon. (The February post may be found here.)
2. Make progress embroidering this Christmas stocking for my eldest son. (#10 on the APQ 2017 UFO Challenge, selected in June.)
3. Create a purse with this block from the Crazy Quilt Journal Project (CQJP) 2014. (#5 on the APQ 2017 UFO Challenge, selected in August.) You may read more about this block here.
4. Work on embroidering my CQJP 2014 December block. (#7 on the APQ 2017 UFO Challenge, selected in September.)
5. Create "Beach Boy Freddie" - block 8 of the Sun, Sand, and Sea BOM designed by Carol of Just Let Me Quilt. You may see it here, and there is a link to the pattern.
6. Create "Bathing Beauty" - block 9 of the Sun, Sand, and Sea BOM designed by Amy of Sew Incredibly Crazy. You may see it here and there is a link to the pattern - which is free throughout October.
7. Create a wall quilt with my CQJP 2017 January block. (You may read more about this block here.)
8. Sew the borders onto "Hearts Askew" quilt top, and stitch around appliqued hearts. The pattern is from the book Hearts Aplenty by Lynda Milligan and Nancy Smith. (#3 on my APQ 2017 UFO Challenge, selected in October.)
9. Complete my 2nd coloring class through Kit and Clowder. This month's class features the Pure Prairie Bouquet digitial stamp (found here) from Power Poppy. I have completed the first video tutorial so far.
10. Make a gift to share on the 1 X-mas Item a Month Blog.
I will be sharing photos of my progress on Instagram (here) and on my Hand Stitched Treasure Facebook page (here).
2. Crazy Quilt ATC Tutorial Part 2 - Embellishing - here
3. Crazy Quilt ATC Tutorial Part 3 - Finishing - here
4. TAST Stitches 64 and 99 - here
5. Pink Zipper Pouch - here
Thank you for stopping by!
Renee
Other September Accomplishments:
I finished a tutorial: How to Make a Crazy Quilted Artist's Trading Card (ATC). Find out more about the Crazy Quilt Quarterly 2018 ATC Swap here. This was a 3 part tutorial: Piecing the ATC, Embellishing the ATC, and Finishing the ATC. (Links may be found below with the list of top viewed posts in September.)I know several people living outside of the USA wish they could participate. You might be interested to know that Wilma is organizing a Halloween/Autumn Crazy Quilted Fabric Postcard Swap for members of the Crazy Quilt International Facebook Group. The group may be found here, and the deadline to sign up is October 5th and postcards need to be mailed by October 14th. (I signed up to make an Autumn themed postcard.)
I made my first Etsy sale! I do hope the new owner likes it. :)
This zipper pouch was finished and added to my Hand Stitched Treasure Etsy Shop. The blog post is here. The shop is here.
I also finished off the last two mailbox fabric panels that I colored back in February. They will be shared on the blog soon. (The February post may be found here.)
October Goals:
1. Make a wall quilt with the blocks from a Crazy Quilting International Heart Round Robin. (This was #2 on my list for the APQ 2017 UFO Challenge and was selected as the May project.) You may see all of the blocks here.2. Make progress embroidering this Christmas stocking for my eldest son. (#10 on the APQ 2017 UFO Challenge, selected in June.)
3. Create a purse with this block from the Crazy Quilt Journal Project (CQJP) 2014. (#5 on the APQ 2017 UFO Challenge, selected in August.) You may read more about this block here.
4. Work on embroidering my CQJP 2014 December block. (#7 on the APQ 2017 UFO Challenge, selected in September.)
5. Create "Beach Boy Freddie" - block 8 of the Sun, Sand, and Sea BOM designed by Carol of Just Let Me Quilt. You may see it here, and there is a link to the pattern.
6. Create "Bathing Beauty" - block 9 of the Sun, Sand, and Sea BOM designed by Amy of Sew Incredibly Crazy. You may see it here and there is a link to the pattern - which is free throughout October.
7. Create a wall quilt with my CQJP 2017 January block. (You may read more about this block here.)
8. Sew the borders onto "Hearts Askew" quilt top, and stitch around appliqued hearts. The pattern is from the book Hearts Aplenty by Lynda Milligan and Nancy Smith. (#3 on my APQ 2017 UFO Challenge, selected in October.)
9. Complete my 2nd coloring class through Kit and Clowder. This month's class features the Pure Prairie Bouquet digitial stamp (found here) from Power Poppy. I have completed the first video tutorial so far.
10. Make a gift to share on the 1 X-mas Item a Month Blog.
Top 5 Posts Viewed in September:
1. Crazy Quilt ATC Tutorial Part 1 - Piecing - here (Wow! This is already the 3rd most viewed post of all time.)2. Crazy Quilt ATC Tutorial Part 2 - Embellishing - here
3. Crazy Quilt ATC Tutorial Part 3 - Finishing - here
4. TAST Stitches 64 and 99 - here
5. Pink Zipper Pouch - here
Thank you for stopping by!
Renee
Subscribe to:
Comments (Atom)


