

The Crazy Quilt Quarterly Magazine is hosting an Artist's Trading Card (ATC) Swap - crazy quilt style. You may read more details about the swap at Kitty and Me Designs, here.

Yesterday, I shared how to embellish a crazy quilted ATC. That post is here.
The final step is finishing the artist's trading card.
If you make more than one ATC, I recommend that you embellish them all and then finish them all at the same time. Also, keep in mind that sewing through cardstock will dull your needle more quickly than sewing through fabric does.
Materials used in this step of the tutorial:
Pieced and Embellished ATC block
Peltex or Timtex (I used Pellon 72F Double Fusible Peltex II)
Cardstock printout downloaded from Kitty and Me Designs (printed in Part 1 of this tutorial.)
Cutting mat, rotary cutter, and ruler
Seam ripper
Scissors
Sewing machine with needle for sewing heavy fabrics
Thread
Click any photo for a larger image.

2. Using a seam ripper, I removed the seam basted around the outline of the block.
Tip: Use care not to cut your embroidery stitches.

Please read through the full tutorial before you cut this card out.

5. My scissors do not have a sharp point, so I pierced the slit line with my seam ripper.


Tip: When cutting your block, be sure you do not cut any of the knots or embroidery on the back. (I shared this photo of the back of my block so you can see the ends of my threads are close to the edge, but I did not cut through them.)
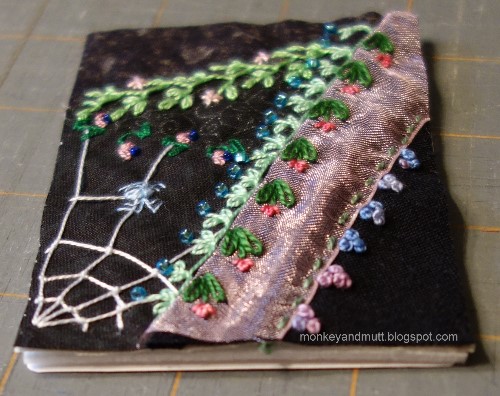
Tip 1: Be sure the top/bottom of the cardstock printout is oriented in the position you want it. (My spider hangs down, making a "top" to this block. So, I oriented the cardstock top so the "2018 ATC Swap..." wording was along that same edge on the back.)
Tip 2: If your embellished block is cut slightly larger, be sure the Peltex or Timtex covers all of your embroidery. You do not want to cut through the embroidery threads when you trim your block.
10. Following the instructions on your stabilizer, fuse the "sandwich" together. I put my "sandwich" on the ironing board with the cardstock on the bottom and the embellished block on top. To avoid damaging the ribbon, I put a clean wash cloth over the block and then pressed the piece with my iron (on the highest dry setting) for 5 seconds. I turned the piece over and covered the cardstock with the wash cloth and pressed it for 5 seconds.
11. Once fused, place your ATC on your cutting mat with the cardstock side up. Trim the excess fabric from your embellished block. Clip any threads that may be sticking out.
12. Finishing the edges.

For the next card, I plan to cut a little above the top line, and a bit farther to the left. I also plan to wait to write in my email address until after the edges are finished.
There are several ways the edges may be finished.
A. Some people hand embroider a buttonhole stitch around the entire piece.
B. Others bind the ATC as they would bind a quilt. (If you use this method be sure the edges do not exceed 1/4" in thickness.)
C. In this fabric postcard tutorial at Needled Mom, fabric is attached to the edges with fusible web and then sewn in place.
D. Lace is sometimes folded around the edge and sewn in place.

F. Annet at Fat Quarter has this great tutorial showing how to couch yarn around the edges of your ATC.
G. Zig Zag stitch around the edges. This is the method I used. Inspired by the final steps in this fabric postcard tutorial at Quilted Delights. I altered mine slightly. I only zig zag stitched around the card 1 time (not twice) with my stitching width set at 3.5 and the length at 0.3. Leah did a great job explaining the process step-by-step.


As you can see, the finished ATC fits perfectly within the fold lines of the cute envelope.

I hope you will take a good moment to look at your work and celebrate your accomplishments. We are truly all our own worst critics.
If you have any questions or find any part of this tutorial unclear, please do not hesitate to ask. I reply to every comment left on my blog. If you do not receive an emailed reply, you have your settings as a no-reply blogger. I will reply within the comments of the post.
Fun facts?
1. It took me longer to select my fabrics than it took me to piece my ATC cards (even with the photo shoot for this tutorial.)
2. It took me longer to decide how to embellish the block than it took me to embroider it.
3. This was the first ATC card I created. (They are pretty similar to CQ fabric postcards.)
4. ATCs are a lot of fun to make!
I want to thank the staff of the Crazy Quilt Quarterly Magazine for organizing this ATC swap. And, I want to thank Pamela Kellogg for allowing me to share this tutorial. It is my hope that the goal of 300 ATCs for the swap is met.
Thank you for stopping by!
Renee
Related Posts:
Crazy Quilt ATC Tutorial Part 1 - Piecing
Crazy Quilt ATC Tutorial Part 2 - Embellishing
I apologize for the blurry photos. They appear more crisp in my photo software than they do on my blog. I am working to figure that out.
9/18/17 - Updated to correct the way my postcard was finished. (Thank you, Cris!)
9/24/17 - Updated to add a link to tutorial at Fat Quarter, showing how to finish an ATC by couching yarn.
12 comments:
Wonderful tutorial! Love all the links, too. You've so many things clearer. Thank you.
Superb tutorial, Renee!
Your photos look fine to me, especially when I clicked on them to see the magnified pictures.
I shall be back to re-read when I have a go myself! Thank you for all your work!
Barbara x
You make such great tutorials!
And cq ATCs, too, of course!
Great tutorial again, Renee. And so very clear. Thank you.
Catherine, I am glad the tutorial was helpful!
Renee you have truly given us wonderful insight to how to create and stitch a CQ ATC and I am very grateful. Today I am giving my seam treatments consideration time. I am most excited to participate in the CQ ATC swap with Pam. Thank you very much and I always love your CQ. <3
Great tutorial! It's a pity I cannot join this swap. I stitch my ATC's completely by hand and finish them with a couched edge. There's a tutorial on my blog for this (on the tutorial page), which I made a few years ago.
Annet, the only downside to the swap is that it is limited to participants in the US. Sorry! Thank you for letting me know about your couching method to finish an ATC. I updated this post, adding a link to your tutorial.
Thanks for adding the link to my tutorial.
Annet, thank you for the tutorial! :)
Wonderful job Renee!! Now I can't wait to make some myself, even though I can't take part in the swap.
How cool. What a explanation. So easy to follow. I'll just stick with my stitching a drool on your beautiful pieces haha.
Post a Comment