Tuesday, June 25, 2013

First CQ Messenger Bag Post 9

Stitched in the Gimp2 CK Curly font.
Yesterday, I deviated from my original sketched plan for the front flap of the messenger bag yet again.  I printed out the words, "Faith, Hope & Love" in a couple of fonts and sizes using fonts I liked from the free Gimp2 photo program my husband installed on my computer a couple of years ago.

My favorite for this saying was the CK Curly font.  I stitched it onto the messenger bag using a single strand of pink variegated EdMar Glory #004 floss using a stem stitch. 

I have a hard time with curves and the stem-stitch, but I think it turned out okay!

Thanks for dropping by!
-Renee

Monday, June 24, 2013

First CQ Messenger Bag Post 8

Center of front flap panel of my first messenger bag after adding beads.

Over the weekend, I added a few heart-shaped beads and light pink beads around the heart embroidered on the center of the front flap.

I also added the beads to the seam on the right.

I am REALLY slow at adding beads.  Using a single strand of a matching shade of cotton floss, I secure each bead with three stitches through the center and secure the back with three knots.  By knotting the thread in the back after adding each bead, if one catches on something and tears only the one bead should fall off.  The others should remain secured.

Seam treatment before and after adding beads.
While I was at it, I decided to add the beads to this seam to dress it up. 


Saturday, June 22, 2013

First CQ Messenger Bag Post 7

Front Flap of Messenger Bag as of 06/21/13.
This is how the front flap looked before I went to bed last night.  Originally, I planned to stem-stitch the outline of a tree trunk and add silk ribbon leaves to the black triangle in the center.  Obviously, I changed my mind!

Using a quilting heart template I bought on sale some time ago and using the technique I learned in Marsha Michler's The Magic of Crazy Quilting: A Complete Resource for Embellished Quilting, I added a heart to the center of the block.
Stem-stitched heart outline.
Knowing I planned to add silk ribbon flowers to the heart, I chose a shade of green ribbon for the leaves and then found a similar shade of green DMC cotton floss.  Using 2 strands of the cotton floss, I stem-stitched the heart.

Next, I used a single strand of pink floss to create spokes along the heart for spider-web silk ribbon roses.  A few pink silk ribbon lazy daisy stitches created rose buds.  There are three shades of pink here. 

Green silk ribbon was used to make two straight stitches at the base of each rosebud, and ribbon stitched leaves were added to the roses.

Next, I added 3 pastel yellow glass seed beads to open areas along the heart.  Five straight stitches with blue silk ribbon were placed around each yellow bead center.  (I ran out of one shade of blue after making the first 2 flowers, so there are two shades of blue on the heart.)
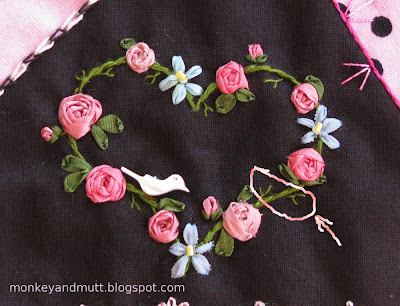
Heart before adding beads.
When I ordered the Winter 2013 Challenge Package from Evening Star Designs, I also ordered their BS White on White Sew-On Bead Sampler, which included the small bird bead I added to the heart.

A few unadorned areas remained on the stem-stitched heart, so I used a single strand of the same shade of green and randomly added fly-stitches.  (A couple are circled with the arrow pointing to them in the photo above.)  I will add glass seed beads to the center of each fly stitch for a few sparkly flower buds.
Heart beads sealed with clear fingernail polish.
Yesterday, I also varnished a few beads.  I purchased these The Bead Gallery heart-shaped beads while they were on sale at Michaels.  The beads are silver-plated, but I could see some metal showing through and worried that might become an issue over the years.  Following a tip I read somewhere last year, I applied a coat of clear fingernail polish to seal the beads.  I was not sure exactly how to do this, so I set out a sheet of plastic wrap and painted one side.  Then, I carefully lifted the bead by slipping a toothpick into the beading hole and moved it to a clean section of the plastic wrap (hoping it would not paint to the plastic.)  I allowed them to dry for a few hours and then flipped them over, painted the other side, and moved them to a clean section of the plastic wrap to dry.  Of course, this morning I determined they would not look right where I wanted them, but at least they are ready when I need them!

I ran a few ideas past my wonderfully supportive (and brutally honest) hubby about a few more additions for this little black triangle.  And, we actually agreed on the idea we both liked best!  I hope to find time to finish this section up today.  If I do, this section will look a lot different tomorrow!
Messenger Bag Front Flap - center section prior to adding beads.

I hope you enjoy your weekend!  It is beautiful and sunny here, after a few days of rain.  Perfect weather to let my eldest practice driving.

Thursday, June 20, 2013

First CQ Messenger Bag Post 6

Close up of upper-right corner of the messenger bag's front flap.
Last night, I finished up this section of the front flap.

Using 2 strands of pink DMC 30818 rayon floss, I made three lazy daisy stitches at the top of the tall flower stems along the seam.  I filled each lazy daisy stitch with a straight stitch so the pink fabric beneath did not show through as much.

Next, I added the butterfly on the right.  Although it is blue, I used pink and blue variegated Lola EdMar floss #093.  And the butterfly on the right was stitched with 2 strands of light yellow DMC 30745 rayon floss.

The flight paths for both butterflies were stitched with a single strand of DMC metallic white floss.  The photos fail to capture how they shimmer in the light.

The blue bird was added with straight stitches in blue 4mm silk ribbon.  A tiny straight stitch with a single strand of black DMC #310 floss created the beak and the eye.

Upper-right corner of messenger bag's front flap.
One section is now complete!

A Snowball from Donna!


The 2nd snowball in my collection.  Donna in MT made this delightful winter scene for me!
Look what arrived in the mail today!  Isn't it delightful?!  Donna made this beauty for my wintery snowman collection.  (She should receive her snowball tomorrow.)


I love the variety of sequins and beads Donna used.  The clear flowers, silver flowers, and shimmery silver circles love to dance with the light.

The beaded seam over sheer ribbon and the white stitched flakes are adorable!

The thin silver trim separating the sky from the snow is so delicate.

And I just LOVE the snowman sledding along the snowy hills.

I have a hard time thinking of ways to use ribbons and trims.  Swapping snowballs allows me to admire creative ideas that would never occur to me - like the snowy path for this little snowman and his sled!

Thank you, Donna.  I love it!

Hugs,
Renee