Tuesday, June 25, 2013

First CQ Messenger Bag Post 9

Stitched in the Gimp2 CK Curly font.
Yesterday, I deviated from my original sketched plan for the front flap of the messenger bag yet again.  I printed out the words, "Faith, Hope & Love" in a couple of fonts and sizes using fonts I liked from the free Gimp2 photo program my husband installed on my computer a couple of years ago.

My favorite for this saying was the CK Curly font.  I stitched it onto the messenger bag using a single strand of pink variegated EdMar Glory #004 floss using a stem stitch. 

I have a hard time with curves and the stem-stitch, but I think it turned out okay!

Thanks for dropping by!
-Renee

Monday, June 24, 2013

First CQ Messenger Bag Post 8

Center of front flap panel of my first messenger bag after adding beads.

Over the weekend, I added a few heart-shaped beads and light pink beads around the heart embroidered on the center of the front flap.

I also added the beads to the seam on the right.

I am REALLY slow at adding beads.  Using a single strand of a matching shade of cotton floss, I secure each bead with three stitches through the center and secure the back with three knots.  By knotting the thread in the back after adding each bead, if one catches on something and tears only the one bead should fall off.  The others should remain secured.

Seam treatment before and after adding beads.
While I was at it, I decided to add the beads to this seam to dress it up. 


Saturday, June 22, 2013

First CQ Messenger Bag Post 7

Front Flap of Messenger Bag as of 06/21/13.
This is how the front flap looked before I went to bed last night.  Originally, I planned to stem-stitch the outline of a tree trunk and add silk ribbon leaves to the black triangle in the center.  Obviously, I changed my mind!

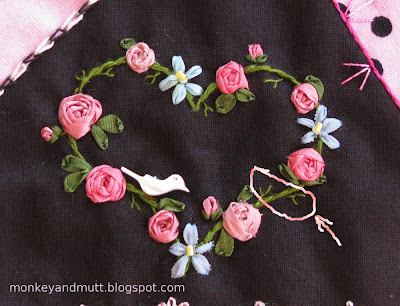
Using a quilting heart template I bought on sale some time ago and using the technique I learned in Marsha Michler's The Magic of Crazy Quilting: A Complete Resource for Embellished Quilting, I added a heart to the center of the block.
Stem-stitched heart outline.
Knowing I planned to add silk ribbon flowers to the heart, I chose a shade of green ribbon for the leaves and then found a similar shade of green DMC cotton floss.  Using 2 strands of the cotton floss, I stem-stitched the heart.

Next, I used a single strand of pink floss to create spokes along the heart for spider-web silk ribbon roses.  A few pink silk ribbon lazy daisy stitches created rose buds.  There are three shades of pink here. 

Green silk ribbon was used to make two straight stitches at the base of each rosebud, and ribbon stitched leaves were added to the roses.

Next, I added 3 pastel yellow glass seed beads to open areas along the heart.  Five straight stitches with blue silk ribbon were placed around each yellow bead center.  (I ran out of one shade of blue after making the first 2 flowers, so there are two shades of blue on the heart.)
Heart before adding beads.
When I ordered the Winter 2013 Challenge Package from Evening Star Designs, I also ordered their BS White on White Sew-On Bead Sampler, which included the small bird bead I added to the heart.

A few unadorned areas remained on the stem-stitched heart, so I used a single strand of the same shade of green and randomly added fly-stitches.  (A couple are circled with the arrow pointing to them in the photo above.)  I will add glass seed beads to the center of each fly stitch for a few sparkly flower buds.
Heart beads sealed with clear fingernail polish.
Yesterday, I also varnished a few beads.  I purchased these The Bead Gallery heart-shaped beads while they were on sale at Michaels.  The beads are silver-plated, but I could see some metal showing through and worried that might become an issue over the years.  Following a tip I read somewhere last year, I applied a coat of clear fingernail polish to seal the beads.  I was not sure exactly how to do this, so I set out a sheet of plastic wrap and painted one side.  Then, I carefully lifted the bead by slipping a toothpick into the beading hole and moved it to a clean section of the plastic wrap (hoping it would not paint to the plastic.)  I allowed them to dry for a few hours and then flipped them over, painted the other side, and moved them to a clean section of the plastic wrap to dry.  Of course, this morning I determined they would not look right where I wanted them, but at least they are ready when I need them!

I ran a few ideas past my wonderfully supportive (and brutally honest) hubby about a few more additions for this little black triangle.  And, we actually agreed on the idea we both liked best!  I hope to find time to finish this section up today.  If I do, this section will look a lot different tomorrow!
Messenger Bag Front Flap - center section prior to adding beads.

I hope you enjoy your weekend!  It is beautiful and sunny here, after a few days of rain.  Perfect weather to let my eldest practice driving.

Thursday, June 20, 2013

First CQ Messenger Bag Post 6

Close up of upper-right corner of the messenger bag's front flap.
Last night, I finished up this section of the front flap.

Using 2 strands of pink DMC 30818 rayon floss, I made three lazy daisy stitches at the top of the tall flower stems along the seam.  I filled each lazy daisy stitch with a straight stitch so the pink fabric beneath did not show through as much.

Next, I added the butterfly on the right.  Although it is blue, I used pink and blue variegated Lola EdMar floss #093.  And the butterfly on the right was stitched with 2 strands of light yellow DMC 30745 rayon floss.

The flight paths for both butterflies were stitched with a single strand of DMC metallic white floss.  The photos fail to capture how they shimmer in the light.

The blue bird was added with straight stitches in blue 4mm silk ribbon.  A tiny straight stitch with a single strand of black DMC #310 floss created the beak and the eye.

Upper-right corner of messenger bag's front flap.
One section is now complete!

A Snowball from Donna!


The 2nd snowball in my collection.  Donna in MT made this delightful winter scene for me!
Look what arrived in the mail today!  Isn't it delightful?!  Donna made this beauty for my wintery snowman collection.  (She should receive her snowball tomorrow.)


I love the variety of sequins and beads Donna used.  The clear flowers, silver flowers, and shimmery silver circles love to dance with the light.

The beaded seam over sheer ribbon and the white stitched flakes are adorable!

The thin silver trim separating the sky from the snow is so delicate.

And I just LOVE the snowman sledding along the snowy hills.

I have a hard time thinking of ways to use ribbons and trims.  Swapping snowballs allows me to admire creative ideas that would never occur to me - like the snowy path for this little snowman and his sled!

Thank you, Donna.  I love it!

Hugs,
Renee

Wednesday, June 19, 2013

First CQ Messenger Bag Post 5


Michelle of Little Orphan Skein made a great suggestion for my birdhouse!  I loved the idea of adding a vine to the pole. 

(I forgot to ask my incredibly honest hubby if the vine helped.  He took one look at it the other day and told me it looked nothing like a birdhouse.  He believed it looked more like a dog on a stick...  At least I know when I show him my work that he will not sugar coat his opinion!)

Using 2 strands of green DMC #368 floss, I brought the thread up just to the right of the bottom of the pole.  I counted up to the third brown chain-stitch, and without penetrating the fabric, I slipped the needle under the chain-stitch to pull it to the left of the pole.  I repeated this process, counting up 3 stitches, and slipping the needle under the third stitch from the right to the left until I reached the birdhouse.  Careful not to catch the silk ribbon, I stuck the needle through the fabric beneath the base of the bird house and secured the thread on the back of the fabric.

Next, using the same green floss, I added fly-stitched leaves to both sides of the "vine," so the stems of the leaves met up with the green of the vine.  (My leaves are far from perfect.  I think I need more practice!) 

You know what they say about necessity being the mother of invention?  Well, I believe mistakes inspire (require?) creativity.  On my first attempt of putting leaves on the vine, my thread knotted in the back, leaving a large messy mass of thread.  I had to resort to my seam ripper and due to difficulties removing the tiny stitches, I had to start all over again.  Unfortunately, my leaves did not match up at the same locations, and I could still see spots on the fabric where the thread had punched through.  So, I added a few random fly stitches and some pink seed beads.  These little pink "flowers" hid my flaws.  They made a cute addition, too!

I also used a single strand of blue DMC #806 floss to add two small lazy daisy stitches to the top of the short green stitches along the seam-line.  I chose this shade of blue because it matched the blue seed beads that I added to the center of each "flower." 
This is a view of the upper-right corner.  I still have quite a bit of work to do before this section will be done.

So, this is how the front flap of the messenger bag looks at the moment. 

I have also managed to make some progress on my CQJP 2013 blocks.  I am seriously questioning my decision to use the short and long stitch on the block with the lightning storm.  As a novice with this stitch, it is not turning out as I had hoped.  I have even considered scrapping the block, but it received so much positive feedback that I cannot bring myself to toss it.  On the bright side, my honest hubby seems to like it.  Perhaps I am being too critical.  Time will tell!

-Renee

Tuesday, June 18, 2013

Evening Star Designs Winter 2013 Challenge Package

Evening Star Designs Winter 2013 Challenge Package
Talk about fast!  Less than an hour after I placed my order with Evening Star Designs, I received an email letting me know it had shipped.  I ordered it on the 14th and it arrived on the 17th.  My boys must have thought I was nuts, I was so excited!
Evening Star Designs 2013 Winter Challenge Package Embellishments
The first thing I had to check out were the embellishments included with the package.  They are absolutely lovely!

Evening Star Designs 2013 Winter Challenge Package Fabrics
The fabrics are simply gorgeous!  I have only stitched on a fabric similar to one of these in the past.  The textures of these fabrics are amazing!  I am so excited to crazy quilt with these beauties.  And, I am equally terrified I may mess them up!  Which means, I am off to a good start.  Any good challenge should require you to step a little bit out of your comfort zone, right?!

You cannot really tell from the photo above, so I took one more so you could see how sheer this pretty silver fabric is:

My requirements are to use at least half of the fabrics included with this package to make a block measuring at least 99-square-inches.  A 10x10-inch block would cover that.  However, the block can be bigger.

This is going to be so much fun!

Have a wonderful day!


Monday, June 17, 2013

First CQ Messenger Bag Post 4


I found myself inspired by a birdhouse in the Whispering Willow Garden motif in Joan Gordon's The Silk Ribbon Embroidery Bible.  Although I changed the colors, the birdhouse was created the same.  Using brown 7mm silk ribbon, I made a vertical straight stitch.  Three more straight stitches were made using 4mm brown silk ribbon for the base and roof of the birdhouse.  I used 2 strands of DMC #310 black floss and 2 wraps for a French knot to create the entrance.

My pole is not the same as the one found in Joan Gordon's book.  Using 2 strands of brown DMC #420 floss (because it matched the brown silk ribbon I used), I ran a stem stitch from the birdhouse down to the black chain-stitched seam below.  Then, I stem-stitched my way back up to the birdhouse, to add more width to the pole.

Had I created the pole first, it would not have intercepted my short flower stem below.  (Yesterday, I added alternating short and long straight stitches about 1/4th an inch apart along the seam line using 2 strands of green DMC #989 floss.)  However, this will simply mean there will be a flower at the base of the pole.

I do have a much larger dilemma...
What dilemma?  My birdhouse is too large for my tree.  They are not to scale at all.  Had I planned this better, the tree would be about 2 inches taller, and the top would be bushier.  However, the birdhouse was not planned.  It was an impulsive addition.  I decided this morning that it would help fill the void to the left of the tree.  So, it did.

Luckily, I am making this bag for myself and I can happily pretend to be oblivious to my own blunder.

Now, I am off to the library to sign my boys (Monkey & Mutt) up for the summer reading program.  While I am there, I will be checking out books on painting with acrylics.  I still have a few fun ideas for my Winter/Christmas themed round robin coming up in July.

I do hope I find more time to work on this more later today.

Have a great day!

Sunday, June 16, 2013

A Snowball for Andrea!

Landscape "snowball" for Andrea in India.  Flower & trees from Diana Lampe's book.
My second CQI Snowball Swap is with Andrea.  On June 12th, it began its journey all the way to India!

Andrea requested a 4"-square landscape with natural colors.  This was the perfect opportunity to finally make the Magnolia Tree in Diana Lampe's book, Embroidery for all Seasons.  (I had been itching to stitch this tree since I first laid eyes on this book!)  The daffodils, forget-me-nots, and the snail were also made from directions in this book.


I added a little bluebird using 4mm light blue silk ribbon and a tiny straight stitch of orange for the beak.

A tiny pink butterfly decided to visit the daffodils.

A small snail made his way through the flowers.

And a few lily pads (lazy daisy stitches filled with a straight stitch made with two strands of pink for the flowers and green for the leaves) were in the water.

I had so much fun stitching this block!

Saturday, June 15, 2013

A Snowball for Donna!

A snowball for Donna in Montana

This is for my third snowball swap; this one is with Donna in Montana.  One of the themes she mentioned she liked was a pond with cattails and critters.

Swan pattern from DMC Collection: Mini Motif Designs by Mary Bartley Stockett
 I have seen swans living near lakes.  I decided this one liked ponds.

A few lazy daisy stitches using green and pink 4mm silk ribbons was all it took to make a few lily pads.

Directions to make this snail were found in Diana Lampe's Embroidery for all Seasons.
This was my first attempt at using a woven picot stitch.  The cattail leaves are not quite perfect, but they are far better than the practice one I made!  I used a strand of variegated green Perle Iris # 8 (color # 5062.)

The tips of the cattails were made with gathered brown 4mm silk ribbon.


No pond scene is complete without a dragonfly, is it?  I love these shimmery blue beads.  I used 4mm light blue silk ribbon for the wings.


I do hope Donna likes it!

-Renee


First CQ Messenger Bag Post 3

Chain-stitched tree with lazy daisy leaves (filled with a straight stitch) and pink French knot flowers.
Most of my stitching time has been spent working on my third snowball, which I hope to send to Donna in Montana next week.   However, I finally took the time to finish my tree! 

The leaves were all stitched with two strands of DMC 92 cotton floss (a variegated green.)  Each "leaf" is a lazy daisy stitch filled with a straight stitch to help hide the pink fabric beneath.  The tricky part about using the variegated floss was trying to spread the leaves out so the tree was not fully dark green in one section and light green in another.  As the thread color changed, I worked my way back to fill in the blanks I had intentionally left behind.

Nicki Lee of Raviolee Dreams made a great suggestion for this tree - add pink French knots as berries or flowers.  Using a single strand of EdMar Iris #218 floss, I clustered groups of three French knots throughout the branches.  I love the addition!

As one of the first people to comment on this blog, Nicki Lee once pointed out that there are so many techniques to learn with crazy quilting.  Every time I begin a new technique or stitch, I smile as the truth of that comment comes to mind.

As I am brainstorming ideas for six 6-inch blocks I will be making for my second round robin, I find myself thinking about that comment.  If time allows, I may make my first attempt of painting on fabric with acrylic paints.  First, I have a snowball to complete.  And, I am still 3 blocks behind on my CQJP 2013 project.  Oh, and I have decided to make another glasses case gift.  All in time... LOL!

Thank you for visiting!
Renee

Friday, June 14, 2013

Evening Star Designs 2013 Challenges


There is something I have really, really wanted to create using crazy quilted fabric.  Ideas have been simmering in my mind for nearly a year.

So, when I discovered Evening Star Designs was offering two challenges and I saw one of the challenge packages, I knew I had to give it a try!  I just ordered the 2013 Winter Challenge Package.  (Special thanks to Nicole from the CQforNewbies Yahoo! Group for bringing the challenge to my attention!)

I was very tempted to order the 2013 Miniature Crazy Quilt Challange Package, too.  However, I really do need to work on some of my UFOs and I signed up as a coordinator for a CQI round robin that will begin next month.  So, I opted not to over-commit myself.

While at the Evening Star Designs site, I also discovered some wonderful trims, beads, buttons and ribbons.  (If only my budget matched my wishlist!)  I do not anticipate winning the challenge, but I would have no problems spending the $100 gift certificate offered for first prize.

I will show you pictures of the package when it arrives.  However, photos of my work will be safely tucked away until after the challenge.  (All entries are due on September 15th.)

Will you be joining one of the Evening Star Designs Challenges?  If so, please let me know!

-Renee

Thursday, June 13, 2013

A Snowball from Nicki Lee!

A snowball from Nicki Lee!  It is even prettier in person.
Look what arrived in the mail today!  Nicki Lee from Raviolee Dreams made this for me.  It is the very first in my winter/snowman snowball collection through the Crazy Quilting International Snowball Swap. (Someday, I may have to make my first Etsy purchase.  Nicki Lee has the prettiest laces and I would love to add some to my crazy quilting stash.  The Christmas wish list has begun!)

Snowman Close-up.  Stitching by Nicki Lee at Raviolee Dreams
The net, the pearls and the beads shimmer and shine in the light.  You can almost catch the shimmer in the photo above.  I just love the falling snow.

Stitching by Nicki Lee at Raviolee Dreams.

My eldest (nicknamed Monkey), calls this feather-stitched section my "wintery tree."  Those facets on those silver beads love to sparkle in the light!  And the bugle beads on the right love to shine.

Stitching by Nicki Lee at Raviolee Dreams.
The metallic blue floss sparkles.  Isn't this lovely?!

Stitching by Nicki Lee at Raviolee Dreams.
I love everything about this beautiful snowball.

My youngest thought he was being clever.  (His nickname is Mutt, because he loves dogs.  And, because I refused to call him Piggy, even if he could oink well when he was little.  Recently, he admitted that I was right when I explained he would thank me for that refusal some day.)  When he saw my snowball, he declared, "That's a horrible summer block!"  My husband and I looked at him funny.  He grinned and added, "That's why it's a wonderful winter block!"  Silly kid, sure is cute.

Thank you, Nicki Lee!

I finished my second snowball this week and mailed it to India.  I am trying to wait until Andrea receives it before I post pictures, but it is not easy. 

Thank you for visiting!
Renee

Saturday, June 8, 2013

First Crazy Quilted Messenger Bag Post 2

Tree trunk and branches stitched for my first crazy quilted messenger bag.
When my children arrived home from school yesterday, I warned them they would be shocked to know I added a tree to my messenger bag.  (I was being sarcastic, of course.)  One of my boys replied, "Yeah, Mom.  That is so unlike you."

I do seem to love embroidered trees and landscapes.  (You will see more when I finally share the other projects I have been working on!)

I threaded my needle with two strands of floss using two different DMC flosses: 1 strand of #838 and 1 strand of #610.  I like the color variation this gave the chain stitched tree trunk and branches.

Messenger Bag front flap as of this morning - June 8, 2013.

Today will be a busy one; yet, I hope to find some time to add some leaves to this tree.  I would love to use green silk ribbon.  However, this part of the flap will be in an area where I worry I may snag ribbon leaves.  So, the leaves will most likely be lazy daisy stitches with a few different shades of green DMC embroidery floss.  (Or maybe I will use a variegated green EdMar floss?!  So many choices. *Grins*)

I wish you a wonderful weekend!
-Renee

Friday, June 7, 2013

My First Messenger Bag Post 1

Front Flap Panel - Bare
Well, after completing my first crazy quilted purse, I decided to try making a messenger bag.  This will be my first attempt sewing a messenger bag, but I decided to modify the pattern with some crazy quilting.  (The pattern I used was Butterick B4147 - I took advantage of a $0.99 pattern sale at Jo-Ann Fabrics last year.)  The front, back, sides, and strap will all be crazy quilted using a variety of pink and black fabrics. 

After adding my first seam treatment, I decided I should plan the block out better - so my seams would not compete with one another.  My sketch also gives me a basic idea to follow, so I spend less time staring at the fabric wondering what to do next.  However, it is not a concrete plan, and I have already deviated from it a bit...
For the first seam, I used 2 strands of green DMC cotton floss and buttonhole stitches.  Next, I added 2 green lazy daisy stitches at the base of each "stem," using the same floss.  After that, I used a single strand of a variegated pink Iris EdMar #018 floss to make 2 alternating flowers.  One consists of 3 lazy daisy stitches.  The other uses two straight stitches with a French knot in the center.

The second seam was an alternated chain stitch using 2 different threads on the same needle.  I used Finca Perle No. 8 in "Light Pale Geranium" #1724 (I discovered this at Canby Quilt and Fabric in Canby, Oregon  - next to their EdMar floss selection) and DMC Perle No. 12 cotton in Black #310.  (I thought I bought No. 8... Oops!)
You can see a bit of the 3rd seam in the photo above.  Using pink RiverSilks 4mm ribbon (#20), I made a herringbone stitch.  (In the future, I think I will take the time to measure, rather than eyeballing those stitches.  My husband tells me it looks fine, but I find myself very critical of my work!) 

Then, I used the tracing method described in Marsha Michler's The Art of Crazy Quilting: A Complete Resource for Embellished Quilting.  I centered quarters along a line I planned to match to the seam and traced them in hopes of achieving evenly rounded arches.  (I think it worked!) 

The lower halves use a single strand of black Lola Edmar #206 and 5 straight stitches to create spokes.  The upper arches use a single strand of a light pink Glory EdMar #218 floss and a chain stitch.  5 straight stitches were made within the pink arches, using the same pink.  The same black was used to make a straight stitch within each pink triangle.  Next, using a single strand of a pink variegated Glory EdMar #043 floss, a lazy daisy was added between each black spoke. 

The arched seam is not complete, but I am saving the beads for later.  The green stem-stitched stems you see above will be completed with some SRE (Silk Ribbon Embroidery.)
As you can see, I skipped the arch that would have interfered with my first seam.

Using pink variegated Glory EdMar floss #083, I made a stem-stitched seam.  Then, I went back and added 3 straight stitches on alternating sides of the seam.
Using DMC No. 5 Black #310 cotton floss, I added the chain-stitched seam (seen above the spider web.) 

I found a DMC pink cotton floss similar to the color of the flower trim, and used a single strand to stitch it into place.

In the lower-right corner (not pictured here), I began working a green chain-stitched vine on the marbled pink fabric (using 2 strands of a green DMC cotton floss).  However, I stopped as I approached the black fabric pictured here, as I knew I wanted a spider web in this section.  I wanted the vine to cross over the web, so I needed to stitch the web first.

A single strand of DMC No. 12 White perle cotton made the web.  As this will be a bag I intend to use, I ignored the advice I have read on many tutorials about making spider webs.  The longer strands are couched down, and the smaller web stitches do poke through the fabric, rather than wrapping loosely around the longer threads.  (I did not want to increase the odds of the threads catching and snagging on anything.)
I picked up a fat quarter of the black fabric with the pink rosebuds (barely visible above) at Every Thread Counts, a lovely quilt shop in Hood River, Oregon.  My desire to use that fabric and the pink OSU fabric inspired the pink and black theme for this bag.

This seam was created with (somewhat) evenly spaced fly stitches (with 2 strands of a green DMC cotton floss.)  I have always wanted to attempt wisteria blossoms, so I added them here.  I also took the liberty of making the blossoms blue using a single strand of variegated Lola EdMar #034 floss to make bunches of French knots.  (Shaping these little clusters was a bit trickier than I imagined, but I think they turned out!

Front Flap Panel by June 7, 2013
This is how the panel looks this morning.  I cannot wait to see this one finished!
Hmm... I forgot to mention that I added the light pink ribbon with the white polka dots along the lace seam.  I believe it went on just before the herringbone ribbon border.

I have also been busy working on two more snowballs for the CQI swap.  And, I have been procrastinating the work on my April block for CQJP 2013.  I am attempting some needle-painting on that block, and I am not sure it is turning out.  Time will tell...

Thank you for stopping by!
-Renee


Wednesday, June 5, 2013

My First Crazy Quilt Purse Completed


I began this purse back in January and finally completed it this morning!  (To see larger views, click on photos.)
Front of purse with the flap open.  (The spider lurks beneath the flap.)

Well, I think it is done.  I am not happy with the Velcro closure.  Although I was extremely careful about placing it where the pattern marked, I believe the Velcro on the front pocket should have been about a quarter-inch higher.

If I use this pattern (Butterick #B5728) in the future, I will sew a buttonhole onto the front flap prior to basting it onto the purse.  Then, I will sew a button onto the front pocket, lining up with the buttonhole.
Front of purse - Butterick Pattern B5728 (original pattern is NOT Crazy Quilted)
Back of purse - Butterick Pattern B5728 (original pattern is NOT Crazy Quilted)
All-in-all, for my first CQ purse, I am happy with the results.

Close Up of front
The beaded flowers on the front flap were inspired by a few crazy quilted blocks I have seen posted with the Crazy Quilting International Yahoo! Group and - more recently - by an adorable Crazy Quilt Journal Project Block.  (Click here to see it.  And, if you have not checked out the eye candy at the CQJP 2013 blog, you are missing out!)

The tall Easter Daisies on the front lower-right pocket were inspired by Diana Lampe's Embroidery for all Seasons
Close Up of back
The flower sequins made turning the purse right-side-out after sewing the lining in very, very interesting.  I feared I may lose them - or pull out some embroidered stitches.  Luckily, that did not happen!

I traced the hearts from a quilting template I purchased some time ago and randomly filled them with stitches.

The tree in the center was inspired by a tree in Aimee Ray's book, Doodle Stitching: The Motif Collection: 400+ Easy Embroidery Designs.  (My husband is not a fan of pastels or pinks.  I must admit, I ended up setting this project aside for over a month after he was a little too honest and told me my tree reminded him of "cheap pink plastic jewelry."  *Please note that Aimee Ray's tree is not at all pink, nor does it resemble cheap plastic jewelry. You may see it for yourself if you click the link to her book on Amazon.com I added above.*  Now we laugh about it and I affectionately refer to this as my "Cheap Pink Plastic Jewelry Purse.")

Thank you for stopping by!
Renee