Friday, February 1, 2013

CQJP 2013 Block 2

Crazy Quilt Journal Project 2013 Block 2
This is the second block completed for the Crazy Quilt Journal Project 2013.  I am very happy with some parts and critical of others.  In the end, I decided to stop being so critical, as this is a learning process and I am gaining experience.
Block 2 prior to embellishments
When I put the block together, I pictured the brick wall of a garden and grassy hills leading off into the distance.  After seeing the picture I posted of the block on my blog, I almost redid the top left corner.  I did not like the hill touching the sun.  In the end, I decided to leave it.

Flower Wall
I began by adding tulips and a vine of roses along the brick wall.  Later, I added the little butterfly.  As a novice at silk ribbon embroidery, I found my copy of The Silk Ribbon Embroidery Bible by Joan Gordon to be an invaluable resource.  (I found a used copy at Powell's for $19.95 during a trip we made to Portland, Oregon last fall.)

Flower Garden
Next, I added a buttonhole stitch along the seam between the garden and the grassy hill.  Then, I referred to my copy of Diana Lampe's, Embroidery for all Seasons (yet again!) and added Shasta Daisies, Cottage Pinks, English Primroses and Forget-Me-Nots.

Fence and Cherry Tree

The fence seam was my next addition.  I used a thicker (5 or 8) cotton floss to stitch a buttonhole seam.  Then I made individual stitches over each of the "posts" to create the fence.

For the cherry blossom tree, I made the trunk using another Edmar Boucle floss in a variegated brown and the tutorial for Easy, Breezy Trees found on the Shaw K L Designs Blog.  The cherry blossoms were created using three strands of a pink variegated floss and lots and lots of French knots.  (I began by adding "blossoms" around each branch and then continued adding them until I thought my husband would stop telling me the trunk was too big for the tree - lol!)  A few green straight stitches of "grass" at the base of the trunk completed the tree.
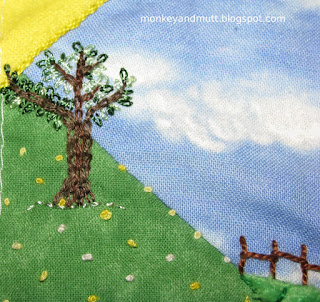
Distant Tree and Dandelion Hillside
I find myself being the most critical of this final section.  I added a stem stitch in a size 5 or size 8 yellow cotton floss along the seam of the sun.  Then, I added a small tree to hide the section where the hill touched the sun.  A variegated brown floss was used to make chain stitches for the trunk and branches.  And lazy daisy stitches made with an Edmar variegated green floss created the leaves.  Tiny colonial knots made with a variegated yellow floss created daisies on the grassy hill.  Along the seam, and behind the tree, smaller French knots were made with the same floss, to give the illusion of distance.  Light green back stitches were added at the base of the tree.  I wanted the tree to be small, to add to the illusion of distance.  However, I fear it may be too small.  And, I was not as happy with the actual dandelions as I was with the ones I imagined.  I did like the way they added a bit more texture to the block.

I toyed with the idea of adding birds to the sky, but I really liked the simplicity of the block as it was, with my eye drawn to the rose vine along the garden wall.

Thanks for visiting!
Renee

Monday, January 28, 2013

Weekend Excursion

This weekend, we joined my in-laws and some family friends and toured the Medical Teams International Real. Life. Exhibit in Tigard, Oregon.

We were asked not to take photographs, in order to respect the privacy of the real people within the exhibit's photographs.  However, a few photos may be seen on Medical Team International's website.

It was a profound experience and I am so glad our children went with us.  My thirteen-year-old had some very good questions.  We were reminded to be thankful for running water, restrooms, and heat that does not require an indoor open flame.

I love the fact that my children left the exhibit inspired to help and that they have a few more ideas of ways they can make a difference.

Hugs,
Renee


Wednesday, January 23, 2013

My First Crazy Quilted Purse Post 3

Front Pocket Embellished (the center blank area will have Velcro later)

Front Pocket Before

Last week, I finished the pocket panel for the purse I am making.  The plain area in the blue floral fabric will have Velcro sewn in.

I tacked down a dark blue rick rack with variegated blue floss.  Then, I added the spider web.  I love the way the facets in the dark blue beads used to make the spider sparkle in the light.  The web is made with a single strand of a DMC white metallic floss, so it sparkles too.

After I made him, I was disappointed to realize he would be hidden by the flap of the purse.  However, I decided the idea of a lurking spider might be more fun.


Next, the seams were embellished.  Below, flowers made of green straight stitched stems, lazy daisy leaves and yellow lazy daisy petals alternate with flowers made with green straight stitched stems and yellow seed beads.


The variegated floss I used to make the lazy daisy seam below and the flower vine had such long sections of each color, I found myself disappointed the end result was not as colorful as I had hoped.  I was not disappointed the section below would mostly be covered by the flap of the purse.


The floral printed fabric was embellished with two different blue variegated Edmar Flosses, using French knots and lazy daisies to cover the flower prints.

Once again, I used my Embroidery for all Seasons book by Diana Lampe and Jane Fisk.  This time, I made the Easter Daisies.  Unfortunately, I also learned that the light blue flannel-backed satin I used on almost every piece of the purse did not hold the stitches well (as seen below.)  I also added a pink butterfly.


Now, I am working on the back of the purse. 

Back of purse, before embellishing
I began with the seam treatments.  And I am currently working on a tree for the center of the block that was inspired by a tree pattern in Doodle Stitching: The Motif Collection: 400+ Easy Embroidery Designs by Aimee Ray.
Progress on back of purse
On the back of the panel, I penciled in the trunk of the tree and a circle for the top.  Using a variegated brown floss and chain stitches, I created the trunk and branches.  Now I am adding flowers, beads, and circular shapes in greens and pinks to fill in the circle.  It is not quite complete.

Thanks so much for stopping by!
Renee


Sunday, January 13, 2013

My First Crazy Quilted Purse Post 2

Upper-left section of purse panel.
The first panel of my crazy quilted purse is embellished!  I tried to keep the colors soft and somewhat subtle, for the most part.  On the upper-left, I added a chain-stitched vine and lazy daisy flowers with French knot centers.


Along the top-center section, I made a green chain stitch along the light blue.  On the dark blue, I added a light green button-hole stitch.  In the same shade of green, I added two small lazy daisy stitches for the leaves and a tiny variegated blue French knot as a flower.  A blue butterfly, made of four lazy daisy stitches and a straight stitch completed the dark blue section.


Next, I added a seam with sets of three pistil stitches using a variegated peach/cream Edmar floss.  (I did not continue the embellishment along the entire seam, as the purse pocket would cover a large section, hiding it.)  Along the upper-right, I made a green stem-stitched vine.  And, using a soft yellow DMC rayon floss, I added lazy daisy flowers.


To finish this panel off, I added two pink rayon floss French knot flowers with tiny green lazy daisy leaves along the bottom, beneath the seam line of the pocket.

Front panel of purse, prior to adding pocket.
Now, I am working on the pocket.  One small section is complete.  I hope to share more soon.

I believe I have also completed my second block for the Crazy Quilt Journal Project 2013.  I am just waiting for the end of the month to share it with you all.  It has been a learning experience.  Parts of it, I am very happy with, and others... well, I'm not sure how I would do them differently...

Thanks for stopping by!
-Renee


Thursday, January 10, 2013

My First Crazy Quilted Purse Post 1

A few months ago, Jo-Ann Fabrics had a sale and their Butterick patterns were only ninety-nine cents.  Knowing I wanted to make a crazy quilted purse in the future, I bought a couple of patterns.  Last night, I decided it was time for my first attempt.

I chose purse B from Butterick's pattern number B5728.  I cut out the pattern pieces.  Then, I pinned all of the pieces I wanted to crazy quilt onto muslin.  Using a permanent fabric safe marker, I traced the patterns onto the muslin, including cutting lines, the seam lines and other notations.  After that, I pieced each section, leaving a couple of inches of muslin around each one.

Two of the pieced sections may be seen below.  One will be the front of the purse.  A pocket will cover a large section of this piece.  The second is the front of a flap that will close over the pocket.

Front of purse

Front flap of purse
This evening, I embellished two seams on the front of the purse.  (The pocket will cover a bit of both seams.)  For both seams, I used ideas from a book my husband gave me for Christmas, The Magic of Crazy Quilting: A Complete Resource for Embellished Quilting: Second Edition by J. Marsha Michler.

First, I added small flowers.  The leaves were stitched with 2 strands of DMC 954 (a light green.)  The flowers (stars) were stitched with 2 strands of DMC 4215 (a variegated blue, pink and purple floss.)
Next, I added two flowers made of lazy daisy stitches with French knot centers.  I used a single strand of Edmar Lola #093 (a variegated blue and pink rayon floss.)

I have also been working on my second CQJP 2013 block.  However, I plan to finish it before posting pictures.  I think it is about halfway there.

Thanks so much for stopping by! 
-Renee