Tuesday, April 1, 2014

Take a Stitch Tuesday (TAST) 4/1/2014

TAST Stitch #104: Buttonholed Cable Chain
The good news is that I have been working on TAST (Take a Stitch Tuesday) Stitches I am learning from Sharon Boggon's blog Pin Tangle.  The bad news?  My computer access has been so limited, I have not been able to share them.  (By the way, there is a Pintangle page on Facebook now. If you frequent Facebook, I encourage you to check it out!)

I am working TAST stitches where I think they will fit into projects I have pieced.  For that reason, the stitches I use will jump around a bit and the projects may as well.  I have a list of stitches I have shared at the end of this post.

TAST Stitch #97: Shell Chain Stitch

(To see a larger image, just click on the photo.)

I worked the Shell Chain Stitch onto one of the seams of the Under the Sea ornament I made as a wedding gift for a friend of mine from high school.

It is a little tricky to see it, buried beneath seaweed, but it is the set of tan links running diagonally from the upper-left corner to the lower-right corner.


TAST Stitch #104: Buttonholed Cable Chain

The photo Sharon shared of this stitch was so pretty, I knew it would be the next one I would tackle.

The stitch requires the Cable Chain Stitch as the foundation.  Let me just say, it took me a few attempts to get the hang of it.  The thing about a chain stitch, is that if I mess up, it means pulling out just about everything I have done because the previous stitch collapses on me as I remove the error.  In this case, the fourth time was a charm!  I simply needed to hold the thread taut with my thumb after making the knot and while making the next loop.

I still need to practice on making the stitches more even, but I am happy with the results!

Beads are not required for this stitch, but they dress it up so nicely! I did practice three links on my doodle cloth with a strand of size 12 white pearl cotton and confirmed the links were large enough for the beads I planned to use.  Then, I changed my mind about the thread and used this pretty size 8 pink pearl cotton. Note to self: using a larger thread leaves a smaller opening. My pretty pink pearl beads did not fit. Oops! Thankfully, I had enough of these small white pearl beads that fit perfectly!

This is another stitch I see myself using in the future.  It took me a while, but it is just so, so pretty!

TAST Stitch #103: Beaded Butterfly Chain Stitch

TAST Stitch 103: Beaded Butterfly Chain Stitch
I had just looked through the last 3 pages of TAST stitches, wondering which one would fit well onto one of my current projects when I stumbled upon a blog post (oh, I wish I remembered which one! If it was yours, please leave a comment with a link to your blog!) that included a link to ideas for couching down rick rack and ribbon.  Curious, I followed the links and when I saw the double cross-stitches couching down the ribbon in this photo at Soseptember.blogspot.ca by September House, I thought it would look lovely with the beaded butterfly stitch.

In the past, I have only run ribbons and trims along seams that begin and end at the edge of the block.  I finally gathered enough courage to pull a few stitches from the foundation of the block in order to lift the blue fabric within the block and tuck the glittery blue ribbon underneath.  After carefully tacking it back down (from the back without going through the top of the fabric), I tacked the ribbon down again between my seam-line and cutting line, to hold it steady.

Originally, I planned to just add the bugle beads, but there was so much extra space, I opted to add some sparkly blue seed beads as well.

I would love to thank Sharon Boggon for teaching so many beautiful stitches.  I encourage you to visit her site, even if you do not plan to work the stitches.  It is so much fun to stroll through the comments and follow the links left there to see the variety of ways other readers have used these stitches.

TAST stitches I have shared (click on the name to see Sharon's directions )
# 95: Linked Chain Stitch
# 96: Beaded Link Chain Stitch
#97: Shell Chain Stitch
#98: Beaded Shell Chain Stitch
#103: Beaded Butterfly Chain Stitch
#104: Buttonholed Cable Chain


Thursday, March 27, 2014

CQJP 2014 March Block

Renee Y.'s CQJP 2014 March Block
Crazy quilting and embroidery are two of my very favorite things.  It amazes me how a few fabrics can be completely transformed with the addition of a few threads, ribbons, trims, buttons, beads and charms.

Renee Y.'s CQJP 2014 bare March block
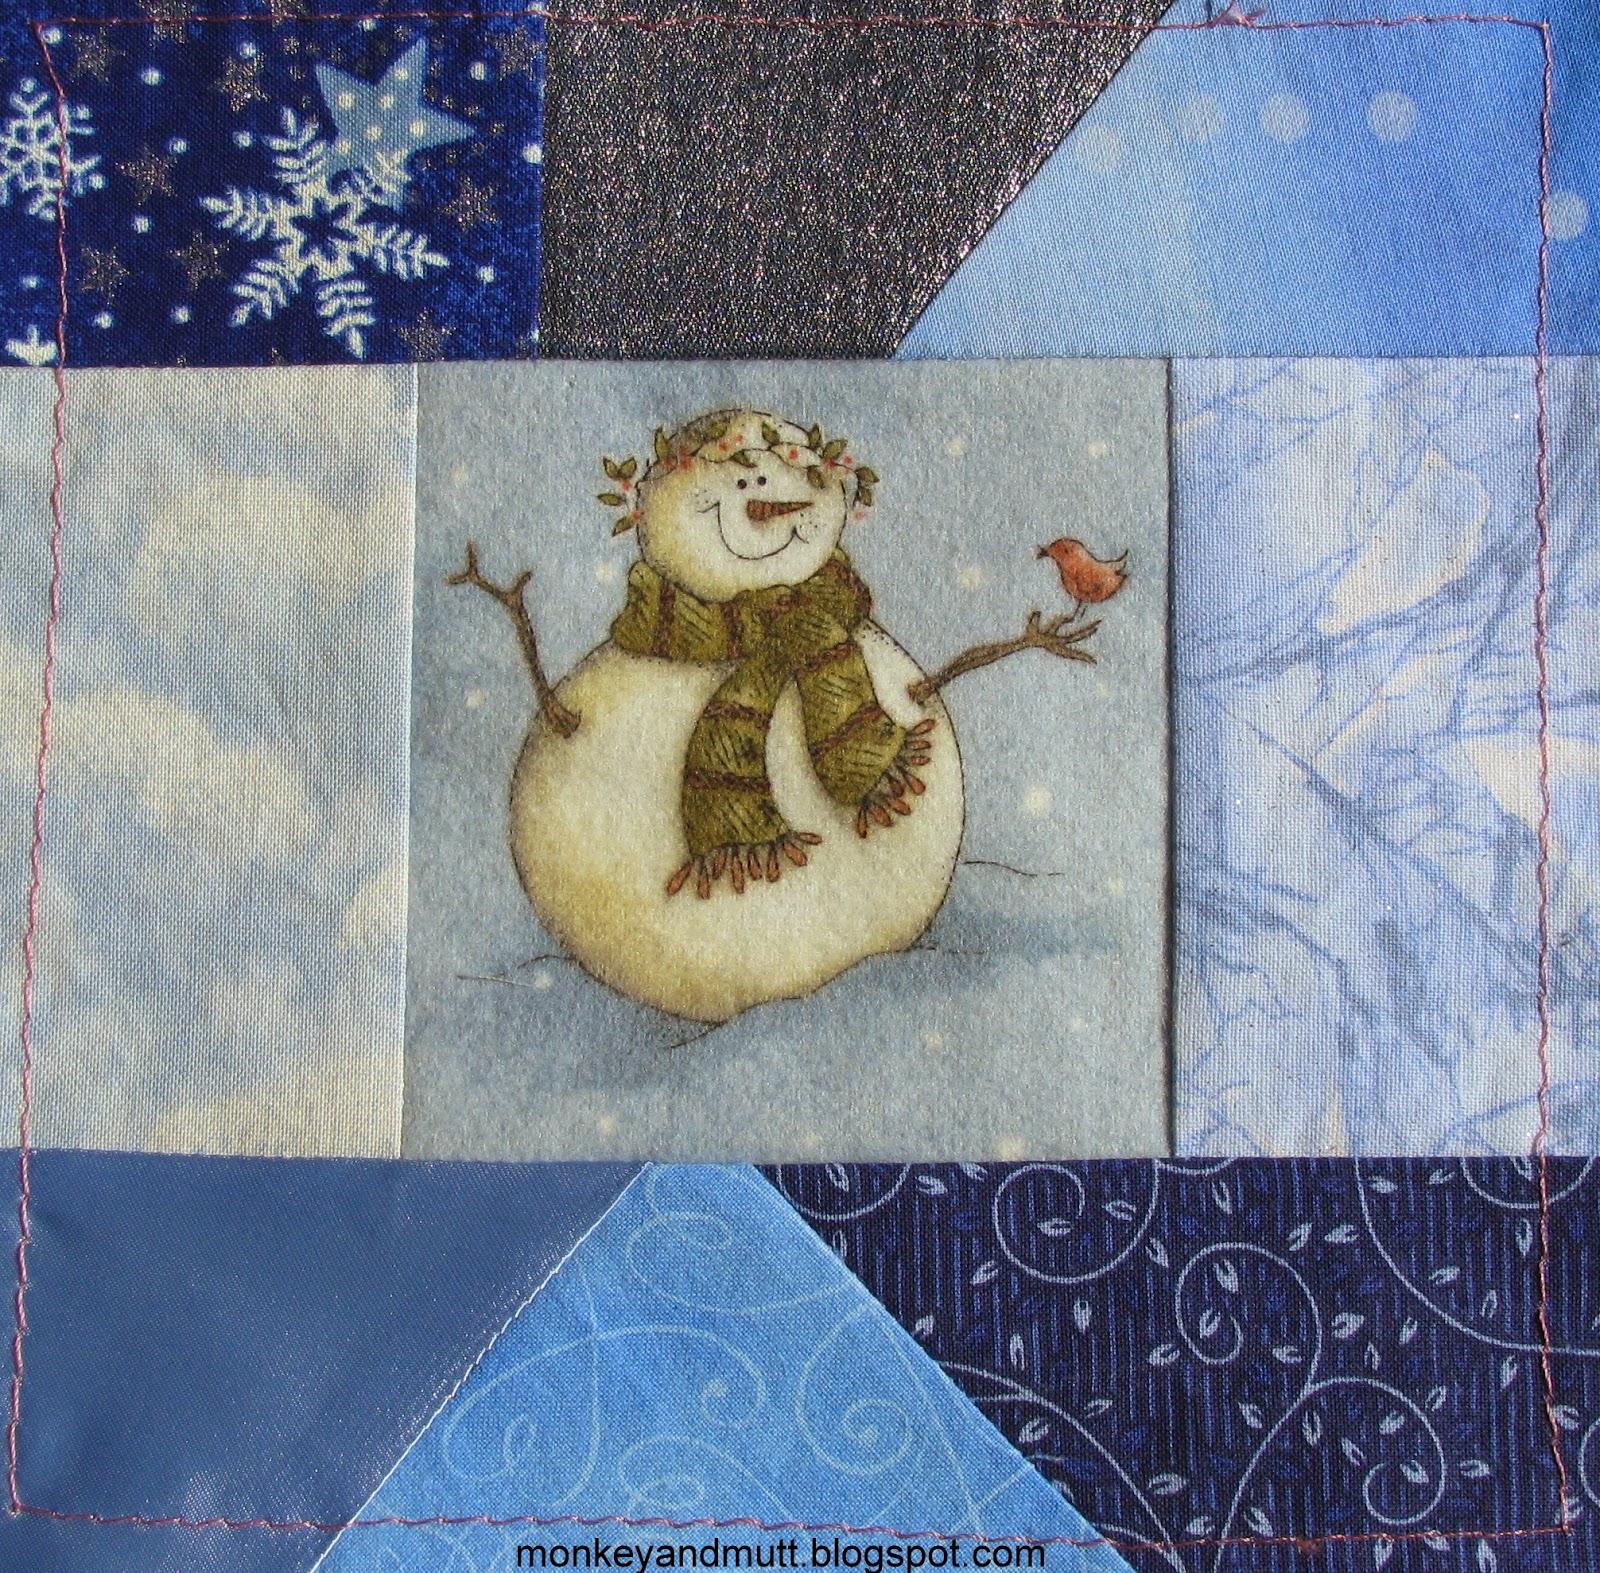
I found a bundle of flannel prints at a quilt shop many years ago.  Isn't the snowman adorable?!


The Beaded Link Chain Stitch made an adorable frame for the snowman.  EdMar Lola #034 blue variegated rayon floss and Darice Beads Jewelry Designer clear glass transparent rainbow seed beads (size 10/0) transformed into a sparkling frame.
Top of Renee Y.'s CQJP 2014 March Block
The white trim (found at JoAnn Fabric), a full skein of EdMar Lola #087 brown variegated rayon floss (yep, the whole skein), DMC #5 silver metallic floss, DMC white rayon floss, DMC #12 white pearl cotton, DMC #666 red floss, and white seed beads turned the rest of the block into a landscape with a blanket of snow.
Bottom of Renee Y.'s CQJP 2014 March Block
White 4 mm silk ribbon; a variety of seed beads, petite seed beads, and pearl beads; a snowflake charm, more DMC white rayon floss; DMC #5 silver metallic floss, Anchor white #8 pearl cotton, and EdMar Glory #071 blue variegated floss finished the bottom up with winter-colored flowers and snowflakes.
Red bird in Renee Y.'s CQJP 2014 March Block
It is not a perfect block.
Blue flowers in Renee Y.'s CQJP 2014 March Block
You may spy my flaws.
White flower in Renee Y.'s CQJP 2014 March Block
But it was created by hand with love and care.
(And I think it's cute - so there!)

Thank you for visiting.  If you have a blog, please leave a comment, I would love to stop by and see what you have been up to!

Hugs,
Renee


Wednesday, March 26, 2014

Work in Progress Wednesday

For a larger view, click on the image.
I have wanted to participate in Sharon Boggon's Work in Progress (WIP) Wednesday for some time.  I figure this week it is finally time to take that step!

If you have a project you are working on and think you might like some support and motivation to make weekly progress, I encourage you to consider participating in Pin Tangle's Work In Progress Wednesday! For information about WIP, CLICK HERE.  The link will take you to the WIP Faq page on the Pin Tangle website.

Aside from the two TAST (Take a Stitch Tuesday) stitches I shared in February, I have made little progress. I did find a blue trim at JoAnn Fabrics that I attached to one seam with a single strand of DMC cotton in a similar shade of blue.  Now, I am in the process of stem-stitching around the word, "Dream," using a single strand of a pale blue DMC cotton floss.  (Kathy B. outlined the word, "Love," on the block she embellished, and I thought it turned out lovely!  You can see the other blocks if you CLICK HERE.)
Renee's "Dream" block progress as of 3/26/14
I hope to make better progress to share with you by next Wednesday!

Hugs,
Renee


Sunday, March 23, 2014

What I have been up to...

Yikes!  It has been nearly a month since my last post.


This week I was very busy finishing up a wedding gift for a high school friend of mine.  I missed her wedding last August.  I have had blocks pieced for the gift for ages.  However, we do not see each other nearly often enough, and I tend to complete work best when I have a specific deadline.  I knew I would see her this morning, so I finally finished it up this week and gave it to her this morning. (I am a horrible person for waiting so long, I know!)

When I pieced the block, I hoped to finish it before Christmas, so the happy couple could use it as an ornament during their first Christmas together.  (Oops.)

For the back side, I used an off-white fabric with gold glitter sprinkled throughout.  (If you click on the image above, it should enlarge.  There is a glimpse of the back fabric in the upper-left corner of this photograph.)  Their names and their wedding date were couched down in gold metallic floss on the back side.  (I opted not to share a photo of the back for their privacy.)

The wedding took place at the beach, and the beautiful invitations had sea stars embossed on them; so, I went with an under the sea theme.
I do hope they like it!

On my Grow Your Blog post, back on the 24th of January, I included a list of items I would be sharing with you soon.  I thought I should take a look and see how much of that list I have accomplished so far.  Hmmm... only two items are finished and I have added more.  I had best get to work!

Here is the old list:
  1. A gift I am working on (Pictured above.)
  2. The purse I plan to make with my CQJP 2014 January block
  3. The 6 blocks I need to piece for the CQI Heart DYB Round Robin
  4. My CQJP 2014 February block (which is not yet pieced and will likely be a test run of the block idea I have in mind for the Heart DYB round robin) (Completed and made into a purse as seen here.)
  5. My block to embellish from the CQI Winter/Christmas DYB Round Robin
  6. The wall hanging I plan to create with all of my CQI Winter/Christmas blocks
  7. My CQJP 2013 May block (better late than never?!)
  8. A crazy quilted hexagon to participate in my first swap with the World Wide Crazy Quilters Yahoo! Group
As you can see, I still have a ways to go.  Here is the new list:
  1. The purse I plan to make with my CQJP 2014 January block
  2. The 6 blocks I need to piece for the CQI Heart DYB Round Robin
  3. Complete my March CQJP 2014 block. (It has been pieced and a photo of the bare block is below.  I hope to finish embellishing it this evening!)
  4. My block to embellish from the CQI Winter/Christmas DYB Round Robin (I will share what little progress I have made on Wednesday.)
  5. The wall hanging I plan to create with all of my CQI Winter/Christmas blocks
  6. My CQJP 2013 May block (better late than never?!)
  7. A crazy quilted hexagon to participate in my first swap with the World Wide Crazy Quilters Yahoo! Group
  8. A change purse for myself (to learn how to use a sew-in purse frame.)
  9. Four gifts I hope to complete by the end of April.
Renee's March CQJP 2014 bare block.
Thank you so much for stopping by!

Hugs,
Renee


Tuesday, February 25, 2014

My CQJP 2014 February block is now a purse!

I finished this purse late last night and thought, "Look what I did!"

My Crazy Quilt Journal Project goal this year is to make 12 crazy quilted purses using the blocks from each month.

This is quite a bit of a challenge for me...  As I have said in the past, sewing is not my strong point.  In fact, if you look closely, you might notice... never mind.  I'll keep my opinions of what I need to improve on to myself today.  I am still basking in the fact that I made a purse without using a pattern for the first time, and I am thrilled with how it turned out!

(For larger views, click on the photos.)

I had several ideas in mind for this purse.  Then, I stumbled upon a book at Powell's and decided it was just what I needed to put those ideas into action.

After buying The Bag Making Bible: The Complete Creative Guide to Sewing Your Own Bags by Lisa Lam at Powell's, I spent the evening reading and jotting down notes on how to add the pockets I wanted to make, how to make the handle the way I wanted to, and ideas on what kind of fastener I wanted to use to close the purse.  (The link above will take you to Amazon to see the book.  I am not affiliated with any of the books, beads, flosses, etc. that I share with you.  If you go to Amazon from my blog and make a purchase, I earn credit... toward a gift card, I think ~ it has been ages since I set it up and I do not remember.  I just like sharing the links so you can easily find details about items I like.)  Lisa Lam also has a website where purse making items are available for purchase, and she has a blog at u-handbag.com.  (I have only made a brief visit to the site, but look forward to checking it out more in the future.) The book has patterns for purses, too.  I just focused on the tips and sections related to my plans.

I was gung-ho and ready to go after finding this book.  However, as I began cutting fabric and gathering my supplies together, I felt a little intimidated.  So, I set it aside.  I suppose that worked out for the best.  My sister surprised me for my birthday.  She was WAY too generous and sent me a personalized mini i-pad.  So, I decided I should make sure one of the interior pockets would hold my new toy.

Then, life got crazy.  On the 16th, I awoke just after 5 a.m. to a phone call letting me know my mom was in the emergency room.  I was there before 6 and learned she needed to be admitted, but the hospital had no beds available.  So, I followed the ambulance that transported her to another hospital that is a 45-minute to an hour commute from my home.  She had surgery on the 19th, and I brought her home with me on the 20th.  On Sunday, the 23rd, we got her all settled in back at her house, where she is recovering well.

Yesterday was really my first chance since the 16th to even think about my purse.  After finishing it, I must admit that I am not quite sure why I was so intimidated. (Okay, maybe because I was not quite sure what I was doing.  Next time, the D-ring I added will be smaller so it is not so heavy and the magnetic snap will be slightly higher, but overall, I am thrilled with how it turned out!)
Close up of the front.
The denim is from a pair of jeans I wore until parts were threadbare. The purse is about 8-inches tall and 10-inches wide.  I turned my CQJP 2014 February block into the front pocket.
Back of the bag
The back is very simple. Just denim.
Interior pockets and magnetic snaps.
This was my first time using magnetic snaps.  They were so simple to use, I felt silly for being nervous about it!  (My husband assured me these small magnets would not be a problem with my mini i-pad, but I just had to ask.)

The pocket viewed on the top is sewn into 3 sections.  The two larger pockets on the side sections hold my checkbook and my cell phone perfectly.  The skinny part in the center is perfect for my pen.

The pocket viewed at the bottom has a pink fleece lining, to add more protection for my mini i-pad.  This pocket extends the length of the purse.
Close up of loop with D-ring and clasp.

And, I added a small loop with a D-ring. (I plan to flip the key chain with the clasp around, I was just too tired to monkey with it last night.) I thought this would be a perfect place to hang nail clippers.  Even better, I can clip my car keys on here.  That way, there is no risk of them falling out of the semi-open top.  And, I will not have to worry about them getting lost in the bottom of the purse.  I hold no illusions that it will remain this neat - lol!

Thank you for letting me share my excitement with you!

(Now, maybe I can transform my CQJP 2014 January block into a purse. I am not quite as terrified that I might ruin it!)


Updated April 13, 2015:
This post has been linked to the Stitchery Link Party at Super Mom - No Cape. And photos of how it looks after nearly 14 months of use may be viewed here.