Thursday, September 19, 2013

CQI Winter/Christmas DYB RR - Melody's Blocks

Block pieced by Melody and embellished by Kathy S.
Look what arrived this week!

Melody created 3 winter blocks and 3 Christmas blocks for this Crazy Quilting International round robin.  The fabrics she chose are so pretty! Many of them shimmer in the light (my camera failed to capture those lovely sparkles.)

If you click on the photos, you will see a larger view. 

Kathy S. was the first to receive Melody's blocks and she did such a beautiful job with this wintery scene.  Kathy's seams are always a treat for the eyes. Her stitching is gorgeous.  (To see more of her work - check out her blog.  THIS LINK will take you to see gorgeous beaded mermaids.  Then click on the "Home" button at the top to see more.)

Block pieced by Melody and embellished by Kathy S.
Barbara W. was the next to receive Melody's blocks.  She did such a lovely job embellishing this Christmas block.  Using beads to create candles never would have occurred to me.  (Confession: I have bugle beads, but I can never figure out how I should use them.  I love this idea!)  The wreath, seams and trims are just lovely!

My photos of the stitching on these two blocks do not do them justice.  I am so thankful I gathered the courage to join a round robin.  There is nothing like holding such exquisite work in your hands.

The 4 blocks I have to choose from are below.


Decisions, decisions.  Last night, I decided between the Christmas Poinsettia block and the Winter Tree block (the last two photos above.)  I pulled beads, charms, buttons and trims from my stash that would go with each block and am leaning toward the Winter Tree block.  (Me? Choose a crazy quilt block involving trees?  You might think I like them or something!)

This is going to be fun! 
 Hugs,  Renee

(By the way, it feels like I have not posted in FOREVER!  I did manage to finish my entry for the Evening Star Design Winter Challenge 2013 just in time to meet the September 15th deadline.  That is where most of my time has been spent.  I will share photos after the judging is done.  Regardless of what the judges decide, I am thrilled with my project and I even made it for me - so it is a prize in itself!  I also FINALLY finished the needle painting section of my May CQJP 2013 block. I'm only 5 months behind. *blushing* I may actually finish it and share with you by October - lol!)

Monday, September 2, 2013

CQI Winter/Christmas DYB RR - Completed Block for Kathy S.

The block I chose to embellish.

The beautiful landscape Barbara W. created on the first block completed for Kathy S. made my decision a no-brainer on this round robin.  I have a fondness for landscapes and embroidered trees.  I also love snowmen.  So, I needed a landscape with a tree and a snowman.  Oh, and maybe a cardinal to better coordinate with the block Barbara embellished!

One of the tricky parts of a round robin, for a Newbie like me, is coordinating my work to mesh well with the work the others have done in the round robin.

With my first round robin, we all made one block and the other 4 members divided the seams and spaces by 4 to complete one-fourth of the work.  Coordinating with the colors and styles of stitching and fitting my ideas into the remaining space was quite the challenge sometimes.

My sketch to embellish the block.
This is my first DYB (Do Your Block) round robin, and I think I prefer the opportunity to embellish a complete 6-inch block.  Planning out the entire block without worrying if I am leaving enough space for others to fill in their seam treatments or to add a motif is kind of nice.   (Not that I always make a plan, but for this round robin, I have so far!)

I searched the Internet for "Winter Tree Images" and found a whimsical tree covered in snowflakes.  I loved the curve of the tree, so I sketched a similar tree with slightly different branches.  I thought a birdhouse would be a fun touch, but I had no idea how I would make one.  And, I was not sure how I wanted to add a snowman to the block.  Felt applique?  Satin stitch? (I worried the long threads would snag.)  Short and long stitch? (I am still struggling with my CQJP 2013 block using that method.)  Decisions, decisions.

Beginning of chain-stitched tree.
Using a strand of a dark brown and a strand of a light brown and a chain-stitch, I started with the tree.  By the end of that evening, I felt a pit of dread in my stomach.  I seriously wondered if I might need to contact Kathy and apologize for ruining her block.  Seriously.  (Maybe she could stitch a seventh block?  Maybe?  Could I take out all of those tiny chain-stitches without ruining the fabric?  I doubted it.)  Embroidery invaded my dreams that night.  In the morning, I looked at the tree and felt the same dread.  When I mentioned my concern to my 13-year-old, he commented, "Well, it is a weird design for a tree."  Sigh.  It wasn't just me...

My only option was to keep going and see if it would improve.  (After all, I wanted to throw away my current CQJP 2013 block for quite a while, and now I am kind of pleased with how it is going...)

Progress on the tree - I was not happy with the way it looked.
So, I finished the tree as I had sketched it, but it did not look as whimsical on the fabric as it had on paper.  It looked... off.  There was too much empty space in the middle.

Adding a few more branches helped a bit.  I just worried my whimsical tree was going to end up better suited for a Halloween block...

Tree completed.
It looked better.  I could work with this.  Now, the challenge was going to be adding a birdhouse!  I pulled out my doodle cloth and attempted a satin-stitched birdhouse.  A padded satin-stitch worked!  I used two strands of a light blue rayon floss and a split stitch to outline the shape.  Next, I made satin-stitches in the longer direction, so the top stitches would be shorter and less likely to snag.

Once the stitches were complete, I used 3 strands of a dark brownish-gray cotton floss and 3 straight stitches to create the roof and the base of the birdhouse.  A straight stitch using a strand of a light brown (lighter than the lighter shade used in the tree) connected the birdhouse to the tree-branch.

While creating my "practice" birdhouse, I discovered a French knot hole for the bird's entrance sunk through all of the stitching.  Adding a colonial knot on top of the French knot still sunk through.  So, I added a small seed bead.  I'm not sure how I could have added it without disrupting some of the satin stitches.  Yet, overall, I was happy with the outcome.

Then, using 2 strands of a light brown cotton floss and straight stitches, I added a fence along the bottom seam.  Because the white fabric was so sheer, I tucked each stitch down in the back.  In essence, the fence was a reverse button-hole stitch.  (The back of the fabric showed a button-hole stitch, whereas the front was simple fence posts.)  Tiny stitches connected the posts together.

Now, it was time for the snowman.  I used acrylic paints in black and orange to paint a face on one button and two buttons on a second button for the snowman's head and torso.  Using clear quilting thread, I sewed the buttons on with a third, larger, button at the base.  After sewing the larger button on, I managed to sew a black seed bead into each button hole (which I placed in a vertical position) to look like more buttons on the snowman.  A couple of twig arms were couched down, and a ribbon scarf (in blue to coordinate with the birdhouse - as I feared red was too bright) finished him up.

Button Snowman
It took me a couple of attempts on my doodle cloth, but I did manage to make a cardinal by copying the one Barbara W. created for Kathy S.  I put him on a different branch than I had in my sketch.  If I kept him on the top branch, he would have been further toward the center.  Most of the movement flowed from the upper-right to the lower-left of the block and I did not want to distract from that.  So, I put the bird a bit closer to the upper-right corner.  (I also opted not to stitch a bird on the snowman's arm, as I feared the bottom corner would begin to look too cramped.)

I also added a few French knots using white rayon floss to add some snow to the branches of the tree.
Tree for Kathy's Block.
The last step was to add snowflakes.  I used white metallic floss for some snowflakes and white rayon floss for others.  No two snowflakes were the same.  I thought this final step would be rather quick, but it took almost as long as it had to create all of the other embellishments.  Trying to figure out placement and how to make this one differ from that one probably took me the longest!

This is how the block looked when I finished.  I do hope Kathy S. will be pleased with this wintery scene.  Below you can see the both of the completed blocks.


This was such a fun block to create.  Kathy S., thank you for the beautiful canvas!  Your blocks are gorgeous and the fabrics were so fun to stitch.


Wednesday, August 21, 2013

CQI Winter/Christmas DYB RR - Blocks pieced by Kathy S.

Kathy S. pieced a beautiful canvas and Barbara W. painted a beautiful picture.
Look at what I received in the mail last week!  While I was stitching on one of the blocks Barbara W. pieced together for our Winter/Christmas DYB (Do Your Block) Round Robin through the Crazy Quilting International group on Yahoo!, Barbara was working on a block pieced by Kathy S.  (If you click on the photo, you should have a larger view.)

I love this block, but I must admit the tree and the cardinal are my absolute favorite additions!  Barbara's work is so beautiful, I cannot wait to see what she adds to one of my blocks when she receives them.

Of the 6 blocks Kathy S. pieced, I have 5 to choose from.  The fabrics are gorgeous, as you may be able to tell from the photos posted below.  (My iron died last week, so please ignore the wrinkles from the mail.)

Oops! I forgot to add "Kathy S." to the title on the photo.
The block I plan to embellish.
The last block is the one I plan to work on.  I have a plan sketched out.  However, I have a couple of ideas on that sketch that I have no idea how I am going to manage with a needle and thread.  Therein lies the challenge, right?! 

At the moment, I am working on my entry for the Evening Star Designs Winter Challenge 2013.  One idea for this block came from an addition to my challenge piece.  (Unlike my RR blocks, I have not sketched a plan for my challenge piece.  As a result, it is taking me FOREVER when I finish one section and want to move onto another.  However, with one exception, I am happy with the additions I have made.)  Now, I may just use my challenge piece to practice for those tricky ideas I have for this block.  Time will tell.  Both projects need to be completed by September 15th.  My CQJP 2013 block is progressing ever so slowly in between other projects.  I hope to have more to share with you soon!


Wednesday, August 14, 2013

A Snowball from Andrea!

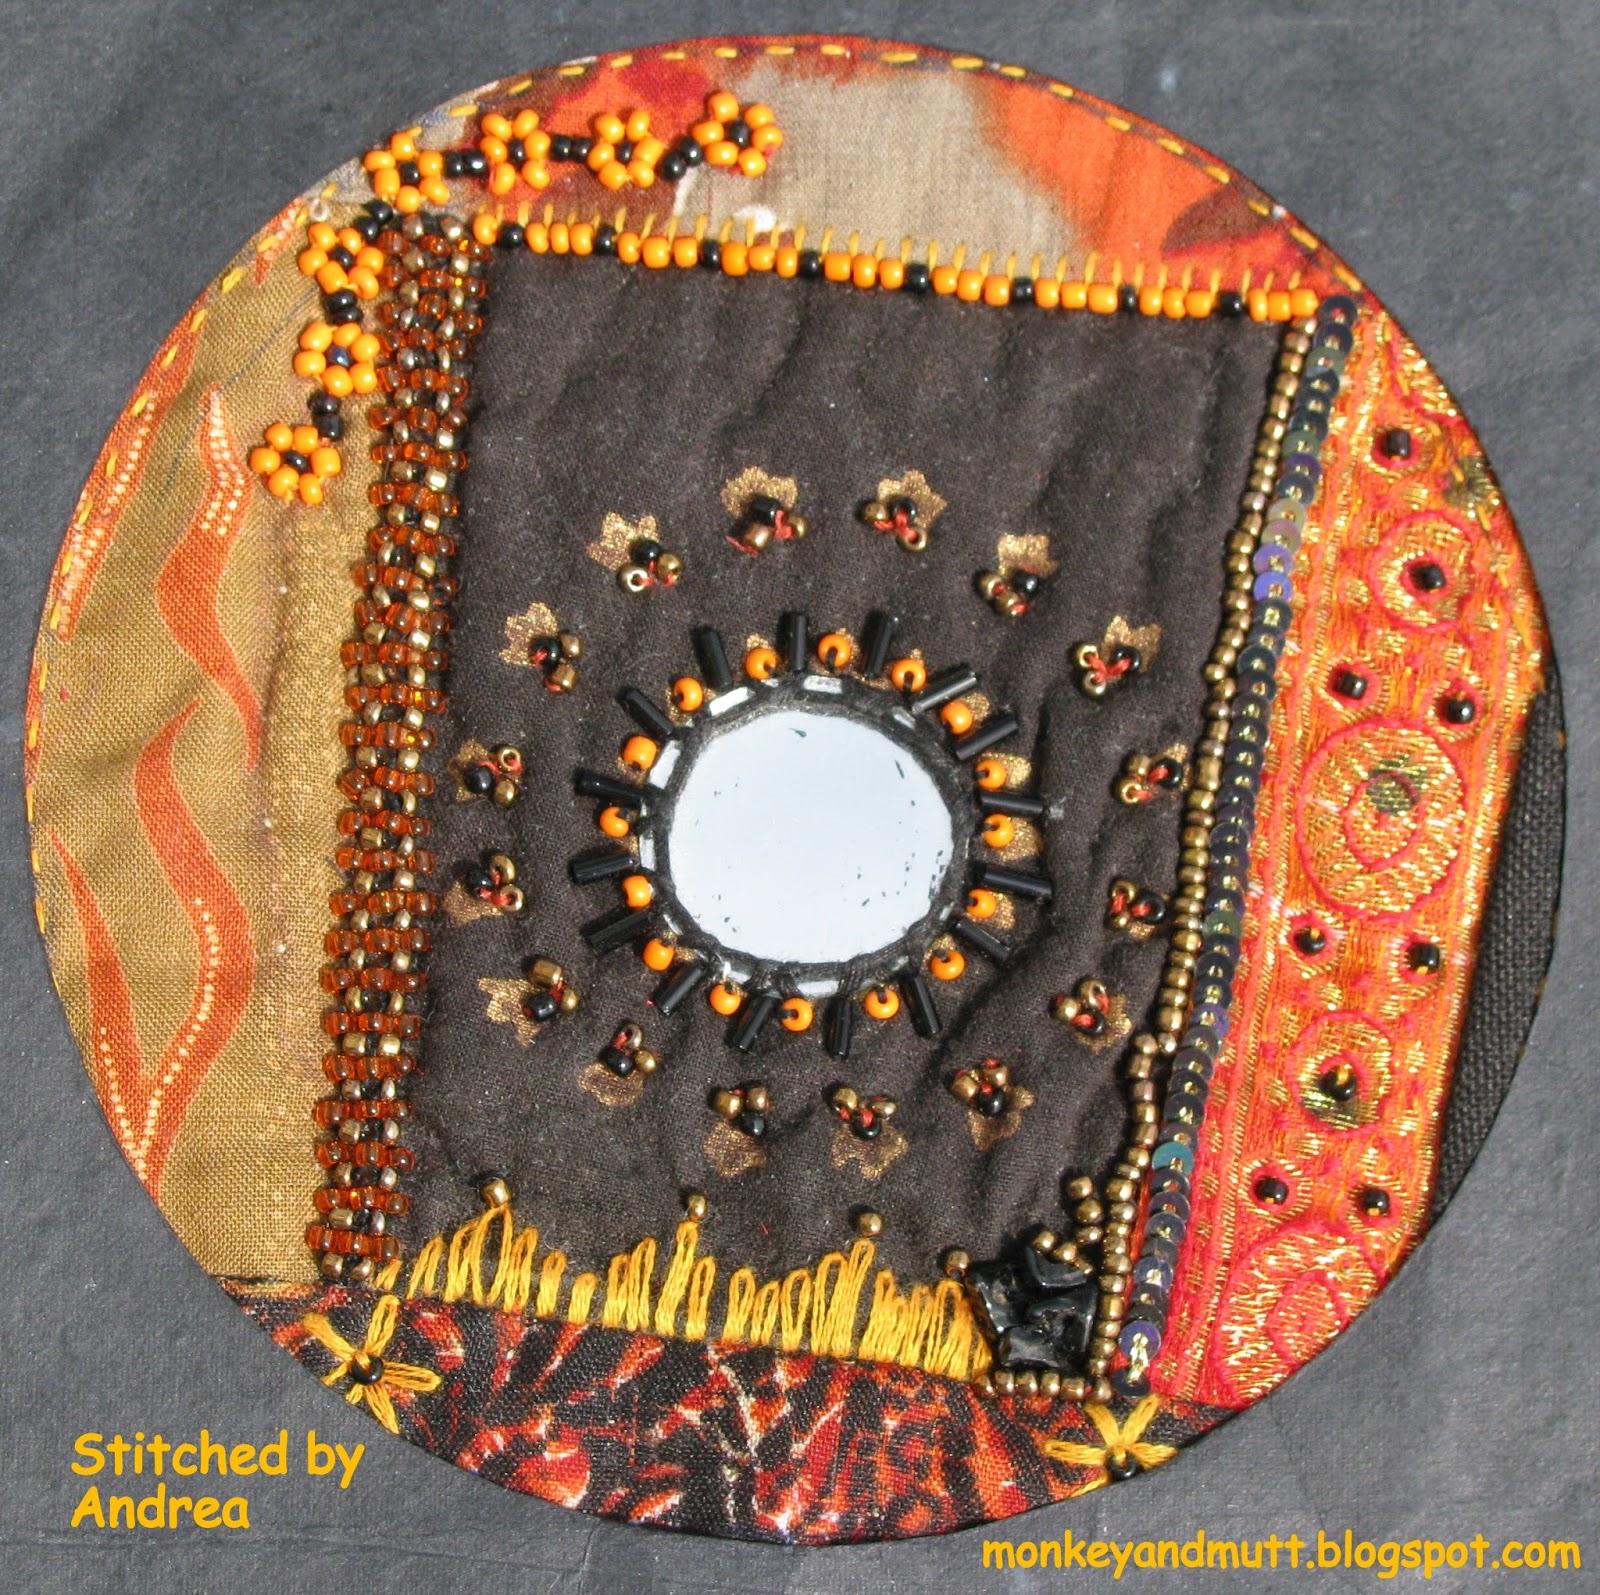
CQI Snowball Swap - The snowball Andrea sent me from India!
This beauty traveled from India and arrived on Friday, just as we were packing up to leave for the weekend.  I desperately wanted to drop what I was doing to take a few pictures and share this and the other goodies Andrea sent me with you all.

Someone must be praying for me to have patience - lol!  On Monday, I set off to finally take the pictures, but my camera was missing.  It ended up in my hubby's computer bag at work.  On Tuesday morning, I eagerly searched for the camera, but it was still in his computer bag.  Sigh...  So, last night I remembered to snatch my camera back when he came home!  Now, I am finally done running errands and able to share my goodies with you!

In the CQI Snowball database, I indicated I would like blue/silver/white wintery or snowman themed snowballs OR orange and black fall or Halloween themed snowballs.  Donna, Nicki Lee and Andrea all chose to surprise me with the themes they chose.
Center details of snowball from Andrea.

I fear the photos I took do not do this block justice!  I love the stitching, the bead work, the sequins, the fabrics, and especially the mirror in the center of the block!

Details of bead work on snowball from Andrea
The beads are just amazing!
Details from snowball from Andrea
The small black beads in the corner look like little black rocks.  The sequins shimmer in the light.  and the fabrics, trims and stitching are beautiful.

Now, I must admit, I am not very good about mailing blocks out.  Don't get me wrong, I can get them to the post office and mail them out by my deadlines.  However, I tend to be so single-minded in the task of mailing that I am lucky to remember to add a note.  Andrea, however, went above and beyond.  She sent other treasures with my block.

She sent me fabrics from her stash.

And she also sent a handmade card from The Life Foundation in India.  I encourage you to check out the website.  (If you are a little shy about clicking on links like I am, just type in www.thelifefoundationindia.org )  Amongst the pictures in the photo gallery, you will see the paper pulp being made.  And there are more beautiful cards displayed under the "Paper Crafts" section that appear to be available for purchase. 

Here is my card - I love the fibers in the paper!
Envelope
Card
I love the woven paper in the center and the beads are so colorful!

Label on back of card
What a wonderful treat!  It was so very sweet and generous.  Thank you so much, Andrea!

I do hope you will take a moment to look at the other cards and paper crafts.  There are animals, flowers, birds and more.  I believe the Christmas cards are my favorites.  Beautiful.

And please send positive thoughts and prayers to India.  From what I have read on-line, this has been one of their worst monsoon seasons in decades.  According to an article on Global Voices On-line, flash floods and landslides killed over 1,000 lives in northern India earlier this summer.  And landslides recently claimed another 15 lives in a south-western region.

Monday, August 5, 2013

CQI Winter/Christmas DYB RR - Barbara's Block is done!

CQI Winter/Christmas DYB RR - Barbara's Block embellished by Renee
I had so much fun working on this block!  It gave a whole new meaning to "Christmas in July!"

Below, you can see the block as a beautiful blank canvas.
Barbara's Block before embellishment.
And, here is the plan I sketched out after staring at these beautiful blocks for a few days and finally choosing one to work on:

Looking back at my sketch, I believe this is the most I have actually stuck to the original idea.  (In the end, I added three angels in the upper-left corner and did not stitch in the metallic silver stars I had planned on.)

Santa and Teddy Bear - pattern from 501 Cross-Stitch Designs by Sam Hawkins
I REALLY wanted to add Santa to this block, but had no clue how to stitch one; so I looked through all of my cross-stitch books to see if I had a pattern that would fit. 

In early July, I picked up a copy of 501 Cross-Stitch Designs by Sam Hawkins at Goodwill for a whopping $3.99.  It includes a chapter titled, "50 Santa Designs" and 3 of those designs would fit patches on this block.  I chose Santa on his sleigh because I thought it would go well with the reindeer trim I purchased from Evening Star Designs anticipating this round robin.

Sadly, my family could not tell what the teddy bear was until I told them.  But, I just loved Santa sitting on the metallic gold sleigh.

Small pearl beads for snow finished up this section.

Beneath Santa, I did my best to make holly leaves for a border and added a red seed beads for holly berries.  If you look too closely, you will see my leaves are not all the same size and shape.  (I decided they are not in nature either - that's my story and I'm sticking to it!)

Tree adapted from Pencil Pine directions in Diana Lampe's book: Embroidery for All Seasons
For the Christmas tree, I followed most of the directions for the Pencil Pine in Diana Lampe's Summer Garden in her book, Embroidery for all Seasons.  Instead of adding nuts to the tree, I added silver and red seed beads as ornaments, and a small star I received with a package of beads I purchased from Evening Star Designs.  I also combined one strand each of two shades of brown cotton floss and created my own tree trunk.

The gifts had me baffled.  I attempted using a long and short stitch to create them.  Luckily, I tried that on separate fabric first.  I did not like my results.  In the end, I found silky fabrics and cut them into small squares and rectangles.  I ironed the edges under and stitched them onto the block with clear quilting thread.  I suppose I should have used a bit of interfacing.  They may have held their shape a little better.

My husband told me several times he thought I should have a red package under the tree, but I worried I may have too much red.  I chose the silver and blue because the fabrics in the top corners both had blue hues to them and a couple of the fabrics included silver.  I did make my husband happy by adding a 4 mm red silk ribbon to the silver package.  I couched size 5 DMC metallic silver "ribbons" onto the blue packages.

Using a fishbone stitch and variegated green EdMar rayon floss, I created a seam of small pine trees to the right of the Christmas tree scene.

Barbara's Block - North Pole close up
For this sign, I printed out the words "North Pole" in several fonts and sizes.  After selecting one that I liked, I traced it onto tissue paper and couched the letters onto white felt with red DMC cotton floss.  I cut the rectangle from the felt and used a blanket stitch and white DMC 8 perle cotton floss to attach it to the block.  The post for the sign was among the last additions to the block.  I had a hard time deciding how I wanted to make it look.  I finally decided to couch down a full strand of metallic white floss with a single strand of red metallic floss.  However, I could not pull the white metallic floss through and feared I would ruin the fabric if I forced it.  So, I used three strands of a white rayon floss and stitched from the sign to the seam.  Then, I made a second stitch right next to it.  A single strand of red metallic floss couched the six strands down perfectly.

A single strand of white metallic floss enhanced two snowflakes on the fabric and I added a couple more for good measure.

Red and white glass seed beads treated the seam to the left of the sign.  And two strands of a light blue DMC rayon floss were used to make lazy daisy and straight stitches to create bows.  Clear Mill Hill petite glass seed beads (#42010) were added to the center of each bow.  (This is a seam treatment I used with my Valentine's Day block.  The idea came from An Encyclopedia of Crazy Quilt Stitches and Motifs by Linda Causee.)

The angel border is also from An Encyclopedia of Crazy Quilt Stitches and Motifs.  It is a border I have been itching to try since I first saw it.  However, I found closed blanket stitches a lot trickier than I thought they would be.
Angel seam from An Encyclopedia of Crazy Quilt Stitches and Motifs by Linda Causee
I used a single strand of a blue and white variegated EdMar rayon floss for the angel seam treatment.  I found the large clear angel beads at Michaels.  My concern was that they did not show up very well on the light fabric.  At JoAnn Fabrics, I discovered the smaller blue angels.  Not only were they perfect, but they were 50% off.  Once I began stitching these on, I worried they may not work.  I began with the halo and I was not sure I would be able to get it to stay in position.  In the end it worked out.  It is hard to tell from the lighting in my photo, but the fabric has soft shades of blue and silver.  Beautiful.

Candy Cane button on Barbara's Block.
I picked this button up sometime last year at a little shop I would LOVE to visit again.  (I just need to save up some cash so I don't overspend again - lol!  There are SO many cute beads and buttons and threads and patterns and... well, you get the picture!)  Acorns and Threads is located on Scholl's Ferry Road in Portland, Oregon.  I have not ordered from them on-line, but they do show a catalog on their website.

Reindeer and Stars on Barbara's Block
This was my first time using a trim (other than ribbon) on a seam.  I used clear quilting thread.  If you click on the photo for a larger image, you may be able to see the red French knot I added to the first reindeer's nose.  My thirteen year old (nicknamed Mutt - his choice) told me Rudolph needed to be on the block.

The gold metallic star is right-side-up when the block is right-side-up.  And a scattering of the clear Mill Hill petite glass beads add sparkle for the other stars in the sky.

Wreath adapted from motif in The Silk Ribbon Embroidery Bible by Joan Gordon.
I found a wreath motif in Joan Gordon's book, The Silk Ribbon Embroidery Bible, that I really liked.  I made a couple of changes and made this with two strands of green metallic DMC floss and red seed beads.

The area needed something more; so, I added a few snowflakes using two strands of white rayon DMC floss.

Wreath adapted from motif in The Silk Ribbon Embroidery Bible by Joan Gordon.
I really enjoyed working on this block!  It will be mailed on to Donna on August 15th.  And I will anxiously await my turn embellishing a block for Kathy S. 

Thanks for visiting!
Renee