Wednesday, January 17, 2024

Crazy Quilt Journal Project (CQJP) 2024 January Block


CQJP 2024 January Block

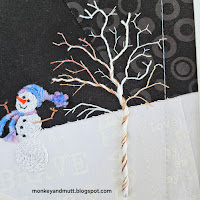
One of the things I love about crazy quilting is watching a bare block like this transform.

I was not happy with the tree stump as it was, so I carefully added satin stitches under the back stitch trellis with size 8 brown perle cotton.

Snow drops were added with 4 mm white ribbon. I put a ribbon stitch in the center and two straight stitches for the outer petals.

Green size 8 perle cotton was used to create stems with a stem stitch. A French knot was added to the center petals and where the stems met the blossoms.

Straight stiches of green 4mm silk ribbon created leaves.

I threaded a needle with two strands of size 8 perle cotton - 1 white and 1 green - and worked two rows of crossed buttonhole stitches from the bottom to the top to make whimsical little trees. 

Small silver flower sequins were attached with clear Mill Hill Petite Seed Beads using a single strand of DMC floss #762.

It is so nice to be able to spend time relaxing with embroidery again. 

Thanks so much for stopping by!

Renee


Tuesday, January 16, 2024

TAST 2024 Week 3: Stem Stitch


Week 3 of Take a Stitch Tuesday (TAST) 2024 at Pintangle(dot)com introduced the Stem Stitch and the Portuguese Stem Stitch for Beyond TAST.

First, I used a stencil from Sharon Boggon's Stitchers Stencils Set 1 to trace a line to follow along a seam.

Size 8 white perle cotton thread was used for the stem stitch.

Next, I added flower sequins that were held in place with Mill Hill Petite Glass Seed Beads. However, I will use regular seed beads in the future. Some of the sequins can pop over these tiny beads.

A strand of Kreinik Metallics Fine Braid #4 Pearl thread was used to add tiny leaves to the flowers with detached chain stitches.

The Portuguese stem stitch was worked with size 8 white perle cotton to create little snow drifts under the snowman and the tree on my Crazy Quilt Journal Project (CQJP) 2024 January block.


Have you worked the stem stitch or Portuguese stem stitch? Do you have a favorite way you prefer to use these stitches?

Thanks for stopping by!
Renee

Note:
1.) Click on a photo to see a larger image.
2.) You may learn more about TAST here.
3.) You may learn more about CQJP 2024 here.

Monday, January 15, 2024

How to Embroider a Snowman Using Chain Stitches

 
Embroidered Snowman Using Chain Stitch

It has been a couple of years since I embroidered a snowman using the chain stitch. I had a hard time remembering exactly how I did it, so I thought I would make a tutorial to refer back to in the future.

First, I used a quarter (on the bottom), a nickel (for the body), and a dime (for the head) and traced them with light pencil marks on the back of the block.

Starting from the center of a traced circle, I made a triangle with three chain stitches. Then, I continued chain stitching in a circle until it was the desired size.

I used white DMC size 5 thread.

As seen in this photo of the back, my stitched circles ended up slightly off center. However, starting in the center of each circle and chain stitching in the same direction kept all three sections of the snowman lined up.

I ended the chain stitches at the bottom of each circle.


Once the body was stitched, I needed to decide on the face. I wanted this snowman to look up towards the moon on the block. 

Using 2 strands of a variegated DMC orange floss, I made a triangle pointing up towards the sky using 3 straight stitches.

Using the same floss, I satin stitched the nose. (I have found my satin stitches are a bit more even if I create an outline to stitch over first.)

Next, I attached size 10/0 black Czech glass seed beads, using a single strand of DMC black (#310) floss, to create eyes and a nose.

For the mouth, I couched 2 strands of the same black floss down using a single strand of black to tack it down. 

To be honest, I was nervous about adding a scarf and a hat. Using a single strand of a light blue embroidery floss and back stitches, I created outlines for them both. (I traced the outlines on the back of the block first to use as a guide.)

Using a variegated blue/purple/pink size 5 DMC thread, I satin stitched the hat (starting with the brim) and the scarf.

Next, using the same thread and Turkey Knots, tassles were added to the scarf and a fluffy ball was added to the end of the hat. 


Using a variegated brown DMC floss, I removed one strand (of 6) to couch down the remaining 5 strands to make arms for the snowman. Fly stitches were added to make the hands, using the 5 strands of floss.

You may have noticed the tree branches in the photo with the arms. I knew I wanted to add a tree, and decided to make that first so the arms on the snowman would use a brown in the tree. 

The tree was created using the Easy, Breezy Trees Tutorial on Kathy Shaw's blog (found here). A variety of threads were used. I cut lengths of Kreinik Metallics Pearl #4 Very Fine Braid, DMC Metallic white/blanc floss (all 6 strands), 2 shades of DMC variegated brown flosses (all 6 strands), and white DMC perle cotton in sizes 8, 5, and 3. I used a single strand of white floss to couch down most of the tree. Some of the brown branches were couched with a single strand of one of the brown variegated flosses.

Thank you for stopping by! If you use this snowman tutorial, I would love to see your creation.

Please note: 
1. You may click on a photo to see a larger image.
2. Directions for all of the stitches used for this tutorial (except the straight stitch) may be found in the Stitch Dictionary at Pintangle(dot)com here.


Thursday, January 11, 2024

TAST 2024 Week 2: Back Stitch


Pintangle TAST 2024 Back Stitch


Week 2 of Take a Stitch Tuesday (TAST) 2024 introduced the Back Stitch and the Back Stitch Trellis

I worked both stitches into a tree stump on my January Crazy Quilt Journal Project (CQJP) 2024 block.


First, I sketched a tree stump and traced it onto a small piece of waste canvas.


The Back Stitch Trellis was worked first, to fill in the tree stump. (This proved to be more challenging with the shape of the stump than I anticipated.) Then the Back Stitch was used to outline the stump. All of this was created with a variegated brown size 5 perle cotton.


I removed the waste canvas.


Then, using two strands of a light brown DMC embroidery floss, I colored in the top of the tree stump with more Back Stitches.

Later, I will fill in more of the tree stump, most likely by adding beads.

Thank you for stopping by!
Renee

You may learn more about TAST here.
You may learn more about CQJP 2024 here.

Monday, January 8, 2024

TAST 2024 Week 1: Running Stitch


Pintangle TAST 2024 Running Stitch


Take a Stitch Tuesday (TAST) 2024 began with the Running Stitch. The Beyond TAST stitch was a new one for me, the Ainu Running Stitch

You may find directions for both stitches in the Stitch Dictionary at Sharon Boggon's blog Pintangle.com or by clicking on the names of the stitches above.

Running Stitch

Running Stitch

I opted to use a button and the running stitch to create a moon motif on the first seam of my Crazy Quilt Journal Project (CQJP) 2024 January block. 

The button catches the light beautifully. It was attached with DMC silver metallic thread that blended in with the button. 

The running stitch was completed with glow-in-the-dark Kreinik Metallics Fine Braid size #8 (052F). My stitches are not even, but I think that adds a bit of whimsy to the moon.


I used circles from stencils designed for bullet journaling to help guide the circles around the moon. My bullet journal ruler was used to make marks to help make my next stitches a bit more even.

Ainu Running Stitch


I clearly need more practice with this stitch, but it worked well to create a seam between the snowy ground and the dark night sky on my CQJP January block. 

The base running stitch was made with Finca size 12 thread. The next step was completed with size 8 Anchor white perle cotton.


If you have not already, I do hope you will join TAST 2024!

To see other ways I have used this stitch, click on Running Stitch in the labels listed on the lower right side of the blog.

You may learn more about CQJP 2024 here.


Thank you for stopping by! 
Renee