Tuesday, January 1, 2013

CQJP 2013 Block 1 Completed

Happy New Year!  I hope 2013 brings you all great health, amazing friendships and fantastic memories.

We have made a tradition of spending New Year's Eve with friends of ours.  Their boys are best of friends with our boys, so we always have a wonderful time.  Last night was no exception.
CQJP 2013 Block 1 Completed (Black lines are seam lines.)
I did manage to convince myself, once again, that I am crazy.  (Perhaps the name is part of what draws me to crazy quilting?)  Last night after our friends left, somewhere close to one in the morning, I decided to finish my CQJP block.  I did not want to fall behind on the first block, and it was so close to being done.  It took about two hours to finish it, photograph it, and email the picture for the CQJP 2013 blog.  And here I am, about six hours later, sharing the block on my own blog.  (I think I may actually take a nap today!)

As mentioned in my last post, the house was cross-stitched from the Stoney Creek Country Living Collection from a pattern entitled Cozy Winter Twilight.  (I was unable to find a leaflet available for purchase on the internet.  This house is only one small element of the pattern.)  It was the first addition to the block.

Next, I made the silver birch tree from directions in one of my favorite embroidery books, Embroidery for all Seasons by Diana Lampe and Jane Fisk.  (The book has directions for both right- and left-handed users.) I do wish I had made the tree a little larger, so it would have extended further into the block and into the sky.  However, as I began at the base and worked my way up, I could not bring myself to tear out so many hours of work to redo the tree.
Pathway and snowflake details.

My third addition was the cobblestone walkway.  Using a number 2 pencil, I lightly marked the pathway on the fabric.  (I only marked the two outside lines, not the stones themselves.)  Using DMC Perle 5 #4145 (a variegated brown), I back-stitched the outer edges of the path.  To add to the illusion that the bottom of the block is closer than the house, the path widens at the bottom.  Using additional back stitches, I made random cobblestone shapes.  These were also larger at the bottom of the block and smaller as they neared the house.  (As I did this, I wondered if the more experienced crazy quilters still worry that they might ruin their block with every embellishment they begin.  I know I do!)

After that, I added a border of trees.  I have mixed feelings about the results.  I showed them to my husband and told him I was not sure what I thought about them.  He has found elements of my work he really liked and a few he disliked; but, like me, he simply was not sure what he thought of the trees.  In the end, I loved the texture, so I decided to keep them.  This was my first time using Edmar's Boucle floss.  It is typically used for Brazilian embroidery.  I used #305, a variegated white and light green, to make slanted straight stitches for the tree tops.  The color of the floss allowed the trees to look "snowy."  Then, I used #029, a variegated green and brown floss, to make two straight stitches for the trunks.  In hindsight, I should have made the trunks first, but it turned out okay.

Needle painted mailbox.  (I need more practice!)

Next, I hoped to add a rabbit.  Someday, I plan to make one using a needle painting technique.  However, due to the amount of time I had, I decided to cross-stitch a bunny onto the block.  Unfortunately, the only pattern I had was too large to meet the scale of the block.  (I decided a bunny that was half as tall as the tree was simply too big to fit.)

I did end up making my first attempt at needle painting.  Using my own sketch and tips from Needle Painting Embroidery: Fresh Ideas for Beginners by Trish Burr, I added a mailbox to the scene.  It is far from perfect, but for my first attempt, I decided I was rather pleased with the addition.  I used blue DMC flosses for the mailbox.  The door is a bit lighter, using DMC 3752 and 932.  The main section used DMC 931 and 932.  For the post, I couched a strand of DMC perle 5 #801 floss down with a single strand of regular DMC #801.  To add to the thickness, I couched a second strand down in the same manner.  I may add a little stitch to the top of the post, as my needle went to the fabric a little to close to the first post, but I am undecided.  Up close, that may stand out more than the slightly narrowed post.

To help the post blend in, I added a small spray of snowflake flowers.  This pattern was also from Embroidery for all Seasons.

I still wanted to embellish the seams, but I had two challenges.  I did not want to detract from the landscape image.  And, I had interrupted most of the remaining seams.  The logical solution seemed like adding snowflakes.
Snowflake details.

The fabric for the sky was already glittery.  They are difficult to see, but I added a few Mill Hill Petite Glass Beads #42010 as tiny snowflakes in the distance.  They sparkle in the light.  Next, I added snowflakes to the seams and a few bare spots on the block.  I used a DMC rayon white floss for some and a DMC metallic white for others.  Some snowflakes are made with straight stitches, some with straight stitches and French knots and yet others include straight stitches and an assortment of white or clear glass beads.  In person, the light plays on the flosses and the beads.

A few of the snowflake shapes were inspired by (but not identical to) snowflakes I found in two other embroidery books I received for Christmas.  My mother-in-law gave me Doodle Stitching: The Motif Collection: 400+ Easy Embroidery Designs by Aimee Ray.  And my husband gave me The Magic of Crazy Quilting: A Complete Resource for Embellished Quilting by J. Marsha Michler.  I found both books inspirational last night.

My final touch was the addition of a few straight stitches in DMC 502 to make tiny blades of grass at the bottom of the birch tree.

This morning, my husband commented that this block seemed simpler than my previous blocks.  True.  But, it fits the picturesque image I was hoping for, so I am happy with it.

Thanks so much for stopping by.  Best wishes for a Happy New Year!

-Renee

Saturday, December 29, 2012

Crazy Quilt Journal Project 2013 Block 1 Progress

In December, I decided to participate in the Crazy Quilt Journal Project 2013. What is it?  As described on their blog, "The Crazy Quilt Journal Project 2013 is about promoting the art of crazy quilting and expanding the participant’s individual artistic creativity and technical knowledge." It is a commitment to complete a block a month, and hopefully, assemble a quilt from those blocks.  (For some wonderful inspiration, I encourage you to take a look at the CQJP 2012 blog.)

It took me a few days to decide if I wanted to add another commitment to my busy life next year.  In the end, an excuse with deadlines to create a crazy quilt block every month sounded like a good idea to me!  *Grins*

In the rules I discovered the project should not include something we are already working on, so my monthly themed blocks would not qualify.  I have always loved landscape quilts and thought 6-inch blocks would make for pretty quick work.  Right?!  Well, I planned my first block and realized that might not be the case.
CQJP Block 2 prior to stitching.

To save time, I decided to assemble two blocks the same day.  This way, when I finished one, the other would be ready.  I had pretty clear ideas for one block, and the other, I knew would be more challenging.  Guess which one I decided to work on first?  The trickier of the two for me, of course.  
Winter landscape prior to stitching.

I was hoping to complete my first block before posting photos here.  However, as I have been putting as much of my free time as I could into it for the past week and a half, and it is not even half complete, I gave in to the temptation to share my progress so far.  

My "plans" for the block are a simple sketch on a yellow sticky note.  I wanted to put a house along the horizon and I wanted it to look realistic.  A cross stitch leaflet I have came to mind, so I found it and discovered the perfect house to add to the block.  The leaflet is from the Stoney Creek Collection and it is called Country Living Book 130.  (I tried to find a copy on-line to link to, but I failed.  Sorry!)  The house I chose was taken from the pattern entitled, "Cozy Winter Twilight."  This is only a small portion of the original pattern.  I LOVE Stoney Creek cross stitch patterns because the shading is simply gorgeous.  Of course, that same shading takes me forever to stitch...
Before removing the cross-stitch canvas.
I learned a few important things about cross stitching onto a crazy quilt block.  First, I learned it is a REALLY bad idea to put an intensive pattern across a seam.  (Putting a needle through that many layers of fabric again and again is hard on the fingers.  I could have tried a thimble, I suppose, but I never claimed I was smart - lol!)  I thought that would be my biggest challenge.  However, when it came time to remove the mesh I put down to guide my stitches, I was in for a disturbing surprise - my second lesson.  Instead of pulling out, the threads snapped.  Careful use of a needle and a LOT of time allowed me to remove the layer beneath the tree.  Then, I had to use a pair of sharp scissors to VERY carefully trim the coarse threads all the way around the house.  At one point, I nearly cut the thread used to back-stitch the design.  In the end, I suppose I salvaged the block.  But it was certainly a stressful hour or so, wondering if I had just wasted the past week of stitching.
After removing the cross stitch canvas.
Next, I began stitching a tree in the lower-right-hand corner.  You may recognize this silver birch tree from the stitching I did on Mardeen's block in my first round robin.  For Christmas, my wonderful husband gave me my very own copy of Diana Lampe's and Jane Fisk's Embroidery for all Seasons!  I will be making very good use of that book with my landscape themed blocks this year, I am sure! 
CQJP Block 1 partially complete.
I am anxious to complete the tree and move on to the next section.  I just need to figure out exactly what that will be first!

Thanks for stopping by again!

Thursday, December 27, 2012

Glasses case for my niece

I began this glasses case some time ago, in hopes of completing it as a birthday gift for my niece.  Her birthday was in November.  In November, I was also training for my first half-marathon.  (Due to a stress fracture in my foot the week prior to the race, my first half-marathon will have to take place in 2013.)  And, I was participating in NaNoWriMo. (Although I completed 50,000 words in 30 days, my story is not done and needs A LOT of work!)
Front panel before embellishing
Front panel after embellishing.
Back panel before embellishing.
Back panel after embellishing.
So, I ended up finishing this gift - literally - just in time for Christmas (at 1 o'clock in the afternoon of December 24th.)
Back, after assembly.
Front, after assembly.

I need to make myself a tutorial, as I have altered the original pattern.  It had been a while since I last assembled a case with a button latch, and I forgot to add the button hole when I should have.  Also, the button I used was quite large.  I needed to make the interfacing on the button flap smaller.  The seams were too bulky to fit beneath the presser foot on my sewing machine, so I had to create a make-shift button hole.  I also placed the hole higher than I would have liked.  Next time, I hope to do better.  In spite of my mistakes, my niece LOVED her gift.  It has her favorite colors: blue, purple and yellow.

Oh, I have decided to participate in the Crazy Quilting Journal Project 2013 (CQJP 2013) this year.  The first photos should be posted on their blog on January 1st.  I hope to have my first 6" block completed soon, to share with you.  I thought the 6" blocks would go pretty fast.  Then I planned my first design... I should know myself better by now!

Friday, December 14, 2012

Halloween Glasses Case

I am looking forward to giving my blog (and my CQ projects) more attention!  In a previous post, I was looking forward to creating my first seam treatment inspired solely by my own imagination.
I am very happy with the broomstick seam treatment!
The broom handles were made using brown floss and a buttonhole stitch.  At the base of each handle, I made three small lazy daisy stitches with a yellow floss to create mop heads.  Next, I cinched the tops of the mops by carefully bringing brown floss out from beneath the yellow stitches, near the handle.  I wrapped the brown around the yellow twice, gently bunching the yellow stitches together.  Then, I pulled the needle through the back again, hiding the stitch beneath the gathered yellow lazy daisies.

In the end, the two Halloween panels looked like this:
I had so much fun working on this project!  Of course, the glow-in-the-dark fabrics and embroidery floss may have had something to do with that.  *grins*

The delicate way the silver spiderweb turned out in the upper-left corner is one of my favorite parts.
Front panel
Back panel
This glasses case was a gift to myself.  Although, now that it is December, I am thinking I should make one a little more versatile - lol!

I wish you all a wonderful day.

Hugs,
Renee

Sunday, December 9, 2012

My First Round Robin Post #7

I received the fourth and final block from my first Crazy Quilting International Round Robin on October 29th.  Unfortunately, I knew November was going to be insanely crazy.  (I participated in NaNoWriMo 2012 - and actually completed the challenge this year!  I will save that for another post...)  My hopes of completing my final block between October 15th and 30th did not quite pan out.  With life being, well, life and the holidays and everything else, we were all running a bit behind; so, no one has been held up by my delay.

In my opinion, the block is absolutely lovely.  Crystal, Hazel and Mardeen did beautiful work on this gorgeous jewel toned block.  This is how it looked when it reached my home.  (Click on the photo to view a larger image.)

Shannon's block after Crystal, Hazel and Mardeen
I am not sure how many days I sat and stared at the block, trying to figure out what to do and where.  This block was a great challenge for me.  I find printed fabrics particularly difficult to embellish, and three of the four spaces remaining were prints.  I also spent hours and hours perusing photos of other crazy quilted blocks to see how I should embellish seams partially covered with other embellishments. 

I began working in the lower green corner.  Originally, I planned to put in a seam of flowers, but they would have been upside down.  So, I opted to put in a gold spider web.  I purchased the perfect blue faceted beads to make the spider.  Unfortunately, he did not show up on the green fabric, so I took him out and used orange beads (similar in color to the orange in the upper printed section.)


Next, I added two Swarovski crystal butterfly beads.  I put one next to a curly golden swirl near the top.  The second went in the black section near the bottom (beneath the blue flower) and I added a golden flight path for him.

Then I moved on to the center section and couched gold metallic floss around the golden edges on the blue flower.  This took some time, but I loved the end result! 

Lower-right section
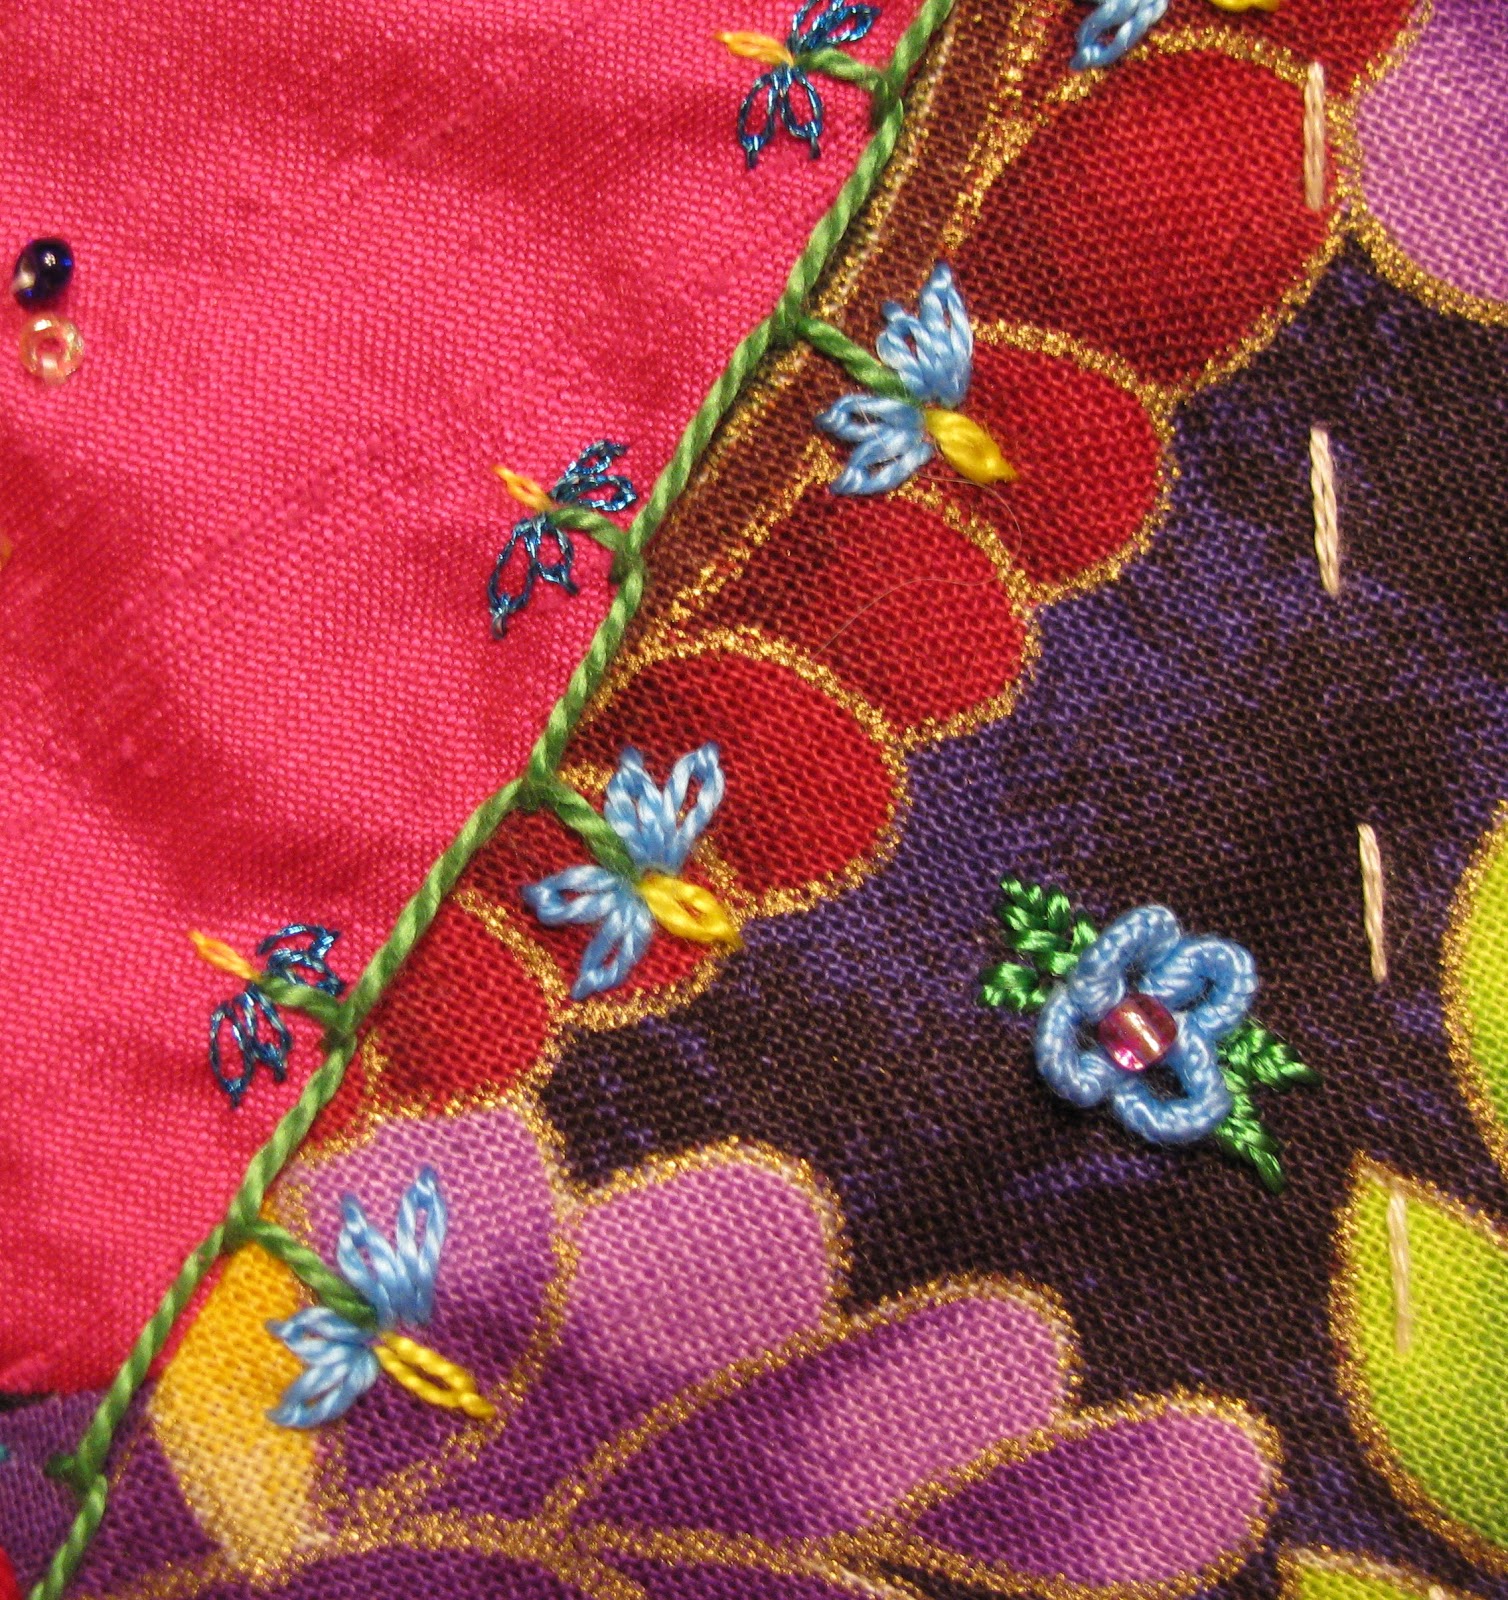
Once more, I found myself at a loss as to what I would do next.  I decided to move to the seam in the lower-right corner.  I wanted to use colors and shapes already used within the block.  I used a green pearl 8 cotton floss to make an open cretan stitch.  This provided me with stems along the printed fabric and the pink fabric.  Next, I imitated the blue and yellow flower in printed fabric near the center of the top of the block.  The flowers in the pink fabric were made with a yellow center and metallic blue petals.  The flowers in the printed section were made with blue and yellow pearl 8 cotton. 

Center Flower  (The pretty beads were here when I received the block.)

Imitating the center flower, in the dark part of the lower printed fabric, I added a blue bullion flower with bright pink beads in the center and green leaves.

It took me quite a while to figure out how to finish framing the center section of the block.  In the end, I used a fly stitch to create seams along the top section.  On the printed fabric, I made pink flowers (matching the shade of fabric in the lower-left corner of the block) with colonial knots and straight stitches.  In the pink section, I used purple floss.  The flowers on the shorter stems were the same as the pink flowers below.  For the taller flowers, I used lazy daisy stitches in place of the straight stitches, but still used a colonial knot for the center of each flower.  Leaves were added to the stems of the taller flowers.

To the right of the center piece, I made my first feathered chain stitch with a green rayon floss.  This created a vine of leaves.  Using a pink rayon floss and lazy daisy stitches, I added flowers between the leaves on the black fabric.

Shannon's block after Crystal, Hazel, Mardeen and Renee.
My final additions were the purple metallic butterfly and the blue pearl 8 cotton butterfly in the printed fabric at the top of the block.  A golden flight path helped embellish that top seam, as well.

I wish you all a wonderful day!
-Renee